Source Code Control
Introduction to Source Code Control in Combine
Combine supports a wide range of source code control system, including Virtual Source Safe (VSS), IBM Rational ClearCase, Perforce, Serena ChangeMan Version Manager (also known as Merant PVCS), Vault, SubVersion, and others. User guides and documentation are available for each supported system on the JNetDirect web site.
Source code control (SCC) features can be used in Combine when working on project package scripts, or when working with individual (non-package related) files in the SQL editor. In order to work with individual (non-package) scripts and files under source control, you must first select your source control provider and set the Folder Mapping option. To work with source controlled packages and package scripts, you must also bind the package to a project (or folder) in your source control system. These configuration settings are explained in detail in separate documents that are available on the JNetDirect web site.
Selecting the Source Code Control Provider
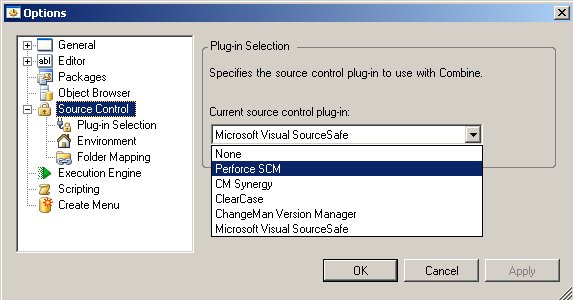
Before you begin to work with source code control (SCC), you must first select your provider in the Options dialog. To do so, go to Tools → Options → Source Control and select the source control plug-in available on your machine. Press OK to close the Options dialog when you are done.
Note: If you do not see your SCC system in the drop down (see Fig. 102A), you will have to install the SCC option and components for your source control provider. These components are available as part of the SCC client tool installation. Please refer to your source control provider or contact JNetDirect support for assistance.
Folder Mapping
In order to work with individual (non-package related) scripts in the editor, you must first select your source code control (SCC) provider and then set the Folder Mapping option. With some SCC providers (e.g., Perforce, ClearCase), the Folder Mapping settings are also required in order to work with project packages. For detailed information regarding SCC features, please refer to the source code control documentation on the JNetDirect web site.
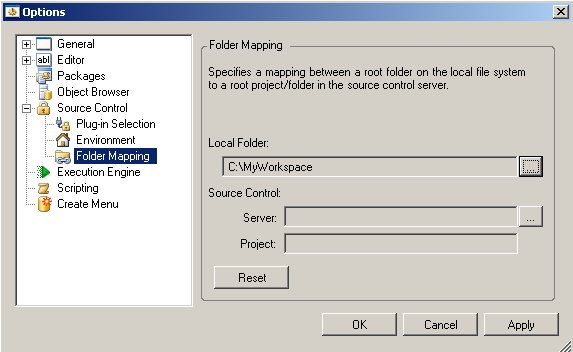
Folder Mapping allows you to set a work area on your local computer and map it to a project (or folder) in the SCC provider. Files can be checked in to source control if they reside under the work area in your local file system. Similarly, files checked out from source control are placed in the appropriate location in your folder-mapped work area.
Example: Assume that Folder Mapping maps between the local folder “c:\MyWorkspace” and the project (or folder) “$/Root/SoftwareProjects/” in source control. When the SQL file “c:\MyWorkspace\MyProjects\Project1\File1.sql” is checked in, it will be placed under the project “$/Root/SoftwareProjects/MyProjects/Project1/” with the name “File1.sql”.
Folder Mapping can be set through the Options dialog: Go to Tools → Options → Source Control → Folder Mapping. Click the Browse (i.e., “…”) button under the Local Folder and select the root folder of your local work area. Then, select the Browse button under Source Control and select the project (or folder) in the SCC provider that will be mapped to the local work area. Press OK to close the Options dialog when you are done.
Binding Packages to Source Control Control
After a project package is created, in order to add the package and project scripts to source code control (SCC), you must first bind the package to a project (or folder) in source control. This configuration settings informs Combine of the SCC project (or folder) where the package and scripts will be stored. For detailed information regarding SCC features, please refer to the source code control documentation on the JNetDirect web site.
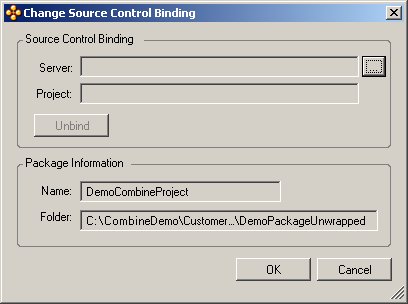
In order to set the binding information, you can either right-click the package node in the Package Explorer and select the Check In option from the right-click menu or the main toolbar. Alternatively, you can select the root node of the package and go to File → Source Control → Change Source Control to bring up the Change Source Control Binding dialog in Fig. 102C.
The package information appears in the dialog under Package Information. To bind the package to source control, click the Browse (i.e., “…”) button under Source Control Binding and select the project (or folder) in your source control system where the package and scripts will be stored. Press OK in the dialog when you are done. Once the package is bound, the package and script files can be checked in, checked out, compared, or overwritten (by using the Get Latest option) from the source control system.
Icons and Script Status in Source Code Control
When editing scripts in the SQL editor, the source control status (e.g., checked in, checked out) is available in the lower pane of the editor window. Similarly, when working with source controlled project packages, the status of each package script is displayed in the Package Explorer next to each script. Available icons and statuses are:
 Item added to package and not yet available in source control
 Package item is checked out to me
 Package item is checked out to another user
 Package item is checked in
 Package item is missing from the source control server (after item is deleted from SCS)
The exclamation mark is added to any of the above icons when the package item is missing from the local file system, for example:
 Item added to package but then deleted from local file system
 Package item is checked in but is not found on my local file system