Containers and Environments
Introduction to Containers and Environments
Containers are used in Combine to deploy SQL code and execute queries against multiple databases in parallel, and retrieve unified results from all queried databases. Containers and Environments are extremely useful for passing SQL code packages between the Development (Dev), Quality Assurance (QA), and Production SQL server environments, and easily deploying release packages on any number of databases and servers in those environments. The use of Containers and Environments in the Dev-QA-Production change management and code release process is described below, and continued in the section titled The Dev-QA-Production Release Process.
General Note: Be sure to register all servers that you will be working with in the Object Browser in Combine before defining Containers or executing code in the editor. Combine servers are used throughout the application and hold the connection information for all databases and servers.
Containers
A Container is a group of one or more databases, either on the same server or on different servers. Each database in the group is identified by the database name and its SQL server instance name (or IP address). A single database can belong to several Containers. In other words, a database that belongs to one Container can belong to other Containers as well.
Containers allow users to group multiple databases into a single entity so that scripts and queries could be run against all databases in the Container in parallel. Throughout this document, the term script is used to denote all types of SQL and T-SQL statements, such as table and user creation statements, stored procedure and SQL job execution commands, queries, or any other data definition or data manipulation statements.
Think of the group of databases in a Container as the set of target databases on which SQL scripts will be executed. To deploy code and scripts on several databases simultaneously, the user is only required to create a Container that consists of all desired target databases, and then execute the script against the Container (see samples and figures below). Combine will then automatically connect to all databases defined in the Container and execute the script on those databases. In addition, if any result sets (e.g., data sets, data tables) are returned from one or more target databases in response to the deployment of the script, Combine will automatically format and aggregate the results returned from all servers, and will then display the unified results to the user.
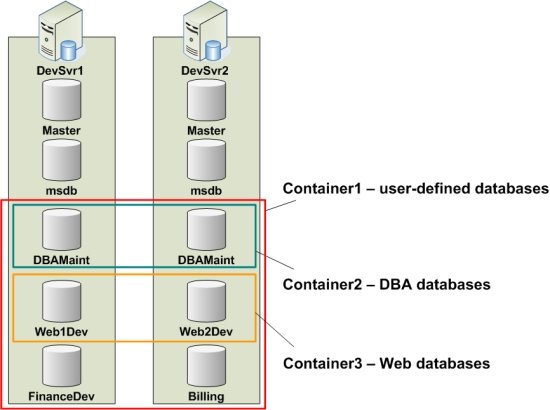
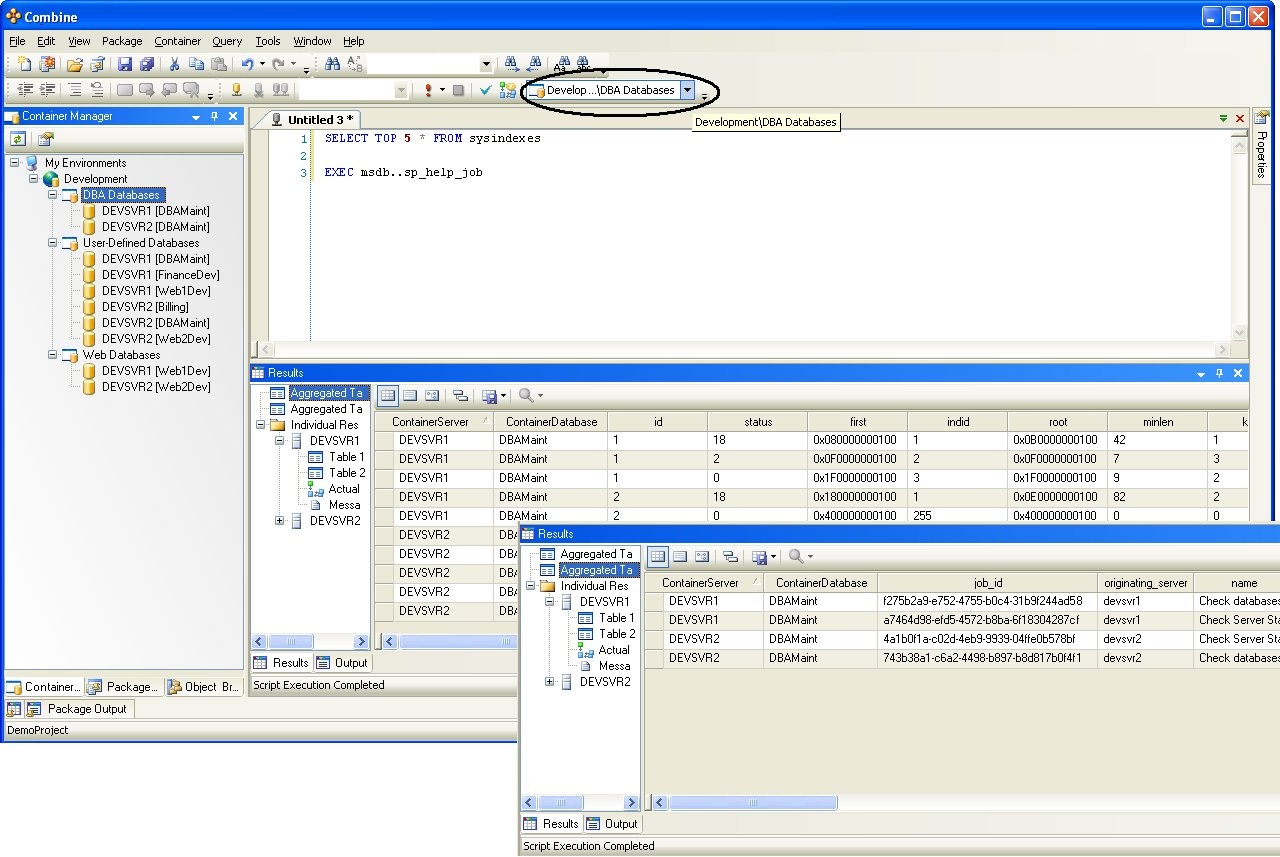
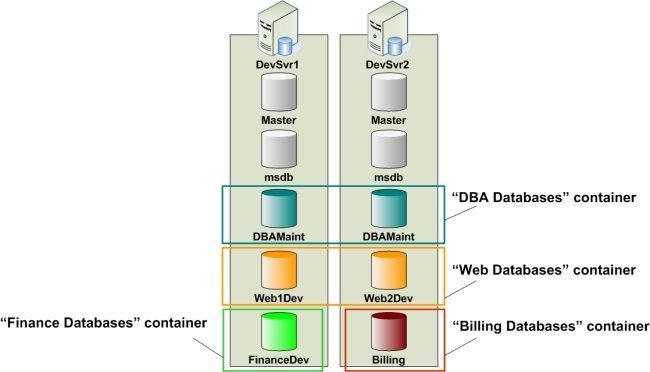
As an example, consider the following diagram that describes three different Containers: Container1 consists of all user-defined databases on the DevSvr1 and DevSvr2 servers. The target databases of Container2 are the DBA databases named DBAMaint on the two servers, and Container3 holds the set of Web databases, namely Web1Dev and Web2Dev. With these mappings, the user can now run scripts and queries against several databases in parallel. For instance, if we execute the SQL statement SELECT * FROM sysindexes against Container1, then the content of sysindexes will be returned from all six databases in the container. Similarly, running a script that creates a stored procedure against Container3 will create the stored procedure on the Web1Dev and Web2Dev databases at the same time. Additional examples are provided in the images below. By running scripts and queries against Containers, database administrators can easily collect information about indexes, jobs, and all other database objects by a click of a button (see sample code packages in our support forums).
Static Vs. Dynamic Containers
Two types of Containers are supported, Static Containers and Dynamic Containers. Each type uses a different technique to store and identify the set of target databases.
A Static Container consists of a fixed group of databases. Databases are added to the Static Container by specifying the typical connection information, such as the database name and SQL server name (or IP address). To add or remove databases from the Static Container, the user must open the Container Manager and manually edit the Container configuration.
When scripts and queries are run against a Static Container, Combine will retrieve the identifiers (i.e., database and server names) of the target databases from the Container configuration, and then run the scripts on all those databases using the authentication type and credentials entered for the Container. Static Containers are therefore useful to store groups of databases that are relatively “static” (i.e., when databases that belong to the group are not created, dropped, or moved between servers frequently). To demonstrate this fact, consider the following counter example where Static Containers should not be used: A Static Container named “MSDB Databases” consists of all msdb databases over all servers in the production environment, and assume that a new instance of SQL server is installed every day. In order to ensure that the “MSDB Databases” Static Container indeed holds all msdb databases, the user must manually add the msdb database to the Container for each new server, daily. This maintenance overhead can be overcome by using Dynamic Containers.
Note: The main advantage of Dynamic Container is that they allow users to share Environment and Container information from a single data repository. Using Dynamic Containers, developers only need to configure the Environments and Containers in their user-interface once, and a single person can maintain the data repository from that point on.
Dynamic Containers assume that a list of servers and databases is already available in some tables. Throughout, we use the term Repository, or Reference, to denote the database in which the server-to-database mappings reside. When a script is run against a Dynamic Container, Combine first connects to the Reference database and runs a user-provided query that returns the identifiers of all target databases. Then, as in the case of Static Containers, Combine connects and deploys the script on all target databases.
The following steps are required to create a Dynamic Container:
1. Locate the Reference database and table(s) that holds the server and database information.
2. Write a query that returns the database and server names for all target databases.
3. Create a Static Container and add the Reference database to it. The Reference database should be the only database in this Container.
4. Use the Dynamic Container Wizard to create the Dynamic Container. When prompted, associate the Static Container in (3) and the query in (2) with the Dynamic Container.
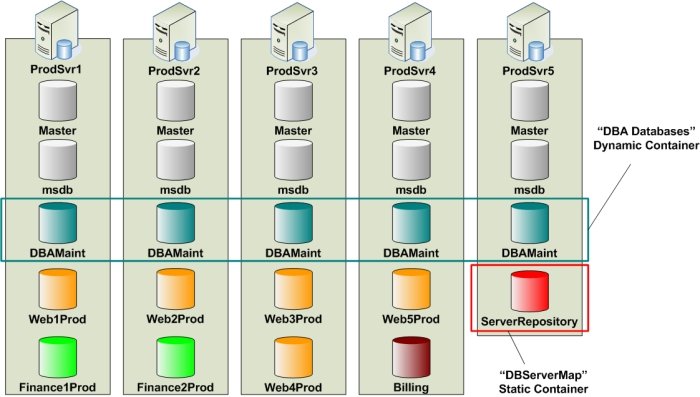
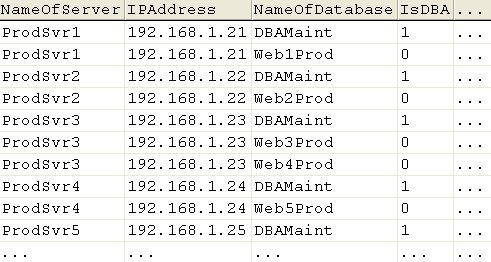
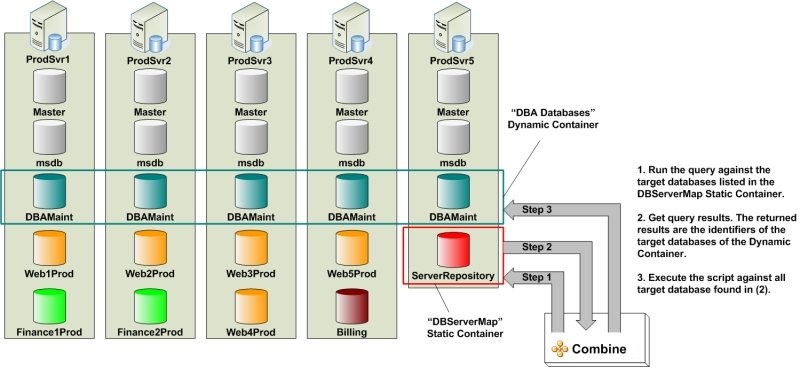
The example below illustrated the concept of Dynamic Containers. Here, we create a Dynamic Container with five DBAMaint target databases on five different servers, and call this Container “DBA Databases”. First, a Reference database is required. Assume that the ServerRepository database on ProdSvr5 has the server-database mappings, and that the data is stored in a table named DBServers (the content of the DBServers table is given in Figure 4).
Now, either one of the following queries (or many other queries) will return the set of DBAMaint target databases:
1 2 3 4 5 6 7 | |
1 2 3 4 5 | |
Next, we create a Static Container (named DBServerMap in Figure 3) that holds the ServerRepository target database. Finally, we create the Dynamic Container using the Dynamic Container Wizard, and when prompted, assign the DBServerMap Container and the query as part of the Dynamic Container configuration. Once the “DBA Databases” Container is created, every time scripts are run against this Container, Combine performs the steps in Figure 5 to deploy code on all DBAMaint target databases.
Environments
Each Environment consists of any number of Static and Dynamic Containers, with the restriction that Container names in a single Environment must be unique. However, Containers that belong to different Environments can (and in many cases should) have the same name. Environments are introduced in Combine to relate groups of databases (i.e., Containers) between separate physical SQL server environments. The primary benefit of Environments is that they allow developers, software testers, and DB administrators to pass SQL scripts and code packages between Development, QA, and Production, respectively, while guaranteeing fast deployment on each environment.
For now, consider three Environments, namely the Development (Dev) environment, the Quality Assurance (QA) environment, and the Production environment. In most companies, databases and servers used by developers to write SQL code are separate from the databases and servers used by software engineers in QA, which are also distinct from the databases and servers in production. By using Combine Environments it is now possible to map groups of databases between these physical environments on the basis of their functionality.
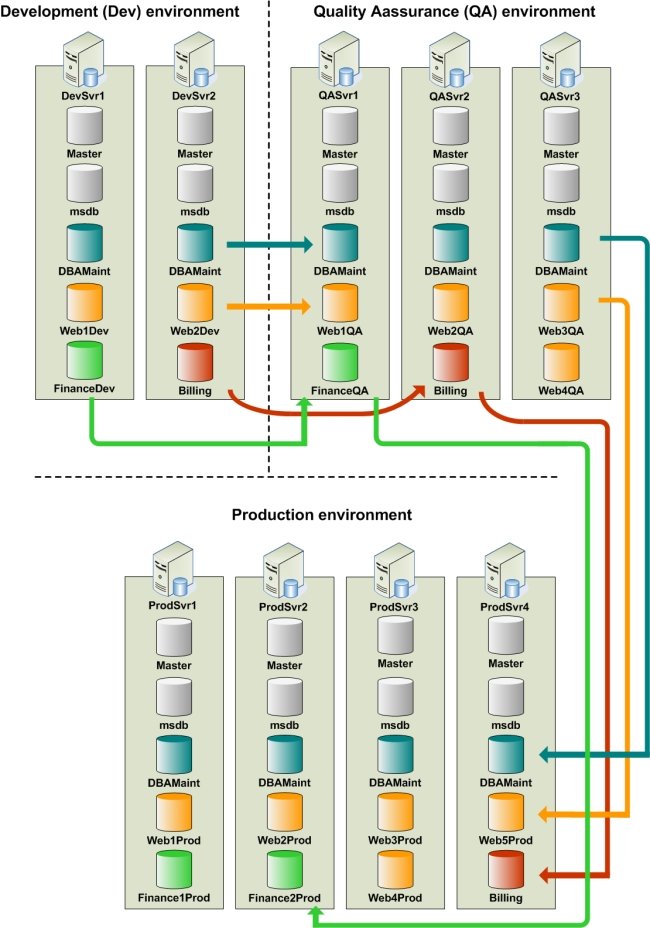
The Development environment – Assume that developers write code and test scripts on two SQL servers, namely the DevSvr1 and DevSvr2 servers (see Figure 6). The DevSvr1 server contains the FinanceDev, Web1Dev, and DBAMaint user-databases, whereas the DevSvr2 server contains the Billing, Web2Dev, and DBAMaint user-databases. For the purpose of this example, assume that the schema in the Web1Dev and Web2Dev databases is similar, so that scripts developed for Web1Dev must also be deployed on the Web2Dev database.
The QA environment – In the QA environment, assume that three SQL servers are available, namely QASvr1, QASvr2, and QASvr3, as illustrated in Figure 7. When scripts written by developers for the Billing database (in Development) are passed to QA, these scripts must then be deployed on the Billing database on the QASvr2 server. Similarly, scripts composed for the FinanceDev database on the DevSvr1 server are later deployed on the FinanceQA database in the QA environment. In the same manner, code developed on the Web1Dev and Web2Dev databases is then deployed on the Web1QA, Web2QA, Web3QA and Web4QA databases in QA, and the same concept applies to the DBAMaint databases as well.

The Production environment – Releases that pass all quality assurance tests are forwarded to production for final deployment. Here, assume that there are four SQL servers: ProdSvr1, ProdSvr2, ProdSvr3, and ProdSvr4 (see Figure 8). In production, scripts developed for the Billing database are deployed on the Billing database on the ProdSvr4 server; scripts written for the FinanceDev database are now executed on the Finance1Prod and Finance2Prod databases, whereas all Web scripts are now run on five production databases, namely Web1Prod, Web2Prod, Web3Prod, Web4Prod, and Web5Prod. The same idea is followed by the DBAMaint databases.

To summarize, the following figure describes the flow of code deployment between Dev, QA, and Production, where each color denotes the appropriate group of target databases (i.e., Containers) across all Environments.
The Dev-QA-Production Release Process
Change management and code release processes are supported in Combine through several key features:
1. Code packages: A code package consists of scripts. Each script in the package is assigned to a Container. When running a code package, each script will be deployed on all target databases in the associated Container (more information about code packages can be found in the Code Packages section).
2. Passing code packages between Dev, QA, and Production: Scripts are packaged into a single .cpa file. This file contains the text of the scripts and the name of the Container assigned to each script. Entire releases can therefore be saved as a single file that can be passed, viewed, edited, and deployed by individuals running Combine. More importantly, once all Containers are configured properly in the Dev, QA, and Production environments in the Combine Container Manager, each Container in Dev has a corresponding Container (i.e., Container with the same name) in QA and a matching Container in Production. This fact ensures fast release deployment for the following reasons: After developers write the release code and build a code package, software engineers in QA can easily open the package and deploy the entire package on the servers in QA by a click of a button, without altering the package content. Since each script in the package is already associated with a Container name, code deployed on target databases of Containers in Development is now deployed on the target databases of the corresponding Containers in QA. This principle also applies when passing packages from QA to Production. Examples that demonstrate the transfer and fast deployment of code packages between Dev, QA, and Production are provided below.
3. Importing and Exporting Environment and Container configuration: Environments and Containers only need to be configured and maintained by one person who is familiar with the groups of target databases in Dev, QA, and Production. Once Environments and Containers are defined, their configuration settings can be exported and then imported by other Combine client machines. Also, note that the three Environments need not be defined on each machine running Combine: Developers only need the Dev Environment with the correct Containers settings, QA engineers need only have the QA Environment with Containers having the same name as in Dev, and Production DBAs only need the Production Environment, again, with same Containers names as in Dev and QA.
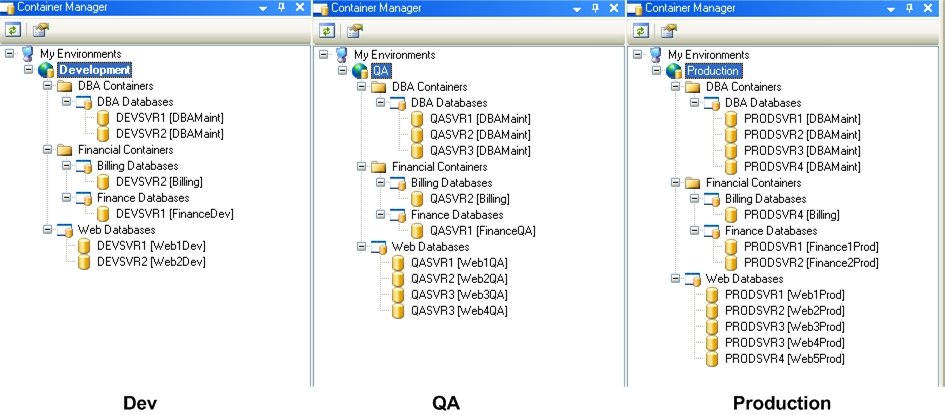
As an example, below is a snapshot of the Container Manager that stores the configuration of all three Environments and Containers for the physical Dev, QA, and Production environments previously described in Figure 9 when all Containers are Static Containers.
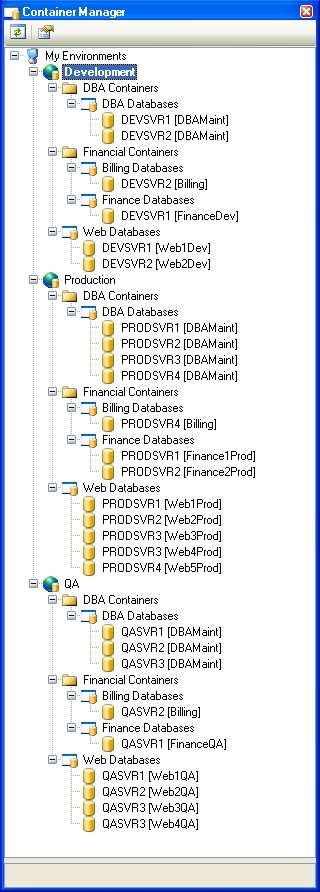
As stated earlier, it is sufficient for developers to maintain the Dev Containers, for QA engineers to maintain the Containers that belong to the QA Environment, and for DBAs to keep the Production Environment Container settings. In this case, the following figure shows the Container Manager viewed by developers, QA engineers, and DBAs, respectively, when all the Containers are Static Containers. Keep in mind that Containers in different Environments need not be of the same type – Static Containers in one Environment could correspond to Dynamic Containers in another Environment as long as they have the same Container name (and they are placed under folders with same names in the Container Manager).
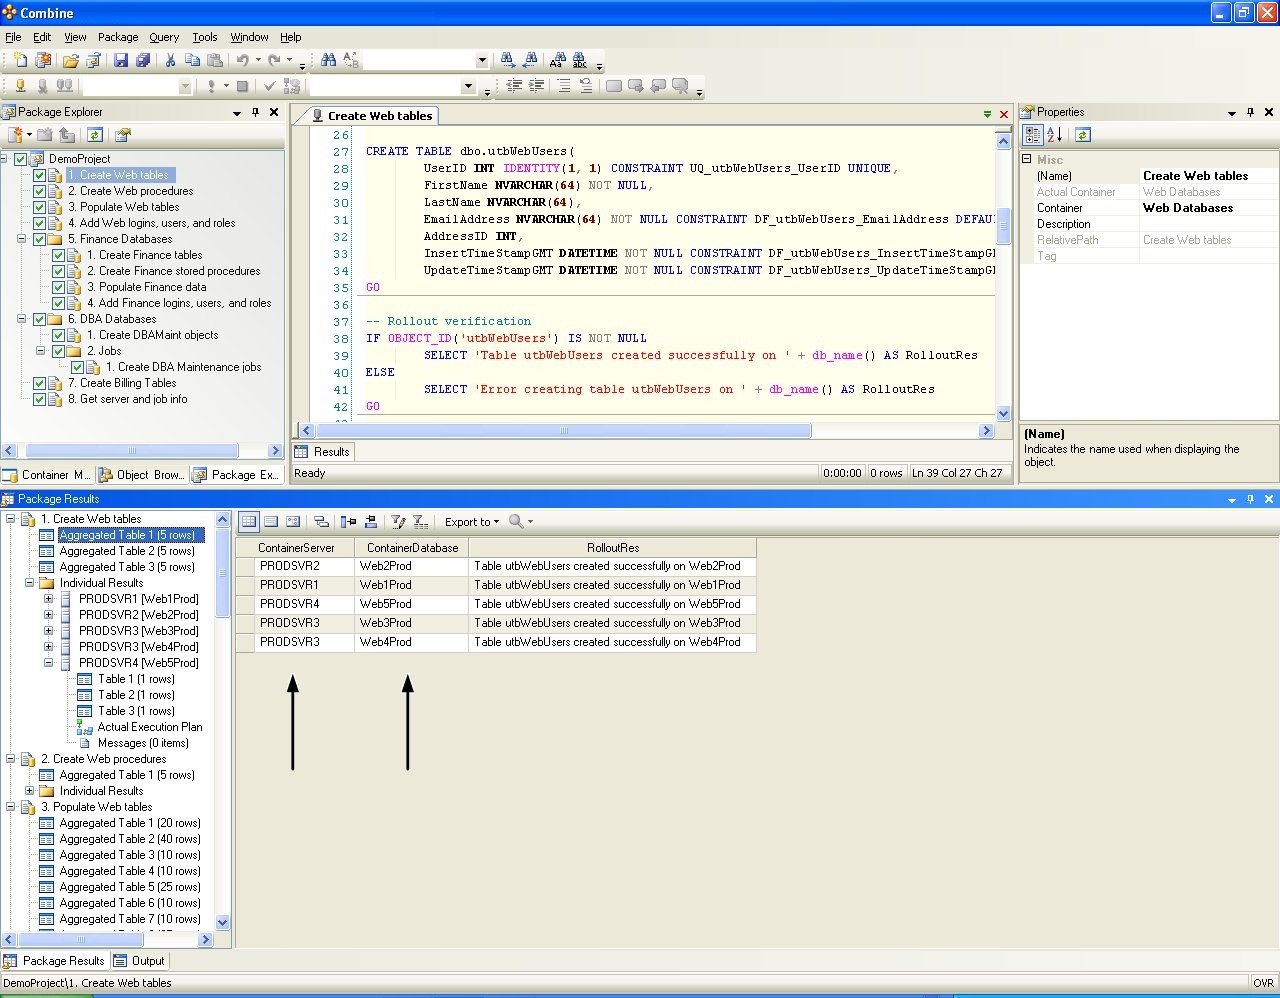
Passing packaged between Dev, QA, and Production using Combine guarantees fast deployment in each environment as now demonstrated (see the section titled Code Packages to learn more about packages): Consider the code package in Figure 12. Each script in the package is associated with a Container name. In this sample package, scripts 01 to 04 are associated with the Web Databases Container, scripts under the Finance Databases folders are associated with the Finance Databases Container, scripts under DBA Databases as well as the script 08 are mapped to the DBA Databases Container, and script 07 is associated with the Billing Databases Container.
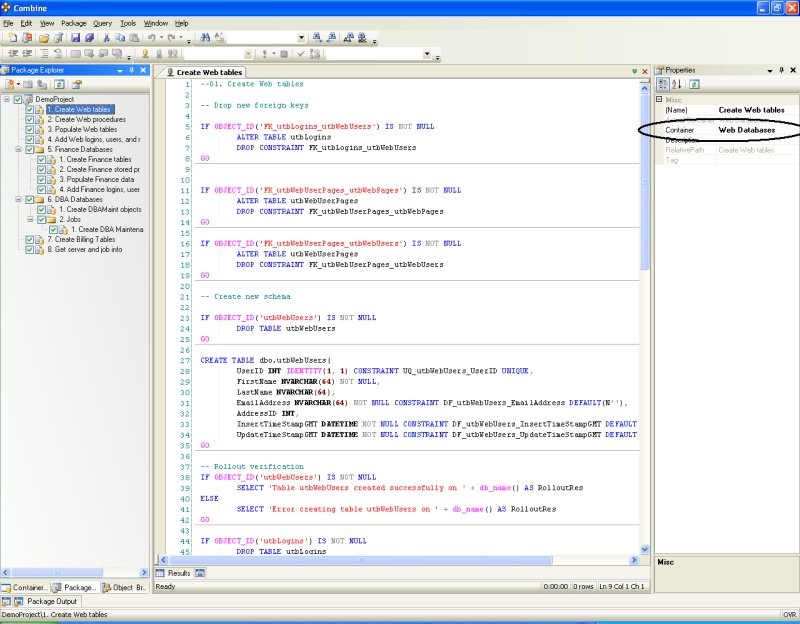
Notice that each script in the sample package of Figure 12 includes a SQL statement that verifies that changes and objects created in the script are indeed deployed successfully. For example, once a table is created the script verifies that a valid OBJECT_ID is available for the new table (i.e., OBJECT_ID(TableName) IS NOT NULL) and returns a single row to inform the user of the rollout results.
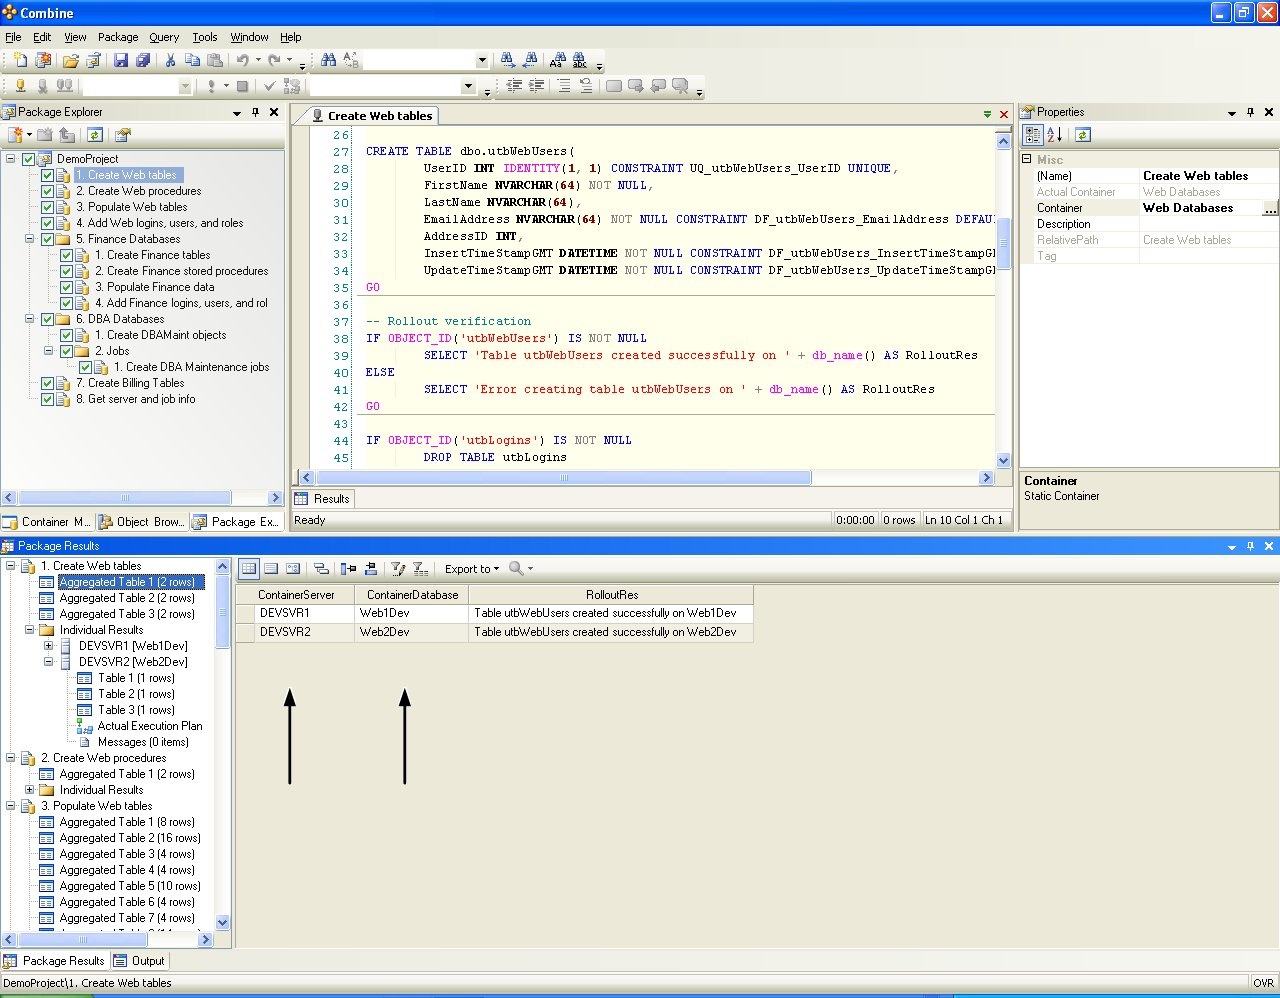
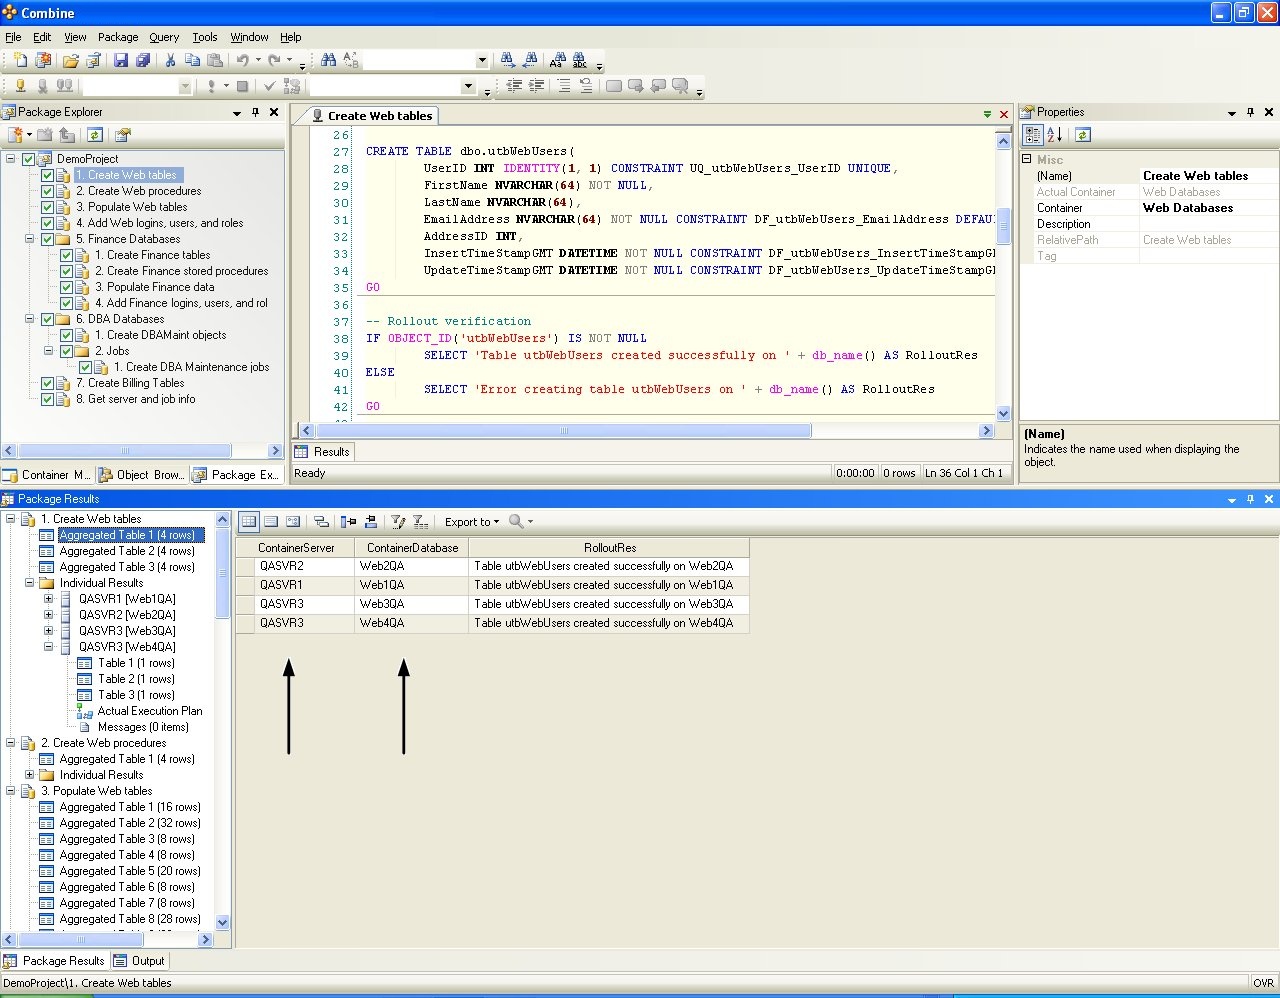
Scripts in the package are executed according to their order in the package tree (see Configuring Code Packages for complete details). When developers run the package, scripts will be deployed on databases in the Containers of the Development Environment listed in Figure 11, and the deployment results are given in Figure 13. When the package is passed to QA engineers, the package is deployed by a click of a button on all the target databases in the QA Environment shown in Figure 11 without making any modification to the package configuration or package content. Execution results in the QA Environment are presented in Figure 14. In the same manner, after the package is sent to Production, DBAs need not make any package changes and can deploy the entire package on all target databases in the Production Environment by a click of a button as shown in Figure 16 below. Notice that the ContainerServer and ContainerDatabase columns in the grids result in the images below are added automatically by Combine to reflect the target database from which each row in the grid is returned). Results returned from the package execution are displayed as aggregated results from all target databases and also include the execution plan and results for each individual database.
Notes: 1. Once a package is executed, Combine performs a set of tests and verifications to ensure that scripts in the package will be executed successfully. For example, database and server connectivity as well as proper authentication and credentials are verified for all databases involved in the package execution before Combine deploys any of the scripts in the package. If any tests and checks are not successful, Combine will notify you of all issues and will not execute any portions of the package. In addition, several screens are displayed before the package scripts are deployed to provide users with better control and visibility to the execution. These screens and many other details involving the package execution can be found in the section titled Executing Code Packages. 1. If multiple Environments are used to deploy code from one client machine as in the example of Figure 10, then using the Container Manager the user must set the Active Environment against which the package will be deployed. At any given time, only a single Environment can be active and the active Environment is the one displayed in bold letters in the Container Manager (for example, in Figure 10 the Development Environment is the active Environment). By setting the appropriate active Environment in the Container Manager, the Dev-QA-Production release process can also be followed from a single client machine that has access to all databases and servers.
Best Practices – Sharing Environments and Containers by using a Combine Repository
Environments and Containers configuration under the MyEnvironments node in the Container Manager are stored on the local user machine. This includes Environment names, Container names, databases in Static Containers, as well as the Reference (Repository) Static Container and the Queries used by Dynamic Containers.
If you wish to pass other users your Container configuration, you must Export you Environment and Container settings, and then ask other users to Import them. However, in order to overcome this overhead and easily share Environment and Container configuration, you can install a Combine Repository database that holds the settings of Environments and Containers, and then have multiple users point to the Combine Repository to share those settings and definitions.
A detailed user-manual that explains the Combine Repository database is available at the download section on JNetDirect’ website. Instructions for installing and using a repository are also available in this document in the section titled Combine Repository – Sharing Environments and Containers.
Exporting Environments
Environment configuration and settings can be exported and then imported again into Combine. When an Environment is exported, all the settings of all Static and Dynamic Containers in the Environment are exported as well, including the target databases of the Static Containers, the Reference and Query under all Dynamic Containers, and their associated authentication types and credentials.
To export your Environments click any item in the Container Manager and select Container → Export from the main menu. The first welcome page of the Export Environment Wizard will then be displayed. If you do not wish to see the welcome page in the future then check the “Do not show welcome page next time” checkbox and press the Next button.

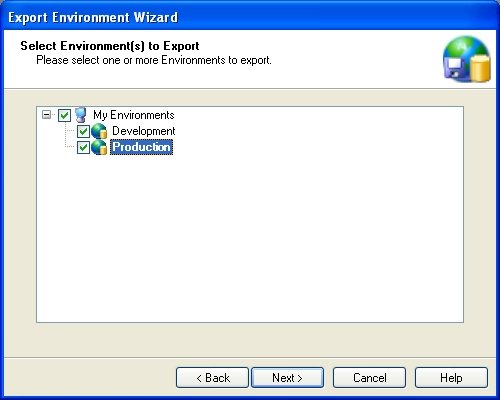
In the next window you will be asked to select the Environments to be exported.
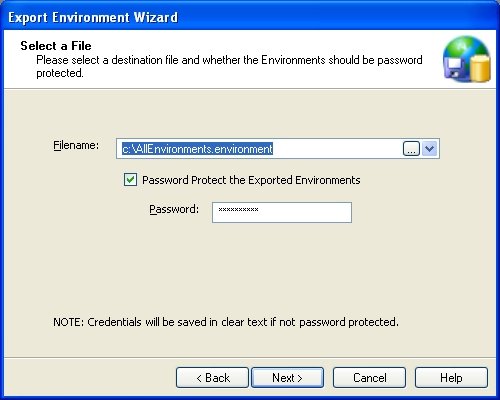
Next you must choose the output file name. The output file name will have the extension “environment”. You may also instruct Combine to encrypt the export file by using the password protection option. If you do not use password protection then SQL user names previously entered in the Container settings will be stored in clear text and could be visible to others. SQL passwords will never be displayed in clear text and will always be encrypted. When encryption and password protection is used, you must also provide a password.
Press Next to get to the last page of the wizard. Then press the Finish button to complete the export process. Once the file has been exported you can view it. Do not edit it. If you edit the file then it will not be imported successfully later. Finally, you can either place the file on a network drive or send the file to other users, so that the Environments and all their settings could be imported to other client machines.
Importing Environments
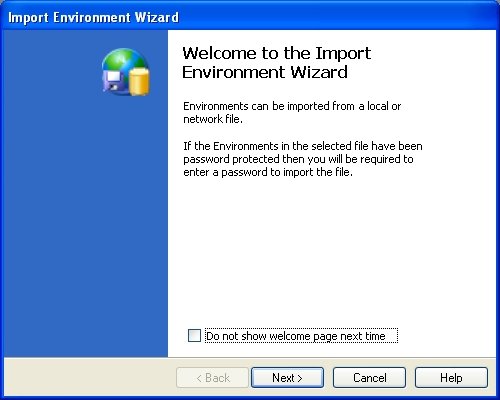
Before you begin the Environment import process, first locate the file you wish to import. This file must have the extension “environment” (for example, c:\AllEnvironments.environment). If this file was exported using password-protection then you must also have the password handy. In order to start importing please select Containers → Import from the main menu to launch the Import Environment Wizard. The welcome page will appear first and you can instruct the wizard to not display this page again in the future. Press Next to advance to the next page.
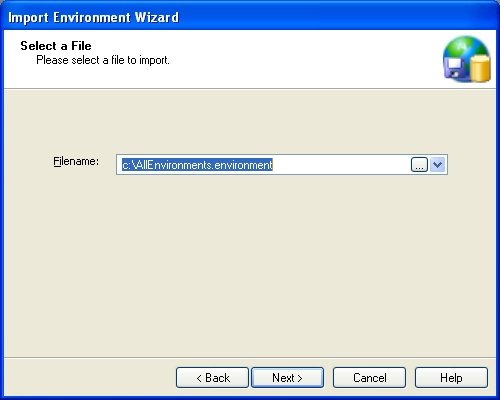
The next window will ask you to select the file to import. Enter the file name and press the Next button.
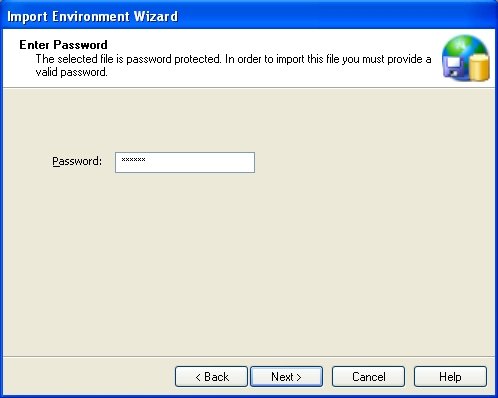
If the file you are trying to import is password-protected, for example when you receive an exported environment file from another user via insecure email, you will be asked to enter the same password used when the environment file was originally exported.
You will then be presented with the list of Environments included in the file. You do not have to import all Environments. Select the Environments you wish to import and press the Next button.
Note: If you already have an Environment with the same name as the one that will be imported then Combine will not override your existing Environment. Instead, Combine will import the Environment under a different name. For example, if you have an Environment named Production and you are importing another Environment with the same name, the new Environment will be imported under the name Production2.

Press the Next button and then Finish in the last page of the wizard to complete the import process.