Collecting Data from Many Databases or Distributing Data to Many Databases
Introduction
Combine™ allows you to get data from multiple databases and servers in parallel and then automatically write all the collected data to one or more databases and servers. Using this feature you can retrieve data from many databases and servers and write them to a central database for monitoring and reporting purposes. Alternatively, this feature is also useful to distribute (or replicate and publish) data from one or more databases to many other databases and servers, as in the case of data replication.
Data collection and distribution is done through code packages. If scripts inside the code package contain SELECT statements (or EXEC or any other statements that return data), then Combine will return the aggregated data from all the databases against which the script is executed. The aggregated data can then be automatically written to all databases that belong to an output Container (also called Save Results Container in Combine).
The following steps summarize the basic process of collecting and auto-saving data:
1. Create a code package with a sql script that contains a SELECT statement for the data you wish to collect.
2. Map the script to a Container. When Combine executes the package, the script will be run against all Container databases in parallel and automatically aggregate all the results collected from all databases.
3. In the script properties, set Save Results Enabled to True and select the Save Results Container. The aggregated results collected in Step 2 will be written to all the databases in the Save Results Container in parallel.
4. Refer to the various Script Results properties associated with the script. Set these properties to instruct Combine how to save and write the results.
5. Execute the package to automatically collect, aggregate, and save the data.
This is the simplest example of collecting and auto-saving data. In actuality, a code package can contain many scripts that return many result sets (in response to one or more SELECT statements in each scripts), and those result sets are then written to their designated target databases. In addition, you can have Combine auto-create the schema for the target tables (the table into which Combine will write the aggregated results) or you can write the schema yourself and instruct Combine to use the existing schema.
Two typical applications of data collection and distribution are:
Collect data for monitoring and reporting purposes: Set the data source Container (i.e., the one associated with the script) to be all databases you wish to monitor. Then, set the Output Container to be a central database where you will store all monitoring data. Then, you can build your data collection package and run it on a scheduled basis (e.g., using Scheduled Packages or the cpaexec command line utility).
Distribute data from a central DB to subscribers: Set the data source Container to be a single database that stores the data you wish to publish, and set the output Container to be the collection of your subscribers databases. Build a package that contains the SELECT statement to get the source data and include other scripts in the package to manipulate the data. Then, run the package manually or in a scheduled fashion (using Scheduled Packages or the cpaexec utility).
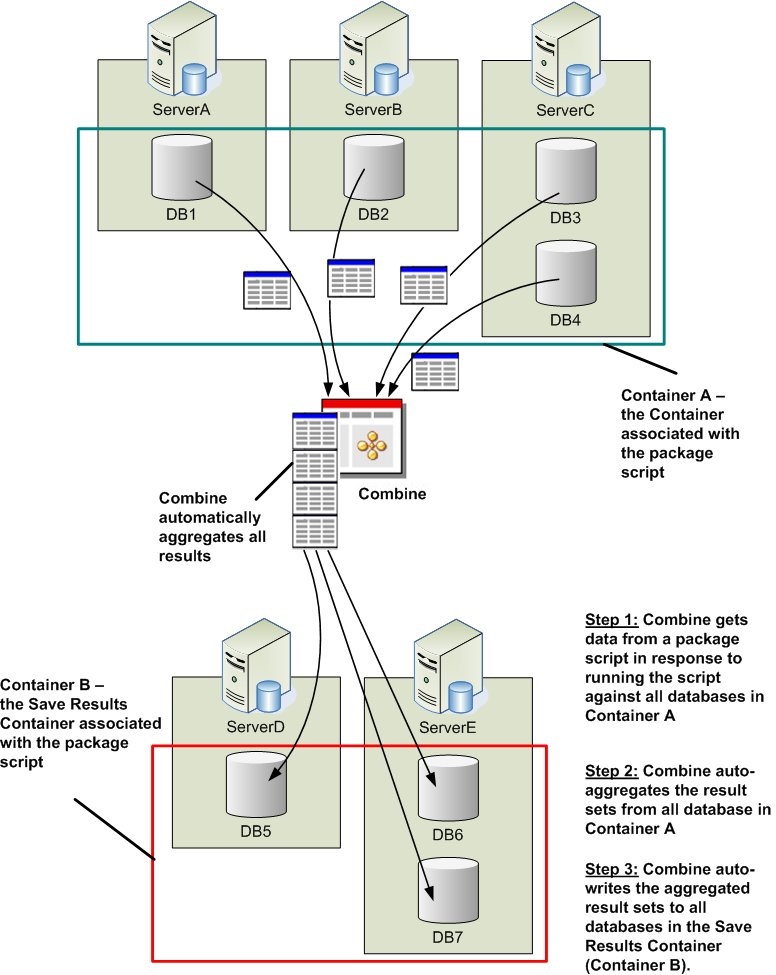
The process of data collection and publishing (or auto-saving) is demonstrated in the image below. Various configuration options allow you to instruct Combine how to create the table schema or use existing tables to save the collected data. These options are discussed in the sections Save Script Results, Save Script Results – Advanced Options, and Save Script Results – Table Creation.
Save Script Results
If a script inside a code package contains one or more SELECT statements, when the package is executed, the script will run against all the databases in the Container associated with this script. The results returned from all the target databases will be automatically aggregated by Combine. If you wish to write the aggregated results to one or more databases, you can do so by setting the Save Script Result properties that are associated with the script. Keep in mind that you will also have to configure all the result-saving options to make sure that Combine writes the results to the appropriate databases and tables.
Once the result saving is enabled, you have to provide Combine with the table names to use for saving results. You can create the table schema yourself and tell Combine to use existing tables, or have Combine automatically create new tables. If the table names you gave Combine do not exist in the output database, then Combine will automatically create the tables and then save the results in the new tables. Moreover, if the tables already exist in the output database you can instruct Combine to delete or truncate the rows in the table before writing the aggregated results, or drop and auto-recreate the table. Furthermore, keep in mind that you can include other scripts in the package that will be run before or after the script that saves result, so you can write custom code to manipulate schema and data throughout the code package (i.e., before or after saving the results).
Important! If you are saving large volumes of data, set the property Include Tables under Script Result to false to not show it in the Package Results and omit it from the cre file.
The properties related to saving script results are listed and explained below.
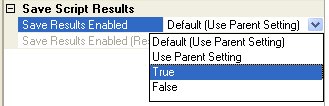
Save Script Results – By default, Combine will not save the aggregated results. To enable results saving you must first select the script in the Package Explorer and set the Save Script Results Enabled property to True, as demonstrated in the figure below. After this property is set to True you will see all the different options that can be set for the results saving.
Save Results Container – This property tells Combine where to save results. The aggregated results will be written to all databases in this Container. This Container be either a Dynamic or Static Container.
Explicit vs. Implicit table names – When results are saved, they will be written to tables in all databases that belong to the Save Results Container. The table names that will be used (whether these are existing tables in the underlying databases or new tables) are determined by the Table Names Mode which can be either Explicit Table Names or Implicit Table Names.
Table Names Mode – Set the Table Names Modes to either Explicit or Implicit, to tell Combine to save results to user-provided table names (Explicit) or to use the script name as the output table name (Implicit). These modes are explained in details below.
Implicit Table Names – The name of the output table(s) is the script name. For example, if the name of the script in the package is [dbo].[MyResults], then Combine will write the aggregated results to the table [dbo].[MyResults]. Implicit Names are useful if a single result set is returned and saved for the script: If multiple result sets are returned then the second set of aggregated result will be written to a table called [dbo].[MyResults_2], the third set will be saved to [dbo].[MyResults_3], and so on. Note that with Implicit Table Names, if more than one set of aggregated results is returned for the script, then all the aggregated sets will be saved. When using Implicit names, make sure that the script name is a valid table name in the format [owner or schema].[table name].
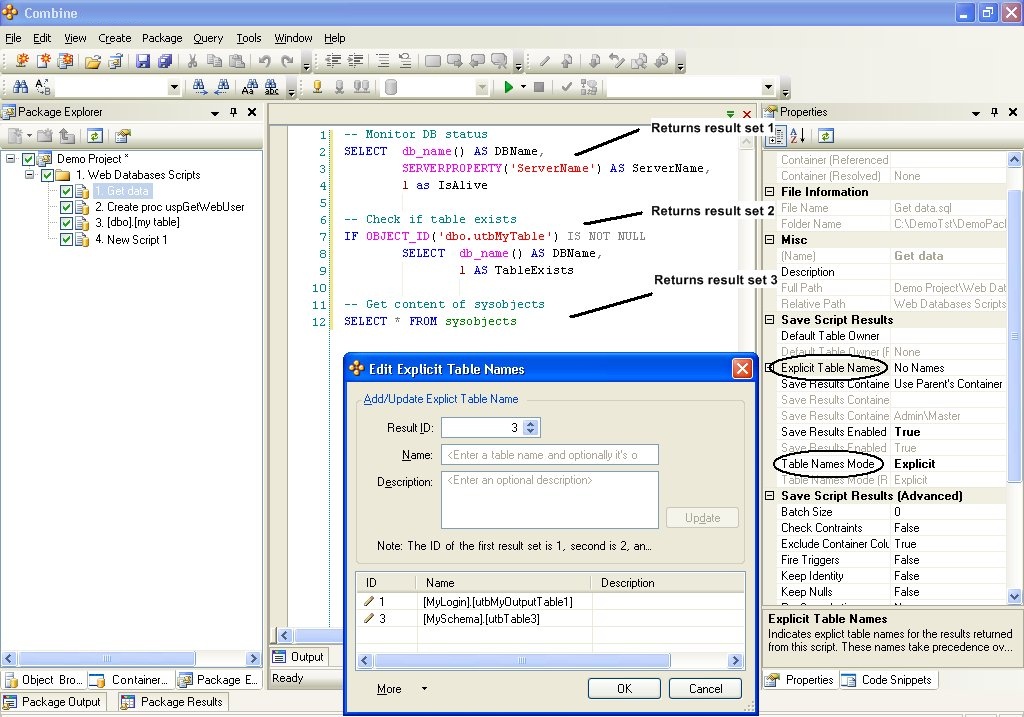
Explicit Table Names – In this mode you can accurately specify the table name for each aggregated result set returned for the script. For example, assume that a script returns 3 aggregated result sets in response to three different SELECT statements. Using Explicit Table Names you can tell Combine to use (say) a table called [MyLogin].[utbMyOutputTable1] for the first result set (i.e., the one with Result ID = 1), skip the saving of the second result set (by not specifying a table name for Result ID = 2), and save the third set of aggregated results to a table called [MySchema].[utbTable3] by assigning this explicit table name to Result ID = 3. This example is demonstrated in the image below. To use Explicit table names, set the Table Names Mode property to Explicit, click the property Explicit Table Names, and set the table names and their corresponding Result ID values in the dialog.
Note: If a script is configured to use explicit table names and the explicit table name (or names) are not provided, then Combine will not save the results. For example, if a script is configured with Save Script Results Enabled and uses Explicit Names, yet no names are configured, then the results will not be saved.
Default Table Owner – This field is only used if the table owner is not specified as part of the explicit or implicit table names.
For advanced options and other table creation attributes and settings, please refer to the sections Save Script Results – Advanced Options and Save Script Results – Table Creation sections, respectively.
Save Script Results – Advanced Options
This section assumes that you have read and understood the general process of saving aggregated results, as explained in the Introduction section and the section titled Saving Script Results.
After Combine collects and aggregates the data from all databases, it saves the results to the databases that belong to the Save Results Container. In order to save data, Combine uses BULK COPY operations (for additional information, please refer to BULK INSERT in books online and on the MSDN website). The advanced properties section allow you to configure the BULK INSERT options that will be used by Combine to write the data to databases.
Batch Size – Data is written to a database table in one chunk (i.e., a single batch) or in batches. When the Batch Size property is set to zero, Combine will attempt to insert all the aggregated rows to the table in a single batch. If an error occurs for any reason (for example due to check constraint violation), the entire batch will not be inserted and no rows will be populated in the table. If there is a risk that data inserts will not be successful (e.g., due to table constraints), it is recommended to set the Batch Size to the number of rows that should be processed each time. Furthermore, keep in mind that if any rows are not populated successfully, then all the rows in the batch will not be inserted to the table.
Tip: For best results, make sure that the target table into which Combine is saving results does not have unnecessary constraints that will cause data population errors, and keep the Batch Size at zero.
Check Constraints – If this option is set to true then Combine (or more correctly, the BULK COPY operation) will validate that the rows populated are not violating any check constraints prior to inserting them. Rows that violate the check constraints will not be inserted to the table whereas all other rows will be inserted.
Fire Triggers – If Combine writes results to a table that has triggers, then table triggers (e.g., an AFTER INSERT trigger) will not fire during the BULK INSERT. If you still want triggers to fire then you should set this option to True.
Keep Identity – If Combine writes results to a table that has an identity column (say a column called ColIdent), but the aggregated result sets that will be written also contain values for this column, you can instruct Combine whether to let the identity column (e.g., ColIdent) generate the identity values or to overwrite the values with the ones in the aggregated results. Set this option to True to have the underlying identity column generate identity values. To overwrite the identity values set this property to False.
Keep Nulls – This option is used if Combine writes null values to a nullable column that has a default constraint. Set this option to True to save the null values in the target table. If you wish to replace the null value with the value specified in the column default, then set this property to False.
Pre-Save Action – If Combine writes results to an existing table (e.g., if the schema was previously created either by you or automatically by Combine), you can instruct Combine to perform various actions that will take place before data is written into the table. These actions include: Drop the existing table and let Combine recreate a new table; Delete all values in the table before inserting the new aggregated records; or truncate the table values before populating the aggregated results.
Save On Cancel – Assume that you have a script that is configured to retrieve data and then save it, and further assume that the script resulted in errors when it was executed against the databases in the Container associated with the script (i.e., the databases from which data was collected). When this is the case, Combine prompts you with the execution error dialog and allows you to choose how to proceed: Cancel execution completely, continue execution on all but the errored databases, or continue execution on all databases. The Save On Cancel property determines whether aggregated results will be saved if you choose to cancel the execution.
Save On Error – Assume that you have a script that is configured to retrieve data and then save it, and further assume that the script resulted in errors when it was executed against the databases in the Container associated with the script (i.e., the databases from which data was collected). Using the Save On Error property you can instruct Combine to save the aggregated results in spite of the errors.
Table Lock – When this option is set to true, then Combine will use a table lock when saving results to an underlying table.
BCP Time Out – The Bulk Copy timeout parameter is configurable in Tools → Options → Connections. The default value for the timeout is zero (for infinite time).
Save Script Results – Table Creation
This section assumes that you have read and understood the general process of saving aggregated results, as explained in the Introduction section and the section titled Saving Script Results.
When Combine saves results to a table (subject to all the Save Results properties and configuration), if the target table does not exist in the target database then Combine will try to create it. In order to create the target table (or tables, if multiple aggregated results are returned from a single script), then Combine runs a SQL script that contains the table creation statement. This script is available in the package results (cre) output – click the Save Results node in the Package Results tab to view the script content.
Collation – If you let Combine auto-create the table schema for saving results, this collation will be used for all the string columns in the table.
Minimum Size (NVARCHAR) – If you let Combine auto-create the table schema for saving results, then Combine uses ADO.NET to auto-detect the table column schema. However, you can provide Combine with a minimum size for NVARCHAR and VARBINARY columns. In other words, if Combine detects that a column is NVARCHAR(10), if the value of Minimum Size (NVARCHAR) is 128, then the column will be created as a NVARCHAR(128). Similarly, all columns that are detected as NVARCHAR(X) where X < 128 will be created as NVARCHAR(128). Acceptable values for the minimum size are integers between 1 to 4000, or max (in which case Combine uses NVARCHAR(MAX) when saving results to SQL 2005 or later, or NTEXT when saving to SQL 7 or 2000, for all string columns).
Note: When creating a table schema Combine will use NVARCHAR for all string columns (i.e., VARCHAR, NVARCHAR, CHAR, NCHAR, etc.) except for NTEXT or TEXT columns; TEXT is automatically converted to NVARCHAR(MAX) in SQL 2K5 or NTEXT in SQL 7 and 2000.
Minimum Size (VARBINARY) – If you let Combine auto-create the table schema for saving results, then Combine uses ADO.NET to auto-detect the table column schema. However, you can provide Combine with a minimum size for NVARCHAR and VARBINARY columns. In other words, if Combine detects that a column is BINARY(10), if the value of Minimum Size (VARBINARY) is 128, then the column will be created as a VARBINARY(128). Similarly, all columns that are detected as BINARY(X) where X < 128 will be created as VARBINARY(128). Acceptable values for the minimum size are integers between 1 to 8000, or max (in which case Combine uses VARBINARY(MAX) when saving results to SQL 2005 or later, or IMAGE when saving to SQL 7 or 2000, for all binary columns).
Note: When creating a table schema Combine will use VARBINARY for all string columns (i.e., BINARY, VARBINARY, etc.) except for IMAGE columns; IMAGE remains as is when saving results to SQL 2000 or converted to VARBINARY(MAX) when saving results to SQL 2005.
Threshold Size (NVARCHAR) – If you let Combine create the table schema for saving results, if a string column contains more than X characters then Combine can automatically convert this column type to be NVARCHAR(MAX) for SQL 2005 or later, or NTEXT for SQL 7 and 2000. This threshold value X is the value of the property Threshold Size (NVARCHAR).
Threshold Size (VARBINARY) – If you let Combine create the table schema for saving results, if a binary column contains more than X characters then Combine can automatically convert this column type to be VARBINARY(MAX) for SQL 2005 or later, or IMAGE for SQL 7 and 2000. This threshold value X is the value of the property Threshold Size (VARBINARY).
Save Script Results – Package and Folder Nodes
Some basic properties of the Save Script Results functionality are available at the Package node and Folder nodes in the Package Explorer. These values are provided for the sole purpose of allowing the user to set configuration options and values at the parent nodes and then let scripts under those nodes inherit those values and settings.
Data Aggregation Types and Modes
Combine™ supports two types (or modes) of aggregating data that returns in response to the execution of queries and scripts against a Container, namely aggregating data with identical column schema and aggregating data according to table position even if the table schema returned from different database is not identical.
Aggregate identical schema: Under this type of aggregation, data returned from multiple databases is aggregated only for result sets that have identical column schema. For example, if a query is run against 9 databases and returns data with 3 different column schemas, then Combine will provide 3 aggregated result sets (one for each schema).
Aggregate by table position: With this aggregation mode, all the (say) N-th result sets returned from all databases are aggregated into a single result set, regardless of whether the column schema is identical for all results. For example, if a script contains 2 queries and the first query returns 9 result sets from 9 databases with 3 different column schemas then Combine will provide a single aggregated result set with data from all 9 databases in response to the first query in the script.
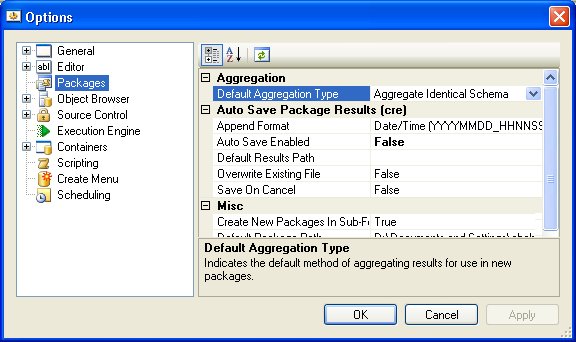
The data aggregation mode can be specified in numerous locations throughout the application, depending on the user needs. To set the default aggregation type, both for code packages and SQL scripts or queries that are executed in the editor, go to Tools → Options → Packages → Aggregation, and set the property Default Aggregation Type (see Fig. 102.19). By default, this value is set to Aggregate Identical Schema.
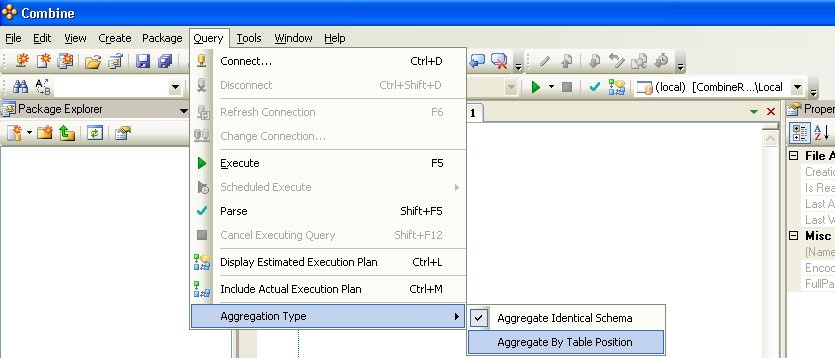
When running a SQL script or query against a Container in the editor you can set the data aggregation mode after selecting the Container, by choosing the aggregation type under Query → Aggregation Type, as illustrated in Fig. 102.20.
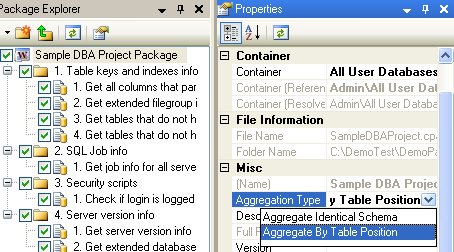
The type of data aggregation can also be specified for code packages, in which case all the scripts in the code package will use the aggregation mode that is set for the package. To specify the data aggregation type for a package, open the package in the Package Explorer, select the root node of the package, press F4 to bring up the Properties Window, and then set the Aggregation Type property under the Misc category (see Fig. 102.21).