Scheduled Packages and Deployments
Introduction
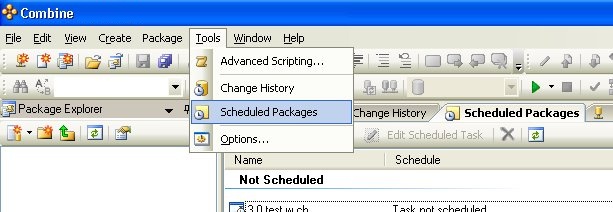
Combine™ allows users to schedule the execution of one or more code packages as well as manage scheduled packages. These and other scheduling features are available under Tools → Scheduled Packages, as shown in the figure below.
Package scheduling uses the Windows Scheduled Tasks to schedule and execute code packages. In order to work with scheduled packages, the Windows service called Task Scheduled must be running.
By using the Scheduled Packages tool, users can perform the actions listed below:
• Create a new schedule to run one or more packages
• Edit the settings of scheduled packages
• View the Scheduled Task settings for scheduled packages
• Enable or disable scheduled packages
Creating a New Scheduled Package
Users can create a new scheduled task to run one or more code packages by invoking the Scheduled Packages tool under the Tools menu. To create a new scheduled task, click the New Scheduled Task in the Scheduled Packages window as illustrated in the image below. Then, follow the instructions in the Scheduled Task Wizard.

Scheduled Packages use the Windows Scheduled Tasks to schedule and execute code packages. When a new Scheduled Package is created, Combine automatically creates a batch file (i.e., a file with the extension .bat) in the folder called Scheduled Packages under the Combine installation directory. You can instruct Combine to save the bat file in other directories by setting the Scheduling options in the Tools → Options dialog.
The bat file contains instructions that call the CpaExec command line utility, which is responsible for executing the package and saving deployment results and outputs. The schedule assigned to the scheduled package is saved as a Windows Scheduled Task and can be viewed and edited either in Combine or under Scheduled Tasks in the Control Panel in Windows.
To summarize, Scheduled Packages contain the following components:
1. A bat file that calls the CpaExec command line utility to execute the scheduled packages. The bat file is stored under the Scheduled Packages folder. The name of the batch file starts with the string “SQL Farm Combine”.
2. A Scheduled Task that calls the bat file according to the schedule specified in the Scheduled Packages tool in Combine.
The Scheduled Task Wizard is explained in detail in the section titled Scheduled Task Wizard. Please refer to that section for additional information regarding how to create or edit scheduled packages and tasks.
Editing Scheduled Packages and Settings
Using the Scheduled Packages tool, users can edit the schedule and other settings of existing scheduled packages. To do so, start the Scheduled Packages tool from the main menu under Tools → Scheduled Packages, select the scheduled task you wish to edit and select Edit Scheduled Task as shown in the image below.
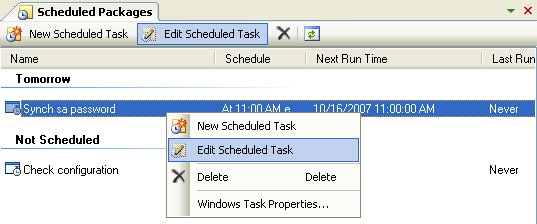
After selecting the Edit Scheduled Task you will be prompted with the Scheduled Task Wizard. The wizard and settings are explained in detail in the section titled Scheduled Task Wizard.
Deleting Scheduled Packages
Users can delete scheduled packages and tasks using the Scheduled Packages tool in Combine. To invoke the tool, select Tools → Scheduled Packages in the main menu, which will bring up a list of all scheduled packages. In order to delete scheduled packages, select the entries you wish to remove and then right-click and select the Delete option from the menu as shown in the image below.
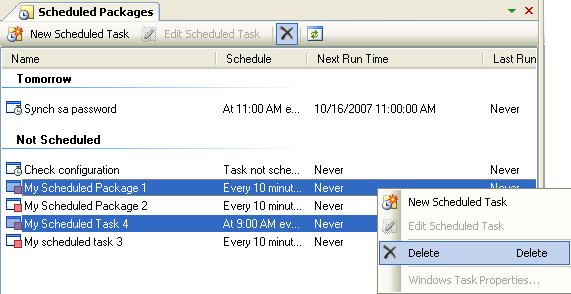
When a scheduled package is deleted, the .bat file that is called by the Windows Scheduled Task as well as the Windows Scheduled Task itself are removed from the file system.
Viewing Scheduled Packages
In order to view all scheduled packages in Combine, start the Scheduled Packages tool by selecting Tools → Scheduled Packages from the main menu. The tool will then display all the Scheduled Tasks that were created in Combine to execute code packages. Using this tool you can also create new scheduled tasks, edit existing scheduled tasks, as well as delete scheduled packages.
Viewing the Windows Scheduled Task Settings for a Scheduled Package
Every scheduled package consists of a Windows Scheduled Task and a batch file (i.e., a file with the extension .bat). The batch file is called from the Scheduled Task according to the schedule specified in the Windows Scheduled Task settings. In turn, the batch file calls the CpaExec command line utility that executes the one or more code packages as scheduled by the user.
Users can view the properties and settings of the Windows Scheduled Task associated with the scheduled package by invoking the Scheduled Packages tool. To do so, select Tools → Scheduled Packages from the main menu to view all scheduled packages. Then, select the desired scheduled package, right-click it, and select Windows Task Properties from the right-click menu. If you make changes to the Windows Scheduled Task, Combine will pick up those changes and display the updated settings in the Scheduled Packages window.

Enable and Disable Scheduled Packages and Tasks
You can enable or disable the execution of scheduled packages by enabling or disabling the Windows Scheduled Task associated with the scheduled package. When using the Scheduled Packages tool, it is important to note that enabled tasks are ones that appear with the icon  . Tasks that are disabled will appear with the icon
  .
.
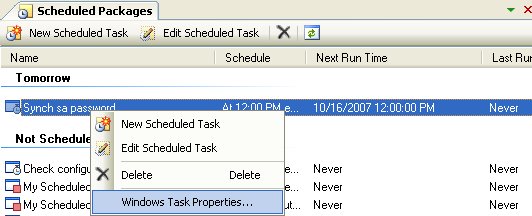
In order to enable or disable scheduled packages, first start the Scheduled Packages tool by selecting Tools → Scheduled Packages from the main menu. Then, in the Scheduled Packages window, select the package or task you wish to enable or disable, right-click the scheduled package node and choose Windows Task Properties from the menu as shown in the image below.
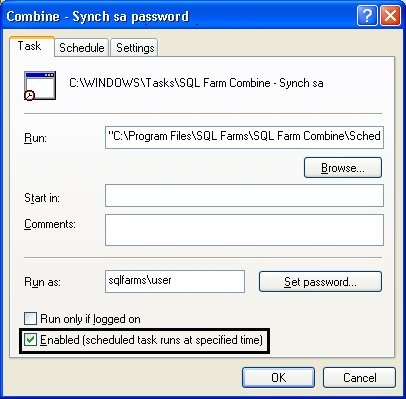
Next, the Windows Scheduled Task dialog appears and shows the settings and properties of the selected task. In this window you can enable or disable the task by checking or unchecking the Enabled checkbox, respectively. The checkbox is shown in the figure below. After you check or uncheck the checkbox, press the OK button in the Windows Scheduled Task dialog to apply the settings.
Scheduled Task Wizard
The Scheduled Task Wizard allows you to create new scheduled packages or edit existing scheduled packages and tasks. Using the wizard, you can configure the local machine running Combine™ to execute one or more code packages according to a user-defined schedule. The schedule is stored in a Windows Scheduled Task, which calls a batch file that executes the CpaExec command line utility to deploy the scheduled code package(s). The wizard and the different package scheduling options are explained in detail below.
The first window in the wizard contains the name of the Windows Scheduled Task, as well as the user name and credentials that will be used when executing the scheduled package. The following fields are available in this window:
Task Name: Name of the Windows Scheduled Task. After creating scheduled packages, note that Combine™ will automatically insert the string “JNetDirect Combine” before the name of the task. When editing an existing scheduled package then the Task Name field cannot be edited.
User name and password: The scheduled packages will be deployed and executed using the Windows credentials of the user entered in these boxes.
Run only if logged: This checkbox indicates that the scheduled package will only be executed if the user is logged on to the computer at the scheduled time of execution.

Next, the Add Packages dialog (see image below) shows the list of code packages that will be executed. Here you can specify and view the one or more code packages that you wish to schedule. The code packages specified in this dialog will be executed in the order they appear in this window.
Adding a new package to the Scheduled Task
To add a new package to the Scheduled Task, click the Add Package button and follow the instructions below.

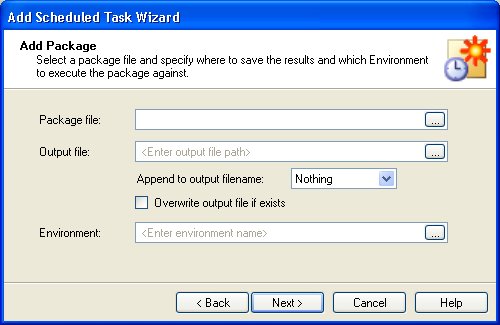
After clicking the Add Package button, the following wizard window appears and allows you to select the following entries:
Package File: The package file to be executed.
Output file: The name of the .cre output package file that contains the deployment results. Using the option Append to Output Filename you can instruct Combine to automatically append the execution date, time or datetime string to the name of the output file. In addition, you can instruct Combine to overwrite an existing output file by checking the Overwrite Output File if Exists option.
Environment: The Environment from the Container Manager against which the package will be executed.
After clicking the Next button you will be prompted to enter the execution options. The following options are available (additional information can be found in the help files for the CpaExec command line utility):
Verbose Logging: This option enables detailed logging outputs during package execution. The Verbose Logging option corresponds to the /v flag in CpaExec.
Include Actual Execution Plan: Check this option to return the execution plan for all package scripts from all databases involved in the deployment. This option corresponds to the /a flag in CpaExec.
Test Database Connectivity Before Package Execution: When this option is checked then CpaExec will attempt to connect to all databases that are involved in the deployment before executing any portions of the package code. This option is equivalent to the /t flag in CpaExec.
Cancel Execution if Any Databases Could Not Be Connected: When the Test Database Connectivity feature is checked – this option instructs Combine what do to in case one or more databases have not passed the connectivity test. If this option is checked and some databases did not pass the connectivity test then Combine will not deploy any portion of the code package on any databases. If this option is not checked, then Combine will deploy the code package only on the databases that passed the connectivity test. In CpaExec this option is denoted by the /d flag.
Important note: It is strongly recommended to check the Test Database Connectivity and Cancel Execution if Any Databases Could Not Be Connected.
Recovery Type: This option instructs Combine how to continue with package deployment in case one or more scripts encounter errors during execution. When this option is set to Continue on Non-Errored DBs Only then after an error occurs, Combine will continue to deploy all package scripts after the error occurs on all databases except for those databases that encountered execution errors. When the option is set to Stop All, then after a script that encountered execution errors has completed running on all the databases in the Container associated with the script, Combine will abort the deployment and will not execute the remaining package scripts. Last, the Continue All instructs Combine to continue and execute all the remaining package scripts on all the target databases associated with each script even after a script execution error occurs. This option is available in CpaExec as the /r flag.
Ignore Empty Scripts: If some of the scripts in the package do not contain any code, then by default Combine will not begin and will abort the package deployment. If you wish Combine to ignore the fact that one or more of the package scripts are empty then you can check this checkbox. When checked, Combine will continue to deploy the code package in spite of the fact that some scripts are empty. This option corresponds to the /ie flag in CpaExec.
Ignore Missing Scripts: When working with unwrapped (i.e., multi-file) code packages, then it is possible that some scripts are missing from the file system. By default, if some scripts are missing then Combine will not begin and will abort the package deployment. However, if you wish Combine to ignore the fact that one or more scripts are missing then you can check this checkbox. When checked, Combine will continue to deploy the code package in spite of the fact that some scripts are missing. This option corresponds to the /if flag in CpaExec.
Cancel Execution of Next Package(s) if Any Errors Occur for This Package: If you are scheduling multiple packages then this option determines whether Combine will continue to deploy the next package in the order, in case any errors occur during the execution of the current package. The order of packages is shown in the window in Fig. 102.30. Note that any and all errors are taken into consideration, including script execution error, inability to save the output file, inability to connect to target databases when the connectivity test is enabled, and so on.

If the scheduled code package contains Environment Variables or if the package references Dynamic Containers that contains Environment Variables, then you will be prompted to enter the values for all Environment Variables in the scheduling wizard. The following figure illustrated the case where Environment Variables are found both in the code package and in the Dynamic Container Query.
Note: If one Environment Variable is used in the code package and in the Query of a Dynamic Container that is referenced by the package, the Environment Variable will be replaced in run-time with the same value for both. In other words, the value you enter for the Environment Variable will be used to resolve the databases in the Dynamic Container as well as in the package code.

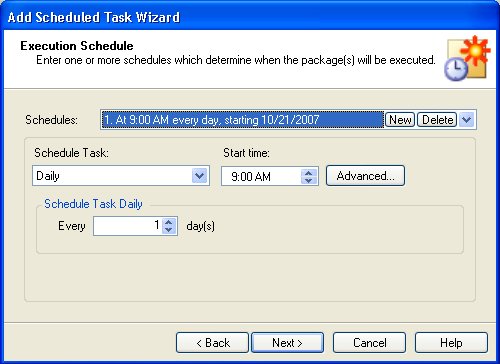
After adding a package to the Scheduled Task, you can continue to add additional packages. Packages will be deployed in the order they appear in the window in Fig. 102.30. Once you are done adding packages to the Scheduled Task you will be prompted to configure the execution schedule, as shown in the image below.
The features in the Execution Schedule dialog (see image below) are identical to the scheduling features in Windows Scheduled Tasks under Windows Control Panel. For additional information regarding scheduling, please refer to Scheduled Tasks in Windows Help and Support.