Editor Window Features and Functionality
Main Editor Window
The main editor is used to compose SQL code, scripts, and queries, and to allow users to run and deploy code either against a single database or against all target databases in a Container. Objects and items in the Object Browser can also be automatically scripted into the Editor window. Text features and editing functions in the editor include (in alphabetical order):
Connecting to a database to write SQL code
Connecting to another database using the same SQL editor window
Disconnecting the SQL editor window database connection
Splitting the screen to work on a single script
Tabbed vs. non-tabbed document organization
Bookmarking
Bookmarks can be used throughout your SQL script to mark lines of code of interest, and to allow you to jump to a bookmarked line. Bookmark related features include the Next Bookmark and Previous Bookmark commands that will take you to the next and previous marked lines, respectively, as explained below.
 Create and clear a bookmark – select the line you wish to mark and then enter the bookmark icon to mark it. You can also mark the line by pressing CTRL+F2. If the line was previously marked then pressing this icon will unmark it.
![]() Clear all bookmarks – press this icon to clear all bookmarks in the code.
Clear all bookmarks – press this icon to clear all bookmarks in the code.
 Jump to next bookmark – if your code contains multiple bookmarks then you can click this icon to jump to the next marked line. If you are currently working on the last marked line in the code then this button will take you to the first bookmark in the script.
 Jump to previous bookmark – clicking this button will take you to the last bookmarked line. If you are working on the line that has the first bookmark then pressing this icon will take you to the last marked line in the code.
Commenting Code Lines
The editor allows you to comment multiple lines of code. First select and highlight the text in the lines you wish to comment. Then press the  icon to append two dash characters to each comment line. Similarly, the editor also allows you to uncomment multiple lines together.
Connecting to a Database to Write SQL Code
You can press the Connect icon  to login and connect to a database or select File > New > New Connection from the main menu. When this button is clicked you will be prompted with the connection dialog. The servers listed in the connection dialog are the Combine servers in the Object Browser. Once you complete the dialog, a new script editor window will appear. This script window is now connected to the database and you can run scripts, queries, or any SQL and T-SQL code and execute it against the database. The connection to the database is persistent. In other words, if you wish to disconnect from the database you either have to press the disconnect icon
  , or simply close the script window. You can also change the connection to log to another database while maintaining the same window. To do so you must click the Change Connection icon
  . You will then be prompted to enter the authentication type and credentials for the new database and server.
Connecting to Another Database Using the Same SQL Editor Window
When you are writing a script in the editor window, you may or may not be connected to a database, depending on how you started the script window. If you wish to connect to a database you may press the Connect icon . However, if you are already connected to a database you can keep your current window and connect to a different database by pressing the Change Connection icon .
Disconnecting the SQL Editor Window Database Connection
When you write a SQL script and your script editor window is connected to a database, you can press the disconnect icon to close the connection. Pressing this button will not close the script window, and you can continue to work on your script and later connect to the database again by pressing the Connect icon .
Find and Replace
You can look for string and string patterns within your code by using the Find and Replace features of Combine. On top of standard features, Combine allows you to search for strings using regular expressions. The Find and Replace dialog is self-explanatory. You can start the dialog by pressing the  icon or using the CTRL+F shortcut.
Indentation
Indentation can be either increased or decreased for multiple lines. Start by selecting the text in one or more lines of code. If you wish to increase the indentation of the selected line then press the  icon. To decrease the indentation of the lines selected press
  .
.
Line Modification Tracking
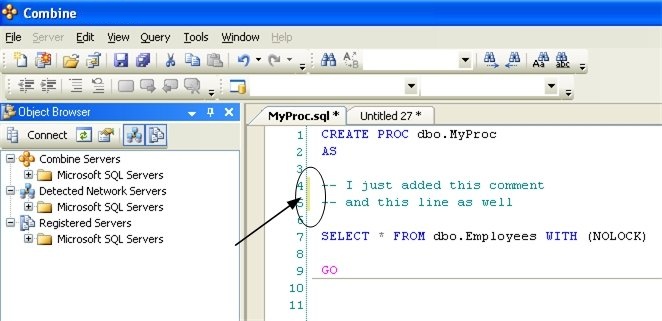
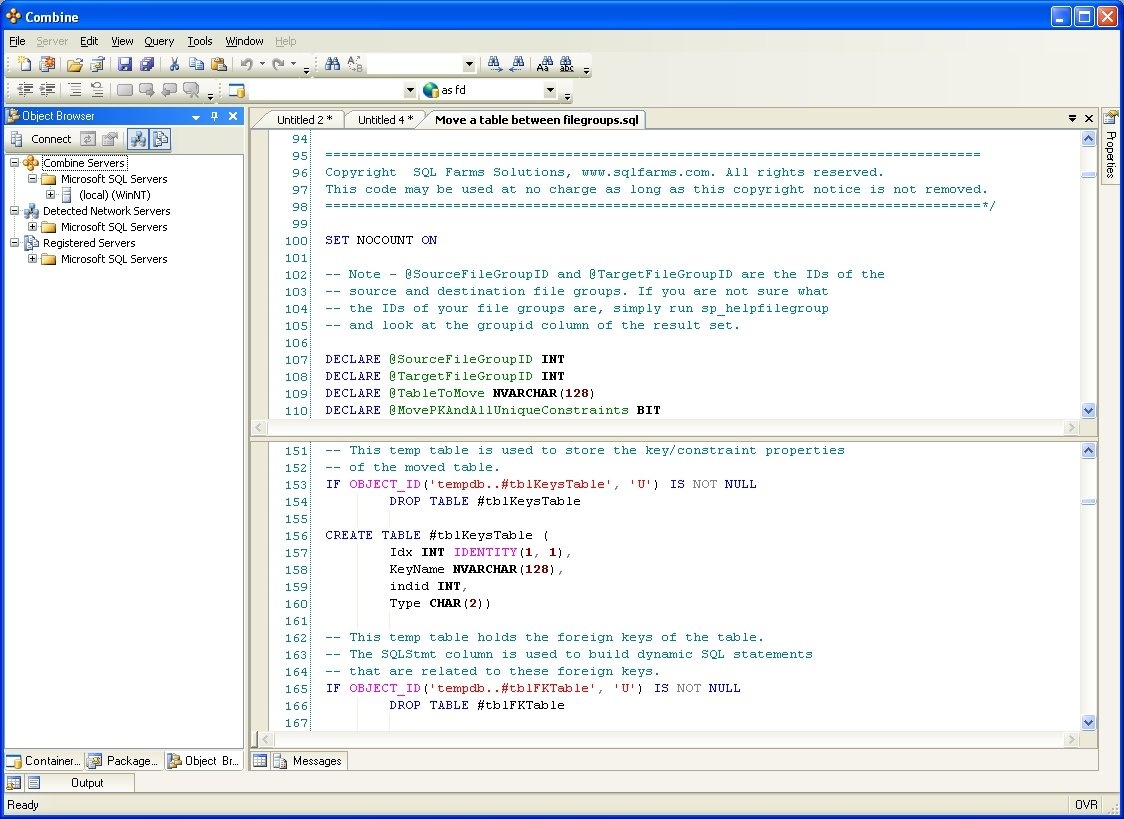
Changes to code lines are tracked by Combine and displayed in the editor by default. Line changes are marked with yellow vertical stripe next to the altered lines. For example, the lines marked in yellow in the figure below are ones that were updated after the file was saved last. You can turn this feature on and off as you please through the options dialog on the main menu. To do so go to Tools > Options > Editor > Mark Line Modifications.
Line Numbering
Line numbers are displayed in the editor by default. Line numbers can be turned on and off by changing the editor settings in Tools > Options > Editor > Show Line Numbers.
Line Separators
Combine can be configured to present a line separator under every GO statement in your SQL and T-SQL code. To turn this option on or off go to Tools > Options > Editor Settings and set the value of Show Content Dividers option as desired.

Make Lowercase
To make text entries use lowercase letters, select the text entries and the press CTRL+U. You can also select this option from the main menu under Edit > Advanced > Make Lowercase.
Make Uppercase
You can capitalize text entries in your code by selecting the desired text and pressing CTRL+SHIFT+U. The same option is also available in the main menu under Edit > Advanced > Make Uppercase.
Outlining
Outlining allows you to build paragraphs inside your SQL code. Each paragraph starts and ends with an outline. You can hide paragraphs and all SQL statements within each paragraph by collapsing the outlines. You can also view hidden paragraphs by expanding the outlines. Paragraphs can also be nested, as demonstrated in the image below.
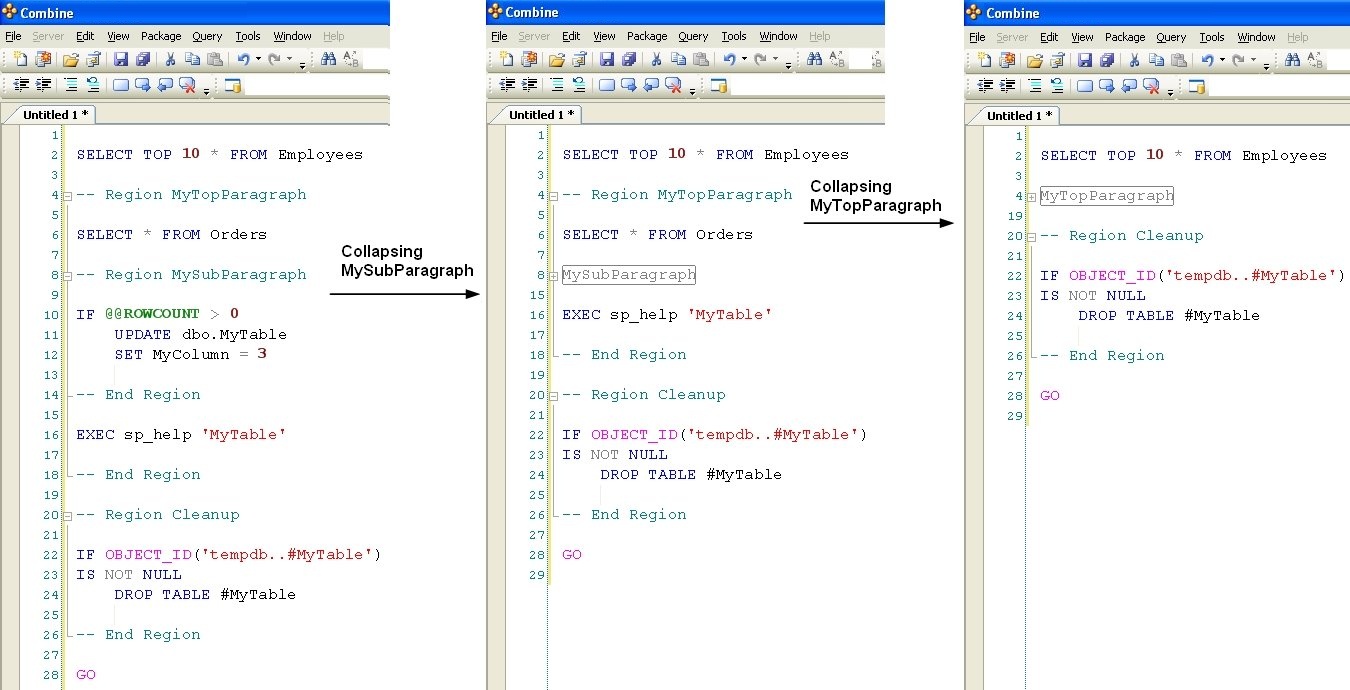
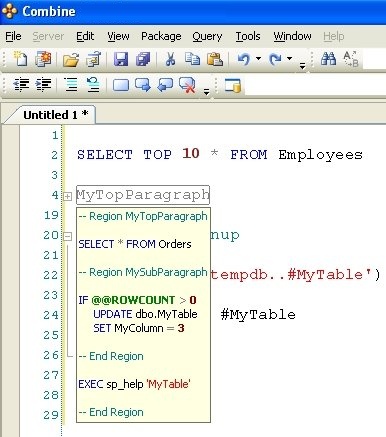
Note that once an outlined paragraph is collapsed, you can still view the content of the paragraph by using the mouse and hovering over the collapsed region.
To start an outlined paragraph use the following syntax:
-- Region ParagraphName
To end the outlined paragraph, use:
-- End Region
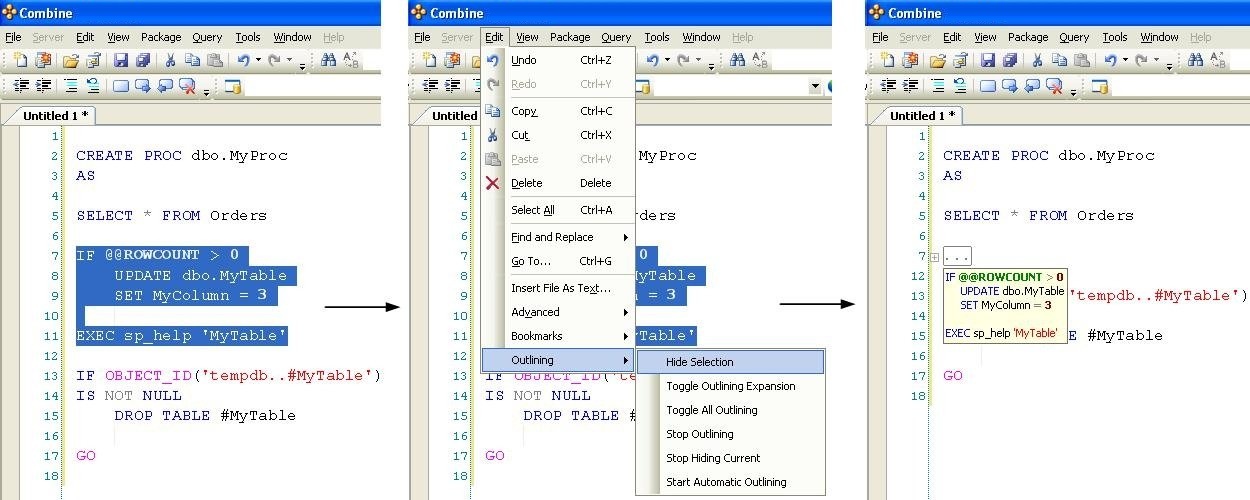
If outlined paragraphs are defined inside stored procedures, functions, or triggers, the ” — Region ParagraphName” and “— End Region” comment lines will be part of the body of the store procedure. Others using Combine can script the stored procedure from the server and will be able to use the built-in outlined paragraphs. If you do not wish to include the outlining comment lines inside your stored procedures, an additional outlining-equivalent technique is available as well. In order to use this alternative technique, first stop the automatic outlining by selecting Edit > Outlining > Stop Outlining from the main menu, and observe that the entries in the Edit > Outlining option menu have changed. Next, select one or more lines of code that you wish to turn into a collapsible paragraph in the editor and choose Edit > Outlining > Hide Selection from the main menu. Using this outlining method does not add any comment lines to the body of stored procedures, functions, or any other SQL code script.
The editor provides a rich set of features that let you collapse on or more paragraphs, expand paragraphs, and enable or disable the outlining feature. Please refer to the Edit > Outlining option in the main menu to view all outlining related features.
Splitting the Screen
Splitting the screen allows you to view different sections of the same code script in two separate windows. You can make changes to the script on either one of the split screens and changes will be automatically updated in the script body as well as in all other screens. Splitting options are available under the Window main menu item, as well as on the right-click menu of the script window tab. Three types of splitting are support:
Horizontal Splitting. This feature is useful to view separate sections of a single long script. For example, the following figure demonstrates a single script with hundreds of lines of code when the screen is split. Changes can then be made simultaneously on with screen and will be updated in both.
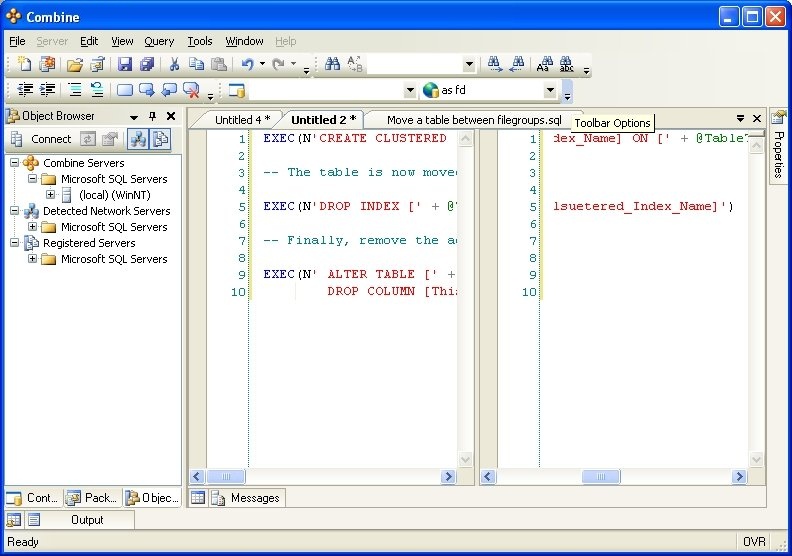
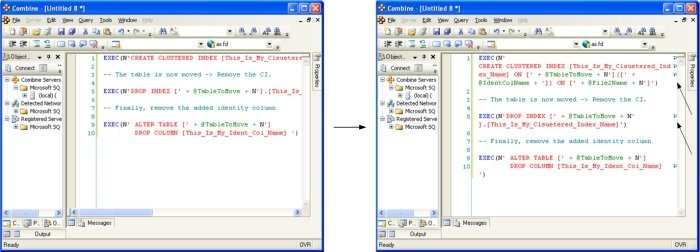
Vertical splitting. Vertical splitting is useful in rare cases where long lines of code are used. For example, you can then split the screen and make changes to two sections of a single long line. Splitting the screen vertically for a long line of code is demonstrated in the following figure.
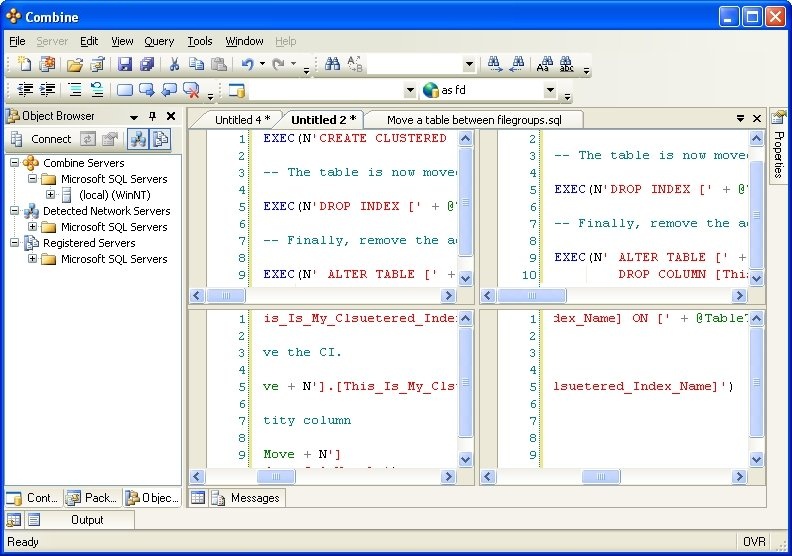
Four Way Split. The editor window can be split a single script screen into four different sections. This allows you to work on different portions of the code in four different working sections. Splitting the screen into four sections is demonstrated in the figure below.
Tabbed Documents
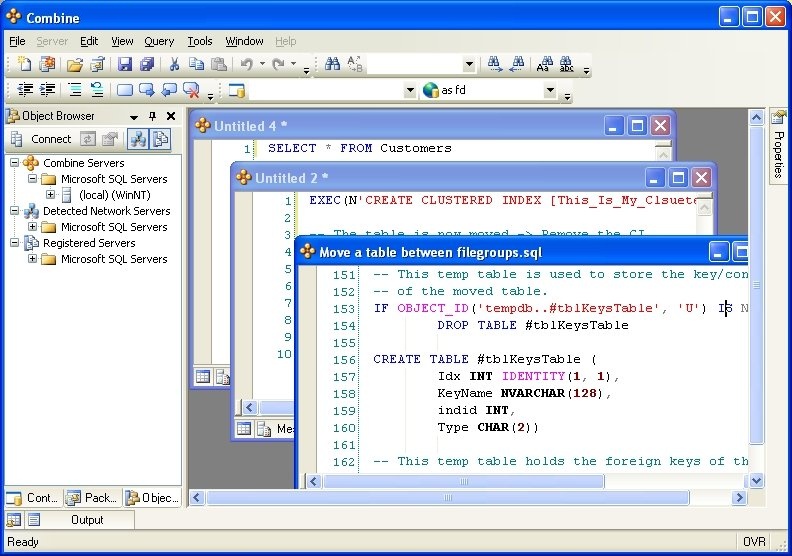
You can set the editor to work with tabbed documents where each script window can be accessed by pressing the window tab. You can also disable this option which will allow you to access each script and switch between windows by pressing the title bar as demonstrated in the following figure. Working with the editor when the window tabbing options is disabled.
Uncommenting Code Lines
Select the text of the one or more lines you wish to uncomment and then press the  icon to remove the first set of comment characters (first two dashes) from each line. To undo your changes you can either press CTRL+Z or the undo icon, or comment those line again.
Word Wrapping and Line Wrapping
Long script lines can be wrapped to span multiple code lines in the editor window. Line wrapping has no effect on the content of the script, and is only provided to ease the viewing of long lines. Combine can be configured to wrap each long line at the beginning of new word, a new character, or not at all. To turn line wrapping on and off or configure the word wrapping feature please go to Tools > Options > Editor Settings and update the WordWrap option.
Source Code Control When Working With Individual Files in the Editor
Source code control (SCC) features are available when working on package scripts as explained in the section titled With Source Code Control in Code Packages, or when working with individual files that are not related to packages. In order to work with individual files under SCC, you must first make sure that a parent folder in the local file system is mapped to another parent folder in the SCC provider. This will allow you to check in and check out files from anywhere under those parent folders.
To map a folder in the local file system to a folder in the SCC server, go to Tools > Options, and enter the folders information in the Folder Mapping dialog. Then, you should be able to use the source control buttons and features to check in all local files that are saved anywhere under your local folder. Similarly, you can now check out files from anywhere under the SCC parent folder.
Note: The SCC status of each script in the SQL editor window is presented at the bottom of each window.
For your reference, below are the icons used in Combine to indicate the source control status of each script:
 Item added to package and not yet available in source control
 Package item is checked out to me
 Package item is checked out to another user
 Package item is checked in
 Package item is missing from the source control server (after item is deleted from SCS)
The exclamation mark is added to any of the above icons when the package item is missing from the local file system, for example:
 Item added to package but then deleted from local file system
 Package item is checked in but is not found on my local file system