Executing Scripts and Queries on One or More Databases
Executing Scripts and Queries on a Single Database
The main editor window can be used to either execute scripts and queries on a single database, or deploy scripts and queries against all or some databases defined in a Container in parallel and get aggregated results from all those databases. In order to execute code on a single database, a new script can be started in the main editor window by selecting File > New > New Connection from the main menu, or alternatively by press the Connect icon in the toolbar  . You can also open an existing SQL file by selecting File > Open > File from the main menu. When you press the Connect icon, a database connection dialog will appear and will ask you to specify the server name, credentials, and database name (see the section titled Connecting to a database to write SQL code for more information). Combine will then connect to the database you selected until the script window is closed or until you press the Disconnect icon
  . Note that you can also select File > New > File from the main menu. This operation will create a new editor window that will not be connected to a database. You can connect later at any time by pressing the Connect icon and provide the needed connection details.
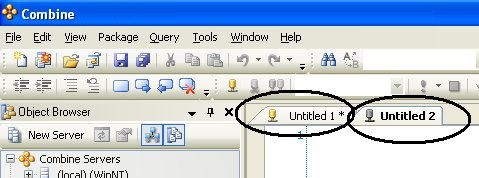
You can tell that the editor window is connected to a database by examining the tab of the script window: If you are connected then the database icon in the tab is displayed in yellow otherwise it will be grey. The image below illustrates the main editor when one window is connected to a database and another window is not.
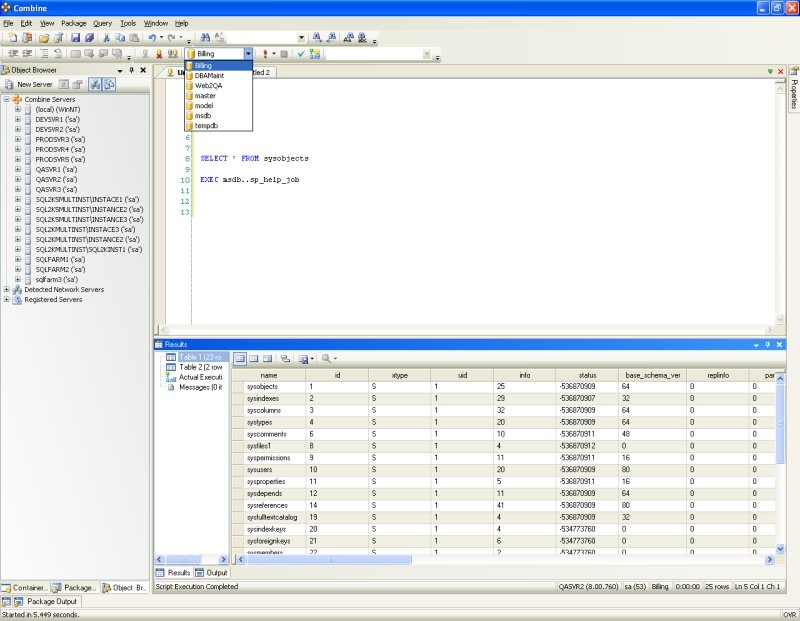
Once you write SQL code in the connected window, you can instruct Combine to return the estimated execution plan for your SQL statements by either pressing the CTRL+L shortcut or selecting Query > Display Estimated Execution Plan from the main menu. In addition, you can return the actual execution plan by selecting that option from the same menu, or by pressing the CTRL+M shortcut. Furthermore, you can change the connection to another database on the same server by using the database dropdown in the main toolbar. To demonstrate these features, below is an example of executing code against a single database. Notice that the actual execution plan is also returned in this example and is available next to the results grid. If any messages and SQL errors are returned from the server then these messages will be displayed in the messages window (see the messages icon on the left hand side of the results grid).
Executing Scripts and Queries on Multiple Databases in Parallel
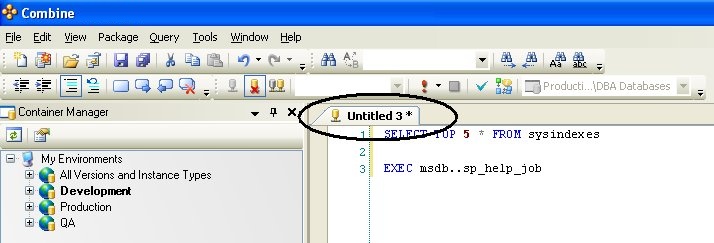
The main editor window can be used to either execute scripts and queries on a single database, or deploy scripts and queries against all or some databases defined in a Container in parallel and get aggregated results from all those databases. To start a new script and execute it against multiple databases, a new script can be started in the main editor window by selecting File > New > File from the main menu. If you already have a script window open, in order to run the script against multiple databases you must first ensure that the script window is not already connected to a single database. You can tell that the window is connected to a database by examining the window tab: If the database icon in the tab is yellow as in the following image then the window is connected and you must first disconnect the connection by pressing the Disconnect icon . The window will then be disconnected and the database icon will turn grey. Grey database icon indicates that the script window is not connected to a database.
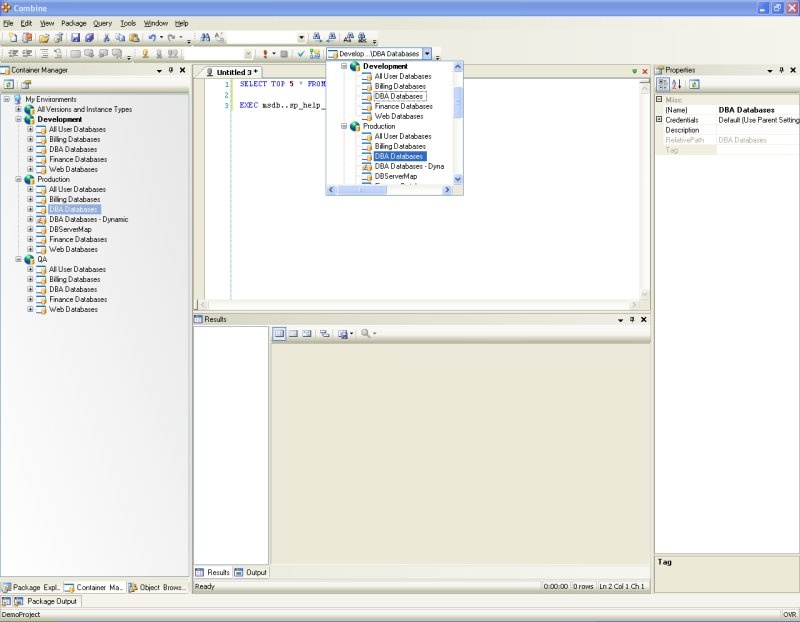
To run code against the databases defined in a Container and return unified results in response to all commands and queries, first make sure to load or type the SQL commands you wish to run in the SQL editor window. Next, refer to the toolbar and use the Container drop down to select the Container against which the code will be run, as demonstrated in the following image. If this drop down is disabled then you must first disconnect the script window from its current database connection. Keep in mind that once you instruct Combine to execute the code, Combine will connect and deploy the code on multiple databases and servers simultaneously. If you wish to limit the number of connections that will be initiated from the Combine machine against all servers or limit the total number of connection that will be used for each target server (applicable when multiple target databases reside on the same server), you can do so by using the options menu. Please refer to the section titled Limiting the Number of Connections for more information.
At this point you can either choose to run the code or only retrieve estimated execution plans from target databases in the Container without executing the code. To return the estimated execution plans, select Query > Display Estimated Execution Plan from the main menu, or hit the CTRL+L shortcut instead. On the other hand if you wish to execute the code against all Container databases then press the Execute icon  (or the F5 shortcut). If you click the arrow in the Execute icon then you can also choose to return the actual execution plan from all databases. You can also direct Combine to return the actual execution plan by pressing the CTRL+M shortcut or selecting Query > Include Actual Execution Plan from the main menu before pressing the Execute icon. After you instruct Combine to start executing the code (or once you request an estimated execution plan) Combine performs a set of tests and verifications to ensure that code will be deployed correctly on all Container databases. The steps taken by Combine are now explained in detail below.
Check that the authentication type and credentials are available for all databases:
Recall that Containers can be configured to use several authentication types, namely SQL authentication, Windows authentication or Prompt (see the Static Container Wizard and Dynamic Container Wizard sections for more information).
Also you are able to modify all SQL server connection options using Advanced button.
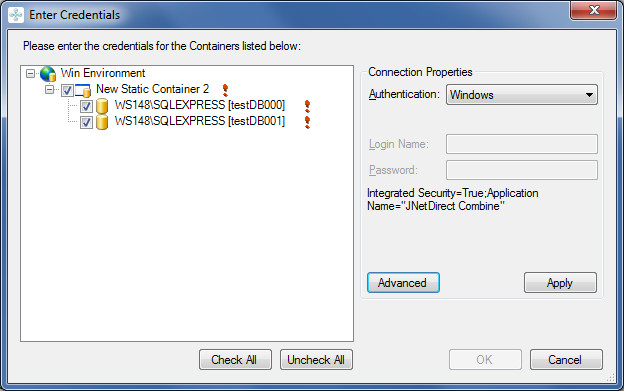
If any Containers are defined to use the Prompt authentication type then you will be prompted to enter the authentication type to use to connect to all Container databases. If you choose SQL authentication type you will also be asked to provide a login name and password. These credentials will not be stored by Combine and are only used in run-time to connect and deploy the code on all databases. On the other hand, if the Container is configured in the Container Manager to use SQL authentication or Windows authentication then Combine will not prompt you for the authentication type and credentials and will continue to perform the next test. The image below illustrated the credentials window displayed by Combine when the Prompt authentication type is used. After you enter the credentials in this dialog you must hit the Apply button and then OK to continue.
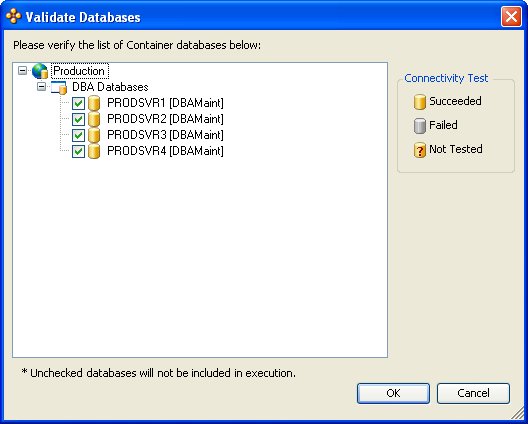
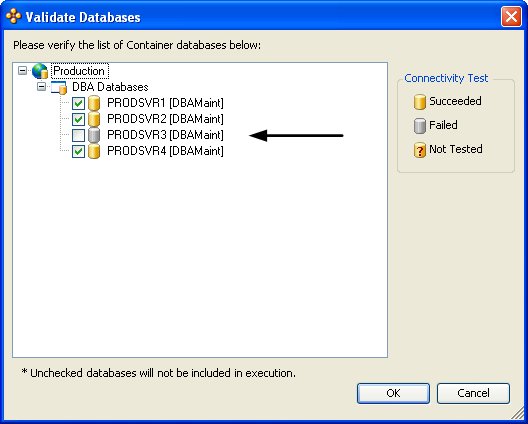
Resolve all target databases, verify connection and authentication to all target databases and allow the user to deselect databases: At this point Combine has the authentication type and all connection attributes needed to resolve the target databases on which code will be deployed. First, Combine resolves all target databases: For Static Containers, Combine will retrieve the database and server names from the Container Manager. For Dynamic Containers, Combine will run the Dynamic Container query dialog the Reference Static Container to retrieve the database and server names for all target databases (please refer to Static vs. Dynamic Containers to learn more about Container types). After all database and server names are resolved, Combine will attempt to connect to all databases to verify that they indeed exist and that the authentication type provided for the Container in the Container Manager (or in the dialog in the last image) can be used successfully. The results of the connectivity test are then presented in another dialog, which also allows you to deselect Container databases. Code will not be deployed on deselected databases and will only be executed against all selected databases. Also note that databases that cannot be connected successfully (due to timeouts or wrong credentials provided in Combine) will be marked in grey and deselected automatically. You can reselect these databases to try to deploy code against them however this is highly not recommended. To demonstrate the connectivity test dialog, below are two examples of the dialog when the connectivity to all Container databases is successfully verified, and when one database cannot be contacted.
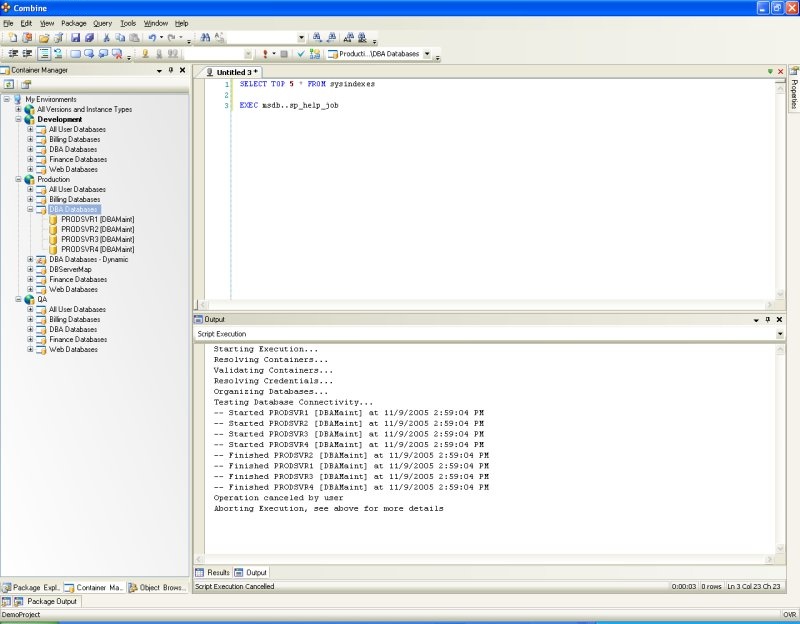
Please be aware that this dialog is the last one displayed prior to code execution. If for any reason you wish to abort the code deployment then press cancel in this dialog. If you press OK then code will be executed against all databases marked in the last dialog. The image below demonstrated the case where Cancel is pressed after the connectivity test. Notice that the connectivity results are displayed in the output window.
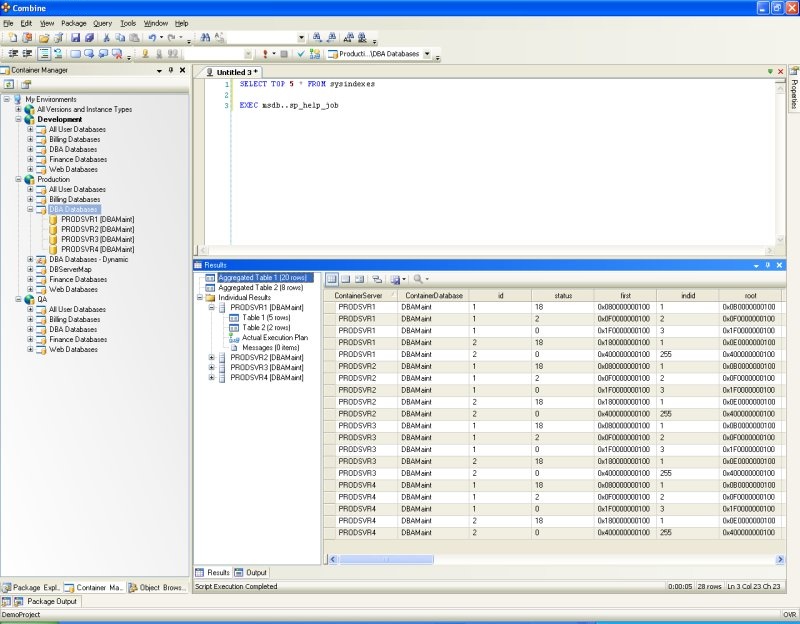
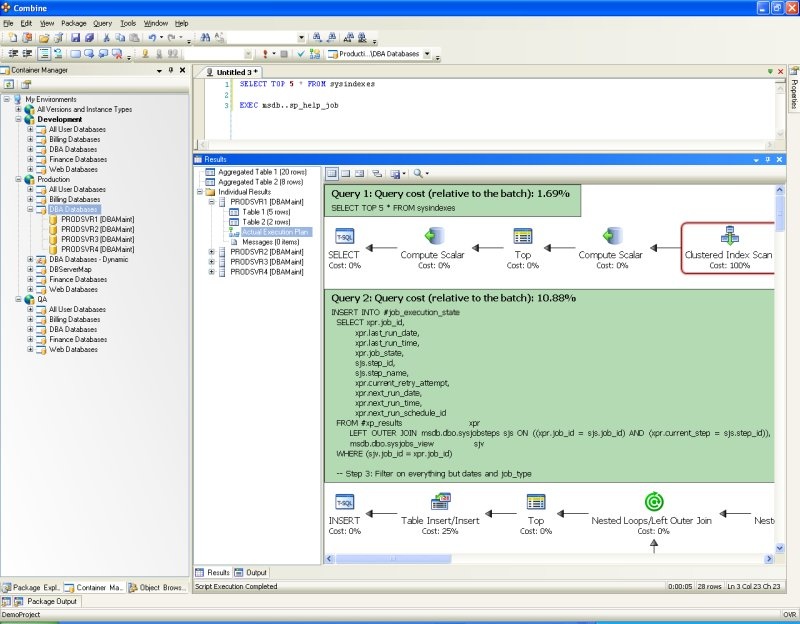
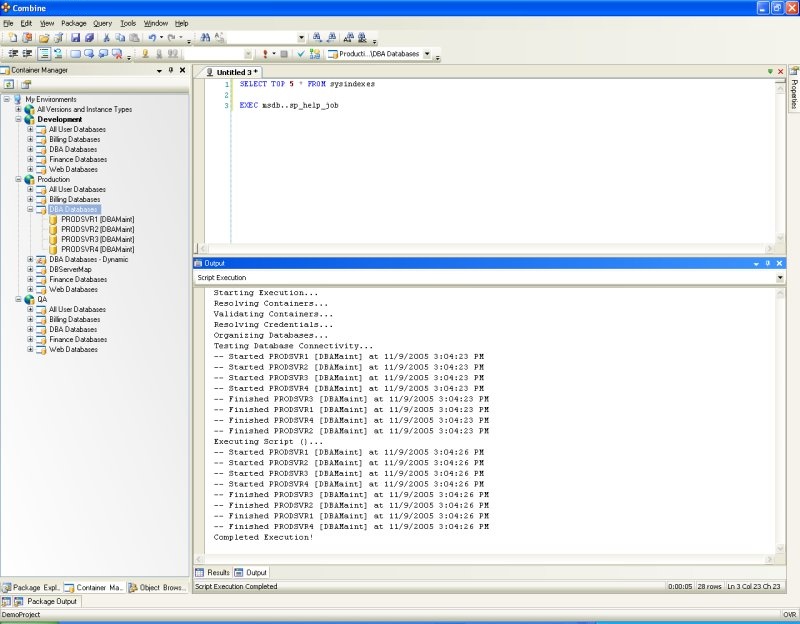
Deploy code on all selected databases and return execution plans and results: At this point, Combine will deploy the code against all target databases marked in the last dialog. Result sets with matching schema returned from the target databases will be aggregated and displayed in the Results window, where results for each individual database are available as well. If you also requested to return the actual execution plans then the execution plans will be available for each individual target database. If any execution errors occur due to incorrect SQL code or if any messages (such as row counts) are returned from the server, these messages and errors can be found in both the aggregated messages window and the messages window for each database. The output window can also be viewed during code execution to monitor the execution status. Below is an example of the aggregated results and individual results for each database when Combine was instructed to return the actual execution plans.
Limiting the Number of Connections for Parallel Deployment
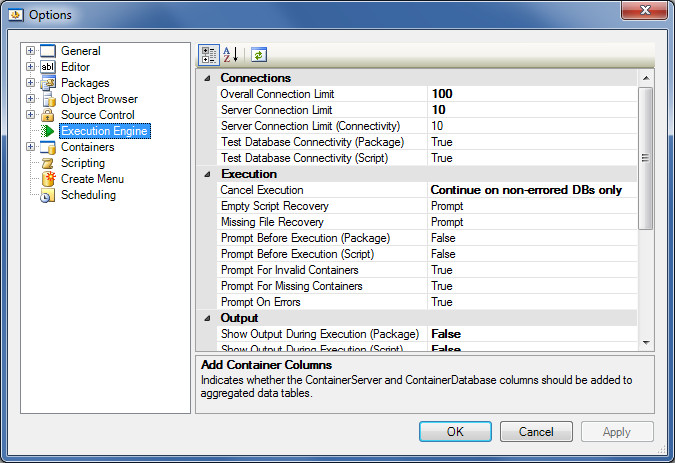
When deploying code on target databases in a Container or when executing code packages, Combine connects and deploys code on all target databases in parallel. The number of connections initiated from the Combine machine can therefore be potentially high. In addition, if multiple target databases reside on the same server then Combine will connect to those databases simultaneously. To help you control the number of connections and code execution, you can set two thresholds to limit the maximum number of parallel connections in the options dialog. This dialog can be activated by selecting Tools > Options from the main menu, and the connection limit options are displayed in the Execution Engine section.
1. Overall Connection Limit:
- The connection limit reflects the maximum number of parallel connections that Combine will handle over all databases and servers. The default value for this limit is set to 25.
2. Server Connection Limit:
- This limit denotes the maximum number of connections that will be launched against a single server. This limit is only useful when multiple target databases reside on the same server. The default value of this limit is set to 2 to ensure that not more than 2 simultaneous connections are opened against any server during code or package execution.
Executing Code Packages
Please refer the section title Executing Code Packages in the Package Explorer for help.
Saving Deployment Results
After running a script, a query, or a code package, against either a single database or multiple databases, all results returned from the target databases and servers can be saved into a single proprietary file with the extension .cre (Combine results). This includes all messages, warnings, errors, result sets and grids, as well as execution plans.
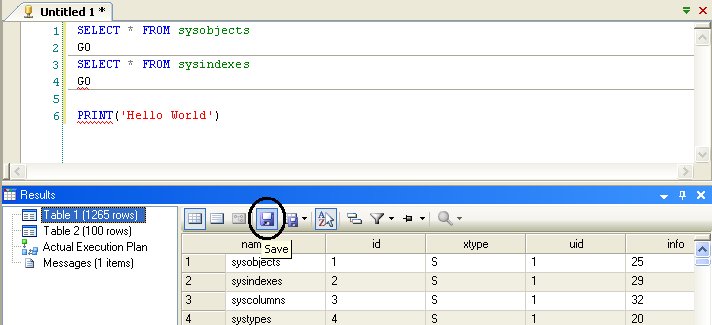
To save the deployment results, simply click the Save icon illustrated in the image below, to save all returned results in the .cre file. Later, you can double-click the .cre file, or go to File > Open > Open File in order to view the content of the saved results in Combine.
Showing or Suppressing Script Output During Execution
When scripts are executed then by default Combine will prompt the Output results in runtime. However, you can suppress the Output and hide it during execution. In order to configure Combine to suppress or show the Output, go to Tools > Options > Execution Engine > Output and set the value of the property Show Output During Execution (Script). Similarly, you can configure Combine to show or suppress the Package Output window during the execution of packages by setting the property Show Output During Execution (Package).
Command Line Execution
See Cpaexec.