Code Snippets
How to Use Code Snippets and Templates
Combine contains many built-in SQL and T-SQL code templates (also known as snippets). These snippets are provided in order to simplify the code-writing process of common tasks and procedures, such as table creation, database backups, addition of users and roles, and other popular actions. Furthermore, Combine allows users to customize the code snippets interface: create new code snippets, add new snippets to the interface, add snippet folders, as well as share snippets with other users.
To use a code snippet, find the desired snippet in the Code Snippets window, and then double-click it to open the snippet in the SQL editor window. The highlighted (selected) text represents a variable in the snippet. To replace the value of the variable, type the desired value and then press Tab to jump to the next variable. Once you hit Tab, the value of all instances of the variable in the script will be automatically replaced with the newly entered value. To complete your work in the code snippet, hit the Enter key to abort the automated snippet edit mode and to be directed to the end of the snippet script. In addition, you may hit the Esc key at any time to stop editing the snippet code.
Code snippets can be customized to fit your needs: Code snippets are stored as xml files and have the extension .snippet. When Combine is installed, default application snippets are installed as well and can be found under the Snippets folder (under the main application installation folder). These snippets can be customized in many ways, as now explained:
-
Creating new code snippets – by following the xml format of existing code snippets, users can create new custom code snippets.
-
Adding individual snippets to the user interface – after composing new custom snippets, these snippets can be places in existing snippet folders and then loaded into the user interface.
-
Adding new snippet folders – users can create new snippets, place them in custom folders, and then load the entire folder with all the snippets and templates into the user interface. Once loaded, Combine will remember the new settings and the new snippets will be part of the application until they are manually removed.
-
Sharing snippets with other users – users can share snippets by placing them under a shared network drive and folder, and then adding that folder as a snippets folder.
Creating Custom Code Snippets
A code snippet must be composed using the xml schema and format illustrated below (for additional examples please refer to the snippet files located in the Snippets folder, under the application installation folder). In order to create a new custom code snippet, the following steps must be followed: First, create a new file with the extension .snippet, enter the xml content with all custom entries, and save it. The name of the file will be displayed in the Combine user interface. Then, in order to make use of the snippet in Combine, you must load it into Combine.
To create a custom code snippet, the following xml entries should be considered:
1. Title – not used in Combine 1.0, but will be used in future versions. It is recommended that the Title field will be identical to the snippet file name.
2. Shortcut, Description, Author – not used in Combine 1.0, but will be used in future versions.
3. Snippet Type – must be Expansion, as in the example below.
4. Literal – each Literal represents a snippet variable. Once the code snippet is opened in Combine, users can automatically replace the value of the variable throughout the snippet script using built-in Combine features.
5. ID (under Literal) – the name of the snippet variable as it appears in the script. When composing the snippet script, the variables must appear in the format $VariableName$. In the example below, one variable name is Database_Name, and the string $Database_Name$ is used to instantiate it in the script.
6. ToolTip – not used in Combine 1.0. This feature will be used in future versions, and the content of the ToolTip will be displayed whenever the user hovers over the snippet variable with the mouse.
7. Code – the SQL and T-SQL content of the code snippet should be placed under the Code xml element, after the CDATA (the CDATA clause is used to include text that will not be parsed as xml and will appear in Combine as entered).
Note: If the xml schema or content you entered is incorrect, either Combine will not load the snippet to the user interface properly, or the snippet will be loaded but will not behave as expected. To test your xml format, simply load the snippet into Combine and verify that it is added and can be used correctly.
1 2 3 4 5 6 7 8 9 10 11 12 13 14 15 16 17 18 19 20 21 22 23 24 25 26 27 28 29 30 31 32 33 34 35 36 37 38 39 40 41 42 43 44 45 46 47 | |
Adding a New Code Snippet to the User Interface
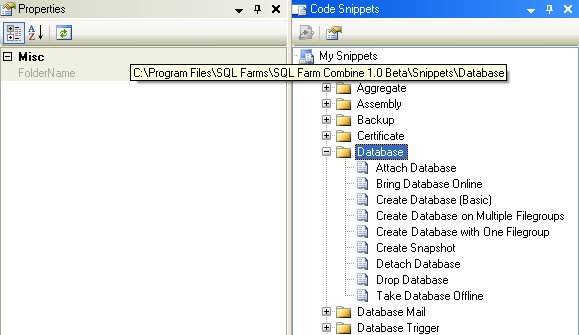
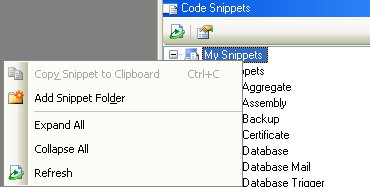
After you create a new code snippet, in order to use it, the new snippet file must be loaded into Combine. To do so, you can either load the individual file to the collection of Combine snippets (as described below), or add the folder that includes the new file as a new snippets folder. To add the new individual file, find an existing Combine snippets folder where the new file will be placed: Locate and select the folder in the Code Snippets window, and then get the physical path of the folder from the Properties window, as illustrated in the first figure below. Then, copy the new file into that physical path, select the main “My Snippets” node in the Code Snippets window, right-click to bring up the context menu, and select the Refresh option (see image below). The new snippet file will now be loaded into the application.
Adding a New Code Snippets Folder
Adding a new code snippets folder allows you to upload a folder, all its subfolders, and all code snippet files in them to the user interface. These folders can reside on the local machine, or on shared network drives. When a folder is added, Combine will automatically identify the .snippet files and their path in the added folder, and will display them in the Code Snippets window according to the folder and subfolder(s) hierarchy.
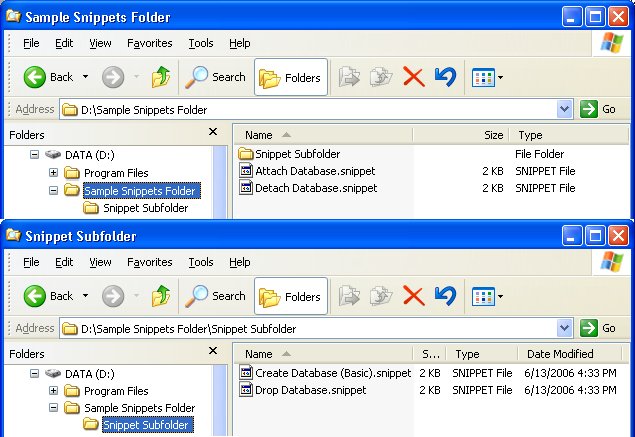
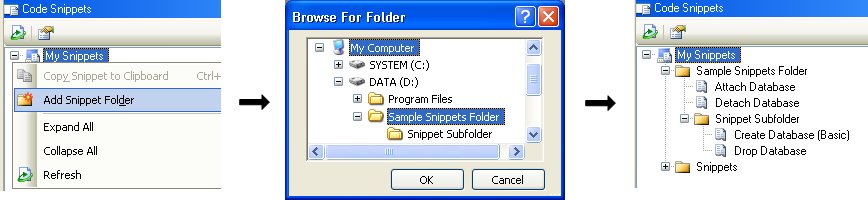
To demonstrate the addition of a new folder, please refer to the example below: The folder named “Sample Snippets Folder” contains two code snippets and a subfolder named “Snippet Subfolder” that also has two snippet files. To add the folder “Sample Snippets Folder” (and the subfolder and all code snippets), go to the Code Snippets window, right-click the “My Snippets” node in the snippets tree, and select Add Snippet Folder. Then, in the dialog titled Browse for Folder, select “Sample Snippets Folder” and press OK. The folder, subfolder, and all code snippets will be loaded to the Code Snippets window, as illustrated in the figure below.
Note: The name of root folders in the Code Snippets tree must be unique. It is therefore not allowed to add two folders with the same name.
Removing (Un-mapping) a Code Snippets Folder
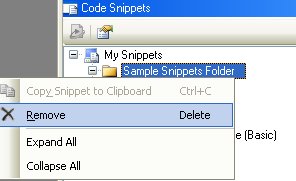
Root folders (and only root folders) can be removed from the Code Snippets window. To remove a snippets folder, right-click the folder you wish to remove and then select the Remove option from the menu, as illustrated in the image below. Please note that once a folder is removed from the Code Snippets window, the folder is not deleted from the file system, yet it is simply remove from the Combine user-interface.
Sharing Code Snippets with Other Users
Code snippets can be easily shared with other users. To do so, please follow the steps outlined below:
1. Create your custom code snippets.
2. Create a shared network drive and create a snippets folder under that drive.
3. Place your code snippets under the folder in a shared network drive.
4. Instruct all Combine users that have permissions to access the shared network drive to map this network drive to their local file system.
5. Instruct all users to add the shared network drive folder as a snippets folder in Combine.