Others
Advanced Scripting Dialog
Advanced Scripting exposes all the new scripting techniques introduced by recent SQL server client tools components and can be used to automatically generate drop and create scripts in the appropriate dependency order from underlying databases and servers, for all database and server objects.
The Advanced Scripting dialog can be used in two ways:
1. When working on code packages, you can right-click the package node and then select Add SQL Script → From Advanced Scripting. Using this option will allow you to generate SQL scripts using the dialog, and when you are done, the scripts will be automatically placed in the code package in the appropriate dependency order.
2. You can also invoke the Advanced Scripting dialog independently of a code package, to generate one or more scripts for your database objects. To do so, go to Tools → Advanced Scripting. After you select the objects that you wish to script and press OK in the dialog, scripts will be created in the SQL editor. If you select the Export option, scripts will be exported to the local file system.
The Advanced Scripting dialog allows you to generate scripts easily. Moreover, you can also see the content of the scripts refresh and change in real-time as you select different scripting options or database objects in the dialog (please refer to the progress bar at the bottom left corner of the dialog when selecting objects or scripting options). Furthermore, special attention should be given to the following scripting options in the dialog:
Script to a Single File (default = false) – when this option is set to true, a single file will be generated for all scripted objects, for all CREATE and DROP statements.
Transaction/Error Handling (default = false) – this option mandates scripting to a single file. When this option is selected, all SQL statements in the script are placed under a single transaction, which in turn provides auto-rollback capabilities when deployed against a target database. In other words, when you set the value of this option to true and place the generated script in a code package (for example), if any errors occur during package deployment, all changes performed in the script will be automatically rolled back by the SQL server. Similarly, if you run the produced script against a single database from the editor, errors that occur during execution will prompt a rollback of all script changes.
Group Drops Before Creates (under the Advanced tab) – when this option is set to true (which is the default), all DROP statements will be grouped together before any CREATE statements, to allow you to run your scripts repeatedly and in the correct order.
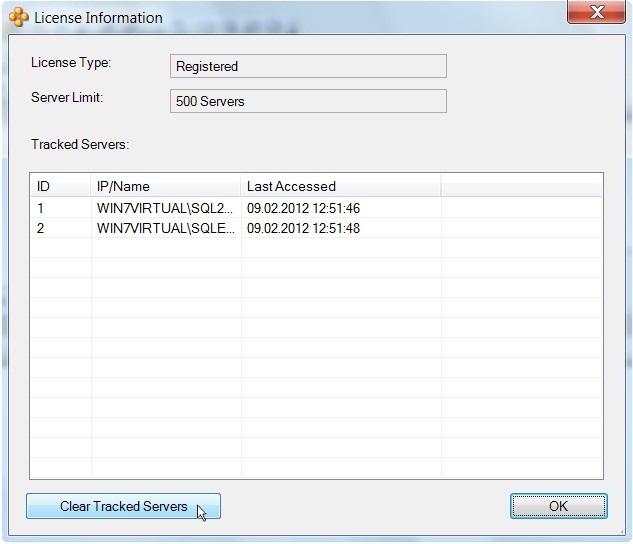
Tracked Servers List
Some licenses for Combine have a restriction to the number of simultaneously used servers. The restrictions are agreed at the moment of purchasing a license.
Each server involved when a package of scripts is being performed, appears in Tracked Severs List.
You can get acquainted with Tracked Servers List at a click on Help->License.
If your Tracked Servers List is full and your list of constantly used servers changes, you can clear the list. For that follow Help->License->Clear Tracked List.
How to Use SQL Help and Online Language Reference
Combine allows you to easily obtain SQL and T-SQL help directly from Microsoft’s Books Online website. Two help modes are supported, namely General SQL Help and Context Sensitive SQL Help, which are now described below:
General SQL Help – When you press ALT+F1 (or go to Help → SQL and T-SQL Help), a new default browser window will open and display the main Transact SQL Reference web page. You can then browse and find additional SQL and T-SQL online help by navigating the Books Online (BOL). If you are looking for help regarding specific SQL or T-SQL commands, this can be accomplished easily by using context sensitive help as described below.
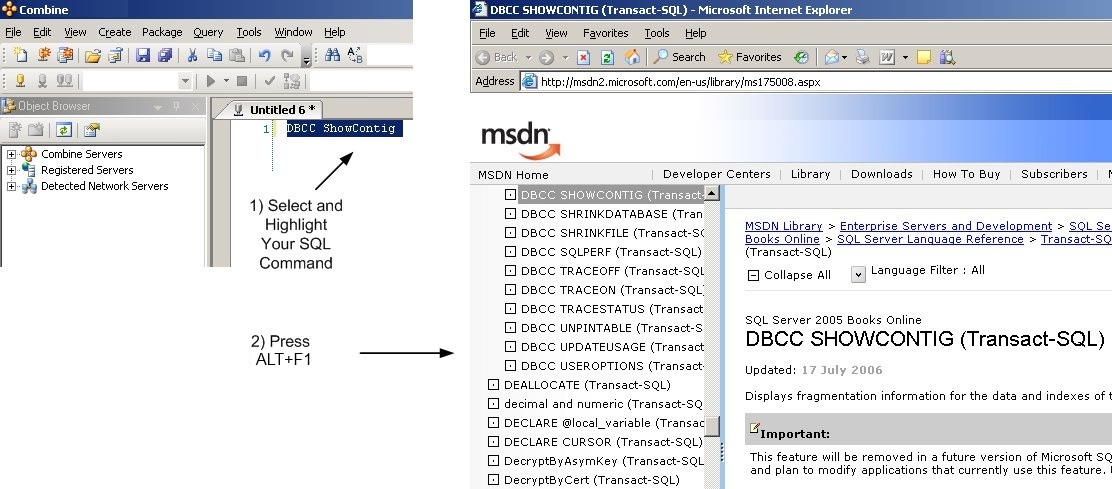
Context Sensitive SQL Help – To use the context sensitive SQL help, you must first open a SQL editor window. In the window, enter (or find) the desired SQL command, select and highlight it, and then press ALT+F1 (or go to Help → SQL and T-SQL Help). By doing so, Combine will search this SQL command for MSDN site using “Bing System” and a new default browser window will open with first search result.
For example, please refer to the images below: By selecting the DBCC SHOWCONTIG string and pressing ALT+F1, Combine will open a new Internet Explorer window with help for the requested T-SQL command.
Comments:
1. If the requested command cannot be found, after you press ALT+F1 you will be redirected to the main MSDN search page.
Local Combine Configuration Folders
The JNetDirect Combine local configuration includes:
-
Windows sizes and docking positions, toolbar settings and layout.
-
Combine configuration options.
-
Environments and Containers settings.
-
Combine Servers list.
The JNetDirect Combine stores its local configuration files in the user local data folder. Different Combine versions may use different formats for these files. For reliability reasons each Combine version stores its configuration files in a separate folder. Below is the table that lists where these files are located for various Combine versions.
Combine version Local Configuration Folder
Combine version 6.2 and below
Combine version 6.3 and above
“
If the newer JNetDirect Combine is run and the corresponding local Combine data folder is not found then it will be created and the latest found existing configuration files will be converted to a proper format and placed in the corresponding folder. Existing configuration files for the previous Combine version are left intact. If there are no existing configuration then Combine creates an empty default configuration.
But if the corresponding local Combine data folder already exists then no upgrade conversion occurs.
There are several examples below.
1. An end user makes a fresh install of Combine 6.3. In that case there are no existing configuration files. The JNetDirect Combine just creates “JNetDirect\Combine\6.3\” configuration folder and fills it with an empty default configuration.
2. An end user upgrades Combine 6.0 up to Combine 6.3. In that case the JNetDirect Combine will convert existing configuration files from “SQL Farms\Combine\1.0.0\” folder to the 6.3 version format and stores the converted files in “JNetDirect\Combine\6.3\” folder. Existing configuration files in “SQL Farms\Combine\1.0.0\” will be left intact.
3. An end user upgrades Combine 6.0 up to Combine 6.3 but later he removes Combine 6.3 and re-installs Combine 6.0 back. The JNetDirect Combine 6.3 behavior is the same as in the previous case. I.e. the JNetDirect Combine will convert existing configuration files from “SQL Farms\Combine\1.0.0\” folder to the 6.3 version format and stores the converted files in “JNetDirect\Combine\6.3\” folder. Existing configuration files in “SQL Farms\Combine\1.0.0\” will be left intact.
But what happens when the user downgrades back to Combine 6.0? The JNetDirect Combine 6.0 will read its configuration folder “SQL Farms\Combine\1.0.0\” which contains configuration just before the Combine upgrade.
This feature can be used to do a safe downgrade if for some reasons the older JNetDirect Combine version should be restored. Please note that any changes made in Combine 6.3 configuration will not be available for the previous Combine version.
4. An end user upgrades Combine 6.0 up to Combine 6.3, then downgrades to Combine 6.0, but later installs Combine 6.3 again. Again the JNetDirect Combine 6.3 behavior is the same as in the previous case. The JNetDirect Combine will convert existing configuration files from “SQL Farms\Combine\1.0.0\” folder to the 6.3 version format and stores the converted files in “JNetDirect\Combine\6.3\” folder. After downgrade the JNetDirect Combine 6.0 will work with its configuration stored in “SQL Farms\Combine\1.0.0\” folder.
But when the JNetDirect Combine 6.3 is installed again it will see an already existing configuration in “JNetDirect\Combine\6.3\” folder. So it will not run conversion routine and will use the existing configuration. I.e. it will use the configuration which has existed just before the JNetDirect Combine downgrade. Thus any changes made in the JNetDirect Combine 6.0 configuration after the downgrade will not be converted.
To force the configuration data conversion in such cases the end user have to manually remove existing configuration folder (i.e. “JNetDirect\Combine\6.3\” in this example) and then re-run the JNetDirect Combine.