Package Explorer and Package Execution
Code Packages – Introduction
A code package consists of any number of scripts, where each script is associated with a group of target databases (i.e., Container) on which the script will be deployed. When creating a code package you will be asked to provide the Container name for each script. Code packages may also include folders that will help you organize scripts in the package. You can also associate a Container with a folder and then configure each script under the folder to inherit the Container from its parent (i.e., the folder that contains the script). If you choose to do so then scripts under the folder will be deployed on the target databases defined in the Container that is associated with the folder. Similarly, you can associate a Container with the root node of the package in the Package Explorer, so that folders and scripts placed directly under the root node can inherit the Container of the root node.
After you compose a package you can save it as a cpa (code package) file. The cpa file will include the package folders, the content of all scripts, as well as the Container names associated with each folder and each script. The cpa file does not include the actual target databases defined in the Container since target databases are configured on each Combine client machine to allow easy transfer of code packages between different server environments. The set of target databases and database identifiers (database and server names) for Containers referenced in the package is retrieved from the Container Manager settings prior to package execution.
Scripts and folders can be imported into the code package by using the Import Dialog. Package scripts and folder can also be exported to the file system or to a shared network drive. Once a package is composed, the package can be executed by a click of a button and each script will be run on all databases in the Containers associated with the script (under the currently active Environment). Please refer to the sections Configuring Code Packages and Executing Code Packages for complete details.
Code packages can be easily passed between Development, QA, and Production and deployed on all target databases in each environment, by ensuring that developers, QA engineers, and database administrators have the same Container and folder names in the Container Manager, as explained in the section titled The Dev-QA-Production Release Process. Before deployment, Combine will thoroughly ensure that the all Containers indeed exist, that all databases in all Containers exist, and that the connectivity and authentication to all target databases is valid using the credentials provided for each Container in the Container Manager.
Wrapped Vs. Unwrapped Packages
Wrapped packages are marked with the package icon  , whereas unwrapped packages appear with the package icon
  .
.
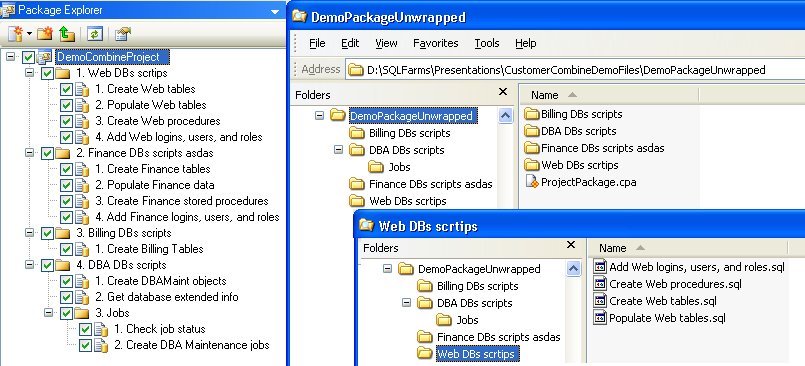
An unwrapped code package consists of a .cpa file that serves as the root node of the package, as well as folders and SQL files that are stored separately on the file system, under the same folder of the .cpa file. In other words, an unwrapped package is very similar to a Solution in a Visual Studio® .Net project. Using unwrapped package, developers can check-in and check-out different SQL files and folders in the code package, and work in collaboration on their database code releases.
The root node of an unwrapped code package is stored as a .cpa file. This file holds all the properties of the code package, such as the name and location of folders and SQL scripts in the package, the Container mapped to each script, and so on. To visualize an example of an unwrapped package, please refer to the image below.
Note: A new code package is always created as an unwrapped package.
A wrapped package, unlike an unwrapped package, is a single .cpa file that contains the content of all SQL scripts included in the package. In other words, a wrapped code package is stored in the file system as a single .cpa file.
When developers complete composing their release, they can wrap the unwrapped code package by right-clicking the package node and selecting the Wrap option in the context menu. Similarly, wrapped packages can be unwrapped by right-clicking the Wrapped package node and selecting the unwrap option from the context menu.
In order to find out whether a package is wrapped or unwrapped, click on the package node and press F4 to bring up the properties window.

Creating Packages
You can create a new code package using one of the following ways:
-
Click the New Package icon in the toolbar
 .
. -
Select File > New > Package from the main menu.
-
Press CRTL+SHIFT+N.
When creating a new package you will be asked to select a file name for the package, as well as the folder in which it will be placed. The new file name will have the extension cpa (for code package). Once the package is created, the Package Explorer will display the root node of the package, which will have the properties displayed in the figure below. To view the Properties window you can press the F4 button or right-click the package icon and choose Properties from the menu.
Keep in mind that every script in the package must be associated with a Container to allow Combine to determine the set of target databases for script deployment. Containers can also be set for the root node of the package, which will later allow scripts to inherit the Container from the root node, instead of associating each script with a Container manually. For more information about associating Containers with package scripts and package configuration, please refer to the section titled Configuring Code Packages.
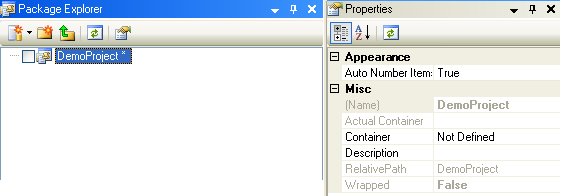
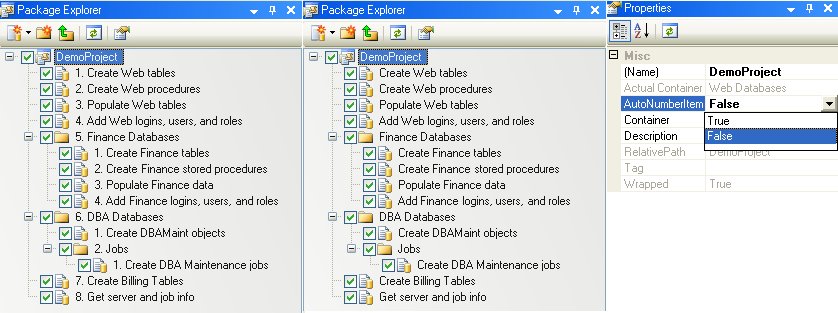
AutoNumber Package Property
The AutoNumber appended to scripts and folders inside a code package is only used for visualization purposes. For example, when working with Unwrapped Packages the SQL scripts are stored on the file system without the automatically pre-pended number.
The AutoNumberItems package Property can be viewed in the Properties window by selecting the package icon in the Package Explorer and pressing F4. When this property is set to True then scripts loaded into the code package will automatically be assigned sequence numbers in the package, to ease the readability of the package. If this property is set to False then the numbers will not be assigned. Below is an example of a package when the AutoNumberItems is set to True and then False. When saving package scripts, you can choose whether to save the number assigned by Combine as part of the script name or to omit the number from script name and only display the number in the user-interface of Combine.
Adding a Script to a Package
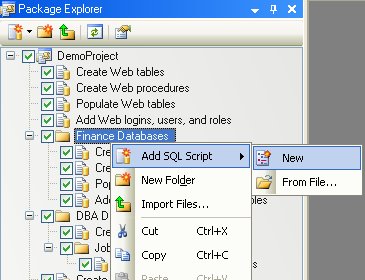
Scripts can be added to a package in several ways. To create a new script, choose a node in the package tree (the root node of the package or a folder) under which the new script will be placed, and then right-click and select Add SQL Script > New from the menu as demonstrated below. You can also add a new script by selecting the appropriate parent node and then clicking the Add SQL Script toolbar icon  .
.
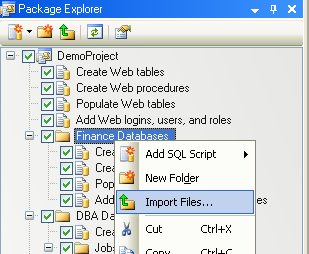
Scripts can also be added to the package by importing them from the file system. Using the Import Dialog, multiple scripts and folders will be automatically loaded into the package.
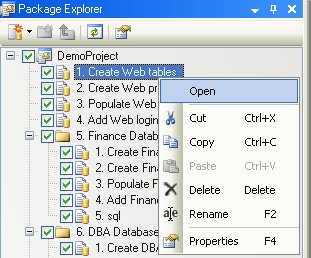
Once a new script is placed in the package you can view and edit its SQL code in the main editor window by right-clicking the script and selecting the Open menu option (see the section titled Editing SQL Code of Package Scripts for more information).
Adding and Linking Existing Scripts to a Package
If you have existing scripts on your local file system that reside under the package folder, you can add those scripts and their parent folder to the project package. To do so, right-click the root node of the package, browse for files that reside in the same package folder or under subfolders of the package folder, and select your files. If the selected files indeed reside under the package folder, you will be prompted with the dialog in the figure below.
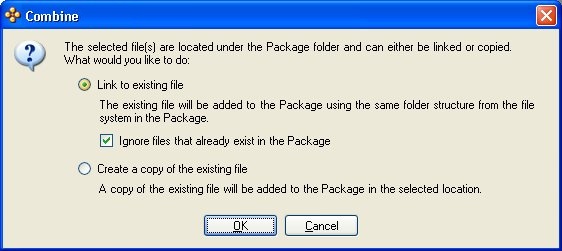
Select the Link to existing files option to load the existing files into the package. On the other hand, if you wish to make copies of the selected files instead of using the existing ones, then select the Create a copy option. Linking to existing files is useful for working with Source Controlled package: If the linked files are source-controlled, you can work and update the source control files within the code package and Combine.
Note: You can also add existing files under package folders by right-clicking the folder node in the package and selecting Add SQL Script > From File. The selected files must reside either under the same folder or its subfolders.
Adding Files to a Package from Source Control
Files can be added to a package directly from a source control system. First, you must check in the package into the source control system. Then, files that reside under source control projects that are mapped to the package folder or its subfolders can be added directly from source control. To do so, right-click the package and select Add SQL Script > From Source Control, as demonstrated in the image below.

Next, you will be prompted with the dialog Add SQL Script from Source Control dialog. Here, click the Browse button (i.e., “…”) and select the source control project. The workspace or workarea for the selected folder must either be the package folder or its subfolder (or sub-subfolder, and so on). After selecting the project from source control, select the files you wish to add to the package and press OK to close the dialog. In turn, JNetDirect Combine will get the latest version of the selected files to the local folder and then add the files to the package.
Note: Some source control providers allow you to specify the local folder for the project while selecting the project. Make sure that the local folder is the package folder or one that resides under the package folder.
Asterisk in the Code Package
After a change is made to a code package, an asterisk will appear next to the package node that has changed. To better understand which nodes change in response to various code package actions, please refer to the description below:
Wrapped packages – recall that a wrapped package is a single-file package that contains all SQL scripts (names and content) as well as package folder information inside the single .cpa file. For this reason, every change to any property, node, folder, or script will prompt an asterisk next to the root node of the wrapped package. If you change the content of a SQL script in a wrapped package, an asterisk will also appear next to the icon of the script.
Unwrapped Packages – the .cpa file of the unwrapped package holds the file names, folder names, and all file and folder attributes Each time a new file or folder is added, or the properties of files or folders are updated, an asterisk will appear next to the root node of the package that reflects the change to the .cpa file. In other cases, e.g., when the content of a SQL script is updated, this does not require a change to the .cpa file and the asterisk will appear next to the SQL script node.
Importing Scripts and Folders to a Package
SQL files, folders, and other file types can be loaded into a code package from the Import Dialog. You can start the dialog by following one of the options below:
-
Click the package root node or a folder under which the imported files and folders will be placed and then press the Import icon
 in the toolbar.
 -
Right-click the parent node (package root node or folder) and select Import Files from the menu as demonstrated in the figure below.
The Import Dialog allows you to load individual files or folders and all their files into the package. The dialog is now described in details below.
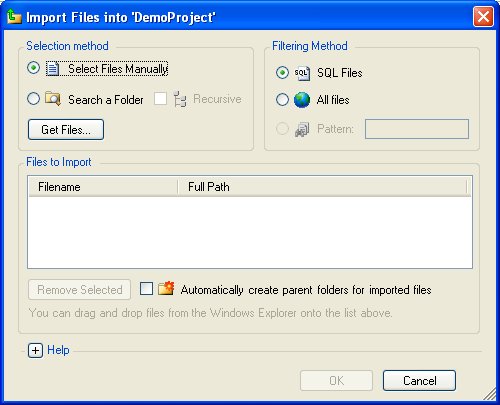
Filtering Method: The default filtering option is set to SQL files. Using this option, only SQL files will be shown in the folder browser that will appear after you press the Get Files button. Furthermore, if you choose to load folders into the package then only SQL files in the selected folders will be imported. The All Files option allows you to browse and load files with any extension to the package. Finally, the Pattern option is only enabled when you load files from folders. This feature is optional and lets you specify custom filters (for example, to load files that start with the word “Rollout” in all folders the Pattern can be set to “Rollout.”).
Selection Method: You can choose to import individual files by selecting the Select Files Manually option, or all files in selected folders by checking the Search a Folder option. Furthermore, you can instruct Combine to load all folders and subfolders and their files by checking the Recursive option in the Dialog.
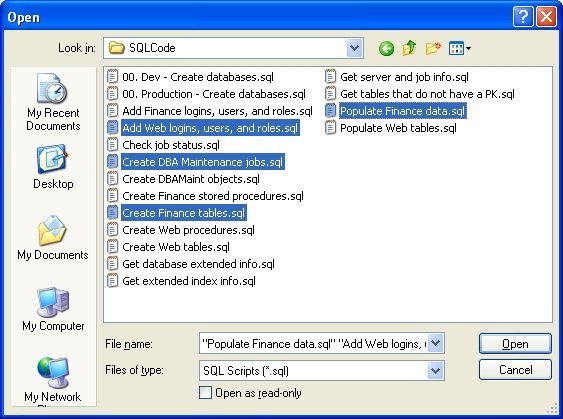
Once the Selection Method and Filtering Method are set, press the Get button to search for files and folders to import. The images below illustrate the selection of SQL files when the Selected Files Manually option is checked.
Automatically Create Parent Folder: If this option is checked then the each script will be loaded and placed under a folder in the package. The parent package folder will have the same name as the parent folder for the script in the file system.
After selecting the files and folders, the Import Dialog will display all files that will be imported. Using the dialog you can add more files by pressing the Get Files button again. Similarly, you can choose to remove files from the import list by choosing the desired files and clicking the Remove Selected button.
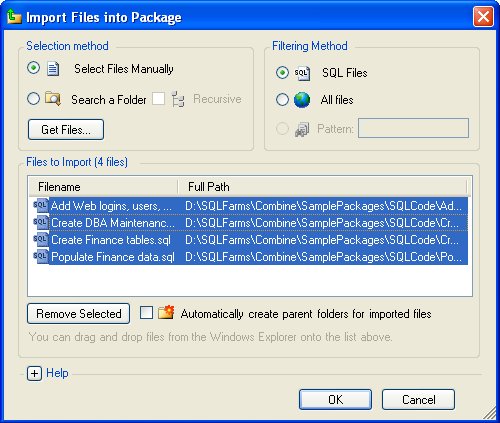
Press the OK button to complete the import process. Files and folders will then be loaded into the package and placed under the initially selected parent node in the package tree hierarchy. After files and folders are loaded you can use the drag and drop feature to place them in different locations in the package. You can also copy and paste files and folders to move them around the package. Also note that loaded files will be marked with an asterisk (*) to denote that the new files have not yet been saved as part of the package. You can select individual files and press CTRL+S to save them in the package or use the save all option to save all changes to the package.
Removing Scripts and Folders from a Package
Scripts and folders can be removed from a package by selecting the objects to remove and then right-clicking and choosing the Delete option from the menu. Another way to remove items from the package is to select them and then press the Cut icon  in the toolbar. After changes have been made to the package, the package icon will be marked with an asterisk (*) to denote the change. Package changes will take effect only after pressing CTRL+S to save the package.
Copy-Paste Package Items
Scripts and folders can be copied and then pasted to place them under different nodes in the package. When copying a script, all properties of the script (including the Container assigned to the script) will be copied as well. Copy-pasting folders will include all the underlying folder scripts and all properties associated with the scripts and the folder.
Choose one of the following options below to copy-paste folders or scripts:
-
Right-click the script or folder you wish to copy and press Copy in the menu. Then, left-click the desired node in the Package Explorer under which the copied item will be placed. Right-click the selected node and choose Paste from the menu.
-
Use CTRL+C and CTRL+V to copy the objects and place them under a selected node.
-
Hold the CTRL button. Using the mouse, drag and drop the object to the new target location in the Package Explorer.
-
Press the Copy icon in the main toolbar, select the target node for the copied objects and then press the Paste toolbar icon.
After changes have been made to the package, the package icon will be marked with an asterisk (*) to denote the change. Package changes will take effect only after pressing CTRL+S to save the package.
Drag-Drop Package Items
Scripts and folders can be dragged and then dropped under a desired parent node to change the script order in the package (recall that the script order is important when executing the code packages). When scripts are dragged and later dropped, all the properties associated with the script will be moved together with the script. If you drag and drop folders then all underlying scripts will be moved alongside with the parent folder. After changes have been made to the package, the package icon will be marked with an asterisk (*) to denote the change. Package changes will take effect only after pressing CTRL+S to save the package.
Editing SQL Code of Package Scripts
After you create a new script in the code package or import scripts to the package, you can view and make changes to the code in the main editor window. The content of the script can be opened by either double-clicking the script icon, or right clicking the script icon and choosing Open from the menu. Changes made to the script are only saved in the context of the package. If scripts were imported to the package from the file system then changes will not be made to those files. You can write the changes to the files in the file system by exporting the package and all the package content. After a script is edited it will be marked with an asterisk (*) to denote the change. Changes will be saved in the package only after you press CTRL+S to save the package.
Associating a Container with Package Scripts and Folders
Each script in the package will be deployed on all databases defined in the Container associated with the script. You can either associate a Container directly with a script or you can set the Container property in the Properties Windows to “Use Parent Settings” for each script. When “Use Parent Settings” is used then the Container associated with the script will be the same Container associated with the parent node for the script in the package tree hierarchy, which is either the root node of the package or a folder. See Configuring Code Packages for additional information.
Tip: If you already assigned a Container to a script and you wish to reset the Container property to the default value “Use Parent Settings”, right-click the mouse on the Container property and select the Reset option from the menu.

Exporting Scripts from a Package
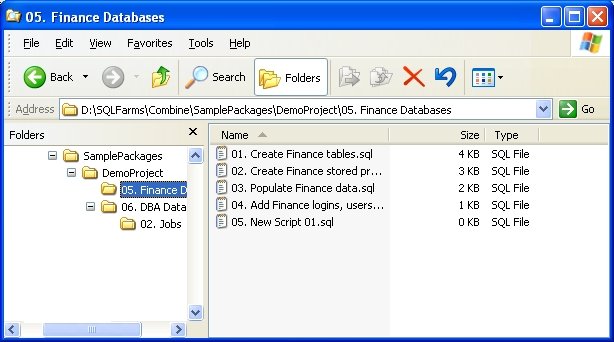
Once a package is composed, you can export the files and folders in the package to the file system or to a shared network drive by right-clicking the package icon and selecting the Export Package option from the menu. When files and folders are exported you will be asked to specify the drive and folder in which all files and folders will be saved. If your package contains folders then those folders will be created in the same hierarchical order as in the package and all package scripts that reside under each folder will be placed under the exported folders. If any files in the file system have the same names as the exported files then those files will be overwritten unless they are marked as read only.
The first step required to export the package content is to start the Export Dialog as demonstrated in the image below.

Next, the Export Dialog will appear and ask you whether to include the Auto-Numbers appended to the scripts by Combine. Checking this option will save the script and folder numbers as part of their names.
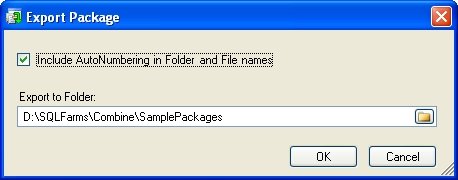
Finally, select the target drive and folder and press the OK button to export the content of the package. The result of exporting the package demonstrated in the figure above is presented below.
Configuring Code Packages
Several key points must be considered when preparing a code package for deployment:
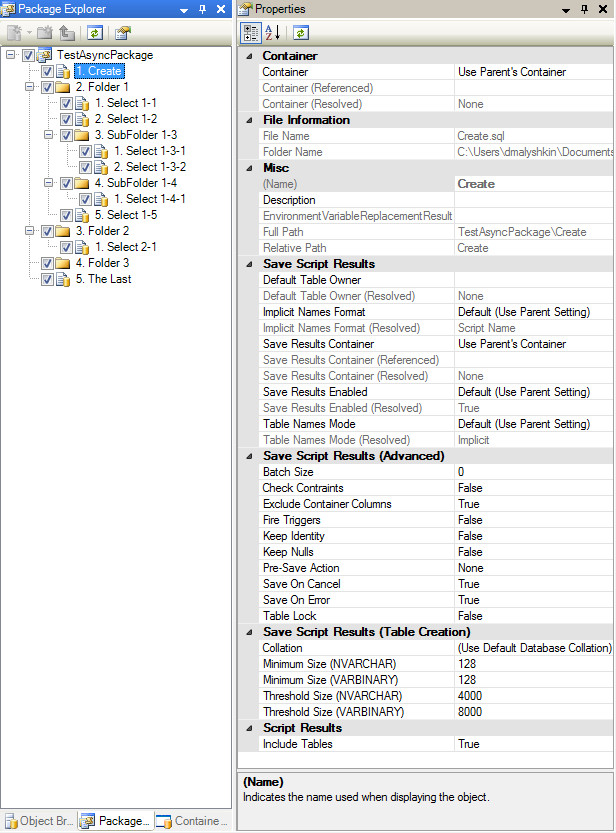
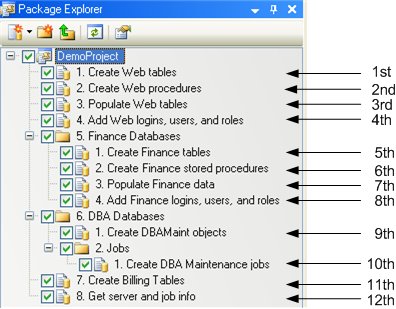
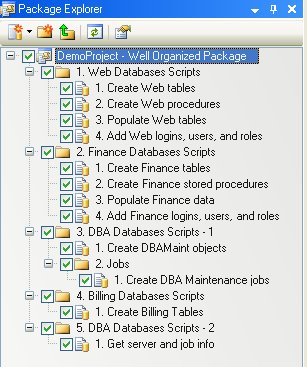
1. Order of package scripts: Upon package execution, scripts are deployed against all target databases defined in their associated Container in the order they are placed in the package. This rule applies to scripts that are either placed under folders in the package or directly under the root node of the package. For example, the order of script execution is listed in the figure below next to each package script. When the package is executed, the first script will be deployed on all its associated target databases. Once completed, the second script will be deployed on its databases, then the third script, and so on.
2. Mapping scripts to Containers: Each script in the package must be mapped to a Container. First, recall that a Container consists of a group of target databases (see Static vs. Dynamic Containers for detailed information). Moreover, remember that each Container holds the authentication type and credentials that will be used to connect and deploy code against all databases defined in the Container. The script-to-Container mapping is most important as it is used by Combine to identify the set of one or more target databases on which each script in the package will be deployed.
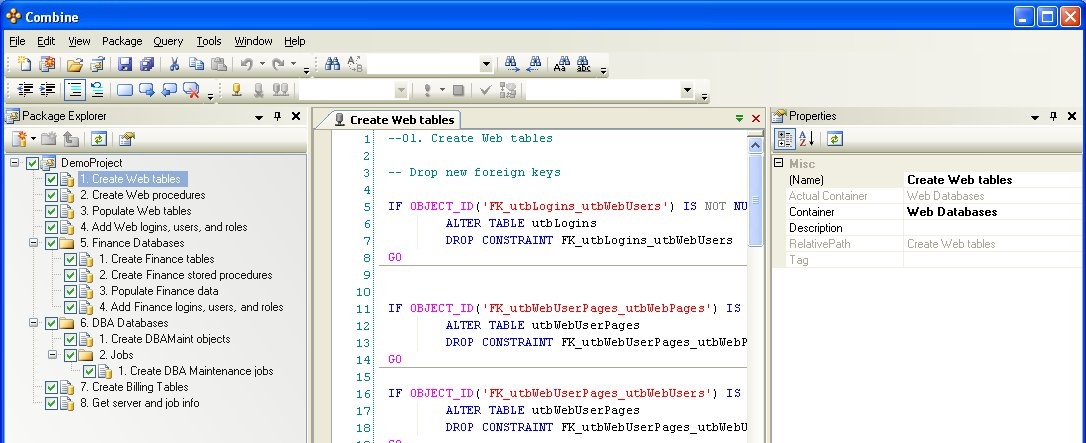
Each script can be associated with a Container directly or scripts can inherit the Container from their parent node (either the root node of the package or the folder above the script icon in the package tree hierarchy). The default Container assigned to each script is “Use Parent Container” and can be changed in the Properties Window. To bring up the Properties Window, select the script you wish to edit and press F4. The Package Explorer and Properties Window for a demo package are presented in the figure below.
You can change “Use Parent Container” to explicitly assign a Container to the script by clicking the Container property. After you click the property, a window with all Containers in the currently active Environment will be displayed and will let you select the desired Container. The dialog is presented in the following image together with the Container Manager (observe that the Development Environment is the currently active Environment since it is displayed in bold letters).

Important Tip: You can simplify your packages by using folders and associating a Container with the folder. Then, only place scripts under the folder if you wish to deploy them on the databases of the Container associated with the folder and set the Container associated with each script to “Use Parent Settings” (which is also the default; See Associating a Container with Package Scripts and Folders). The code package will then become more structured and readable and will be easier to manage, and remember that you can use any number of folders in the package.
3. Container authentication type and credential settings: Each script associated with a Container will be deployed on the Container databases using the authentication type and credentials provided for the Container in the Container Manager. It is therefore important to verify that all Containers in the Container Manager are configured to use the correct authentication with the appropriate credentials. Note that Combine will not execute the package immediately after you hit the Execute button but will first verify that all settings are indeed correct and walk you through several dialogs before the actual execution. Furthermore, if any Containers are configured to use the Prompt authentication type then Combine will also ask you to provide the authentication type and credentials for each such Container that is referenced in the package before execution begins. The entered credentials are only collected for execution purposes and are not store by Combine. Please refer to the section titled Executing Code Packages to examine the process of code execution and the associated dialogs.
4. Check / uncheck scripts and folders in the package: A checkbox is available next to each package node (scripts, folders). If the checkbox next to a given script is checked then Combine will execute the script as part of the package execution. If you wish to exclude one or more scripts from the execution of the package you can uncheck the checkbox next to the script. You can also uncheck the checkbox of a folder to exclude all the scripts in the folder.
It is possible to check / uncheck a group of scripts / folders simultaneously. To do so you should select appropriate scripts and then Shift-click the checkbox next to a script. All selected checkboxes will be set to the state of the clicked checkbox. Please note that if clicked checkbox was not been selected — it will be changed as well.
5. Configuration verification: When a package is executed, Combine will collect the database and server names for all target databases of all Static and Dynamic Containers referenced in the code package. Database and server names will be collected from all Static Container configurations and if Dynamic Containers are used then Combine will connect to the Reference Static Container and execute the Dynamic Container query to return all database and server names. Combine will also perform several verifications to ensure that the package can be executed correctly, such as ensuring that all Containers have at least a single target database. Furthermore, Combine will use the authentication type and credentials defined for each Container in the Container Manager to ensure that all target databases could in fact be connected using the provided authentication settings. If any Containers are configured to use the Prompt authentication type then you will be asked to provide the authentication type and credentials for each Container before verifying the connectivity to the target databases. The authentication types and credentials that you enter for each Container will also be used to deploy the package code against all databases in each Container. More information about the tests and verifications can be found in the section titled Executing Code Packages.
Executing Code Packages
Before executing a code package, please ensure that all scripts and their associated Containers are configured properly in the package. Also, if you have more than a single Environment in the Container Manager, make sure that the active Environment is set properly and that it is the Environment against which you wish to deploy the code package. Please refer to the section Configuring Code Packages for more information. The following list contains a summary of key items that should be verified prior to package deployment:
1. Check the order of scripts in the package: Since scripts are executed according to their order in the package, make sure that all SQL object dependencies (if any) are followed throughout the package and reorder the package scripts as needed.
2. Make sure that scripts are mapped to the correct Containers.
3. Check the authentication type and credentials of Containers referenced in the package for your Environment in the Container Manager
Note: The Container authentication type and credentials will be used to connect and deploy code on all target databases in the Container.
4. Make sure that checkboxes next to all scripts that you wish to deploy are check and uncheck unwanted scripts.
Important Tip: You can simplify your packages by using folders and associating a Container with the folder. Then, only place scripts under the folder if you wish to deploy them on the databases of the Container associated with the folder and set the Container associated with each script to “Use Parent Settings” (which is also the default; See Associating a Container with Package Scripts and Folders). The code package will then become more structured and readable and will be easier to manage, and remember that you can use any number of folders in the package.
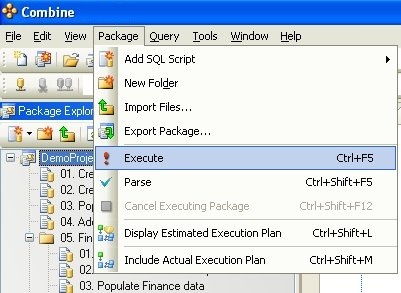
The entire code package is executed by pressing CTRL+F5, or by selecting Package > Execute from the main menu. You can also direct Combine to return the actual execution plan for the package by selection Package > Include Actual Execution Plan from the main menu or pressing CTRL+SHIFT+M. Also note that you can return the estimated execution plan from all databases and servers in which case the steps below will still be followed however code will not be deployed on target databases and only estimated execution plans will be returned.
When a package is executed, Combine performs the following actions and verifications. If any of the checks listed below are not successful, Combine will alert you and will not deploy the package.
Check that the authentication type and credentials are available for all databases. Recall that Containers can be configured to use several authentication types, namely SQL authentication, Windows authentication or Prompt (see the Static Container Wizard and Dynamic Container Wizard sections for more information). Also you are able to modify all SQL server connection options using Advanced button.
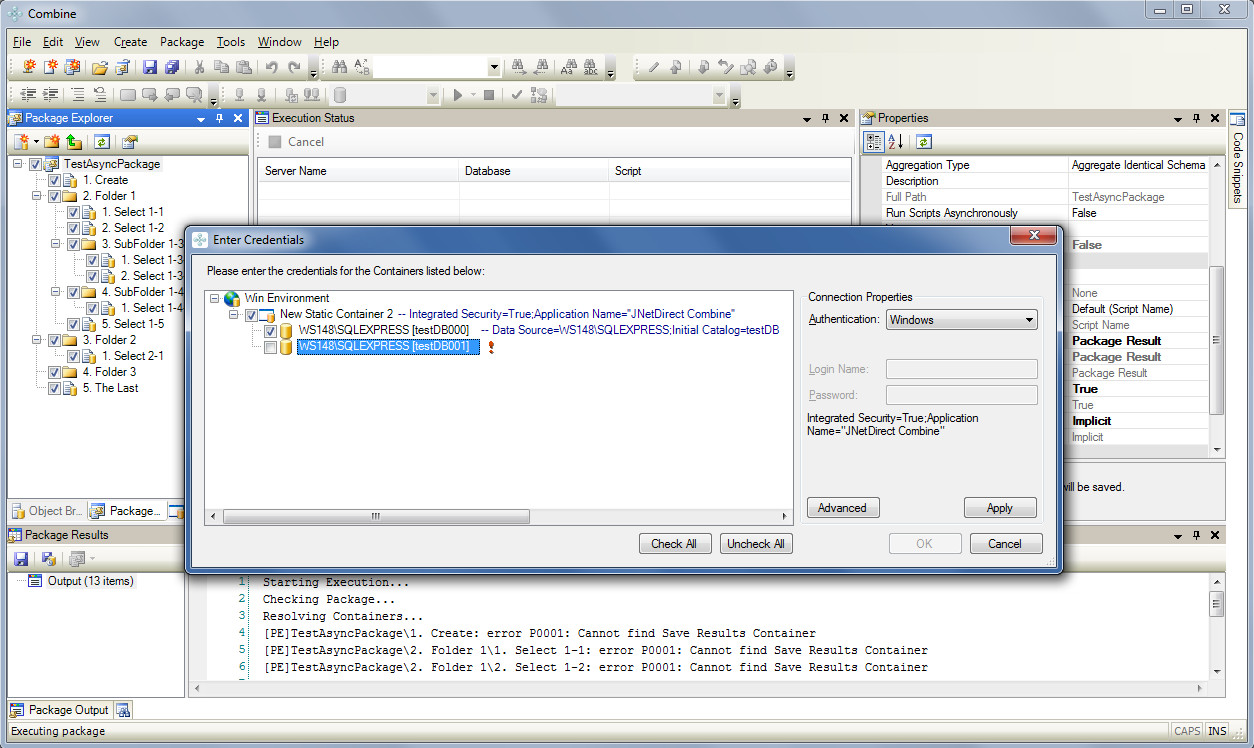
If any Containers referenced in the package are set to use the Prompt authentication type then you will be prompted to enter the authentication type to use to connect to all Container databases, for each such Container. If you choose SQL authentication type you will also be asked to provide a login name and password. These credentials will not be stored by Combine and are only used in run-time to connect and deploy the code on all databases. On the other hand, you will not be asked to provide the authentication and credentials for all referenced Containers that use SQL authentication or Windows authentication since the authentication and credentials entered in the Container Manager will be used. The image below illustrated the credentials window displayed by Combine when the Prompt authentication type is used for all Containers referenced in the package. You can choose different credentials for each Container or use the same credentials for all Containers. After you enter the credentials in this dialog you must hit the Apply button and then OK to continue.
Resolve all target databases, verify connection and authentication to all target databases and allow the user to deselect databases. At this point Combine has the authentication type and all connection attributes needed to resolve the target databases for all package scripts. First, Combine resolves all target databases: For Static Containers, Combine will retrieve the database and server names from the Container Manager. If Dynamic Containers are referenced in the package then Combine will run the Dynamic Container query against the Reference Static Container for each Dynamic Container to retrieve the database and server names for all target databases (please refer to Static vs. Dynamic Containers to learn more about Container types). After all database and server names are resolved, Combine will attempt to connect to all databases to verify that they indeed exist and that the authentication type provided for the Container in the Container Manager (or in the dialog in the last image) can be used successfully. The results of the connectivity test are then presented in another dialog, which also allows you to deselect Container databases. If a database is deselected for a given Container then Combine will not run the script associated with that Container on the deselected database, and will still run code on all other Container databases. Also note that databases that cannot be connected successfully (due to timeouts or wrong credentials provided in Combine) will be marked in grey and deselected automatically. You can reselect these databases to try to deploy code against them however this is highly not recommended. To demonstrate the connectivity test dialog, below are two examples of the dialog when the connectivity to all Container databases is successfully verified, and when one server is down so that its databases cannot be contacted.
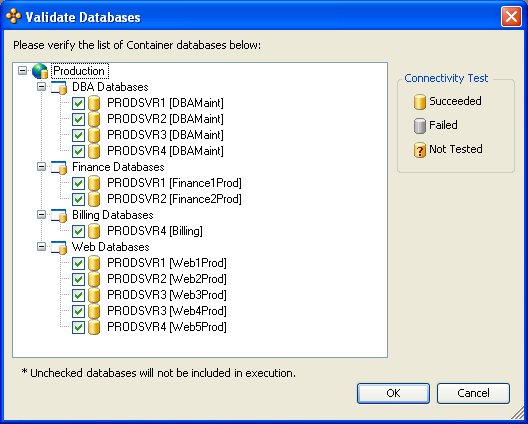
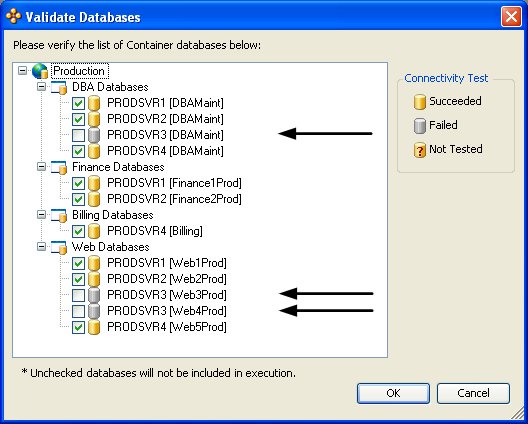
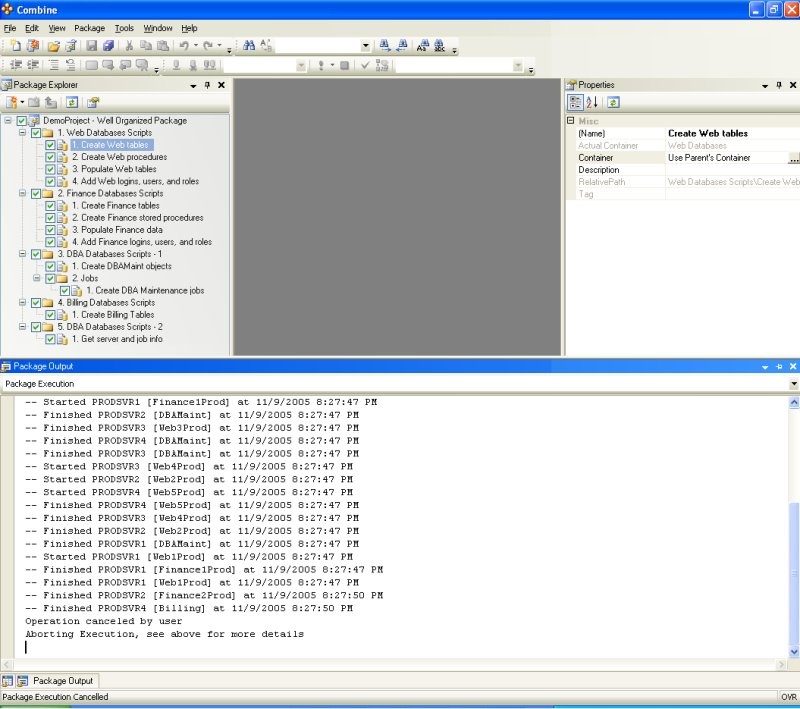
Please be aware that this Validate Databases dialog is the last dialog displayed prior to the execution of all the code in the package. If for any reason you wish to abort the code deployment then press Cancel in this dialog. If you press OK then package scripts will be executed according to their order in the package and each script will be run on all the checked databases in its associated Container. The image below demonstrated the case where Cancel is pressed after the connectivity test. Notice that the connectivity results are displayed in the Package Output window.
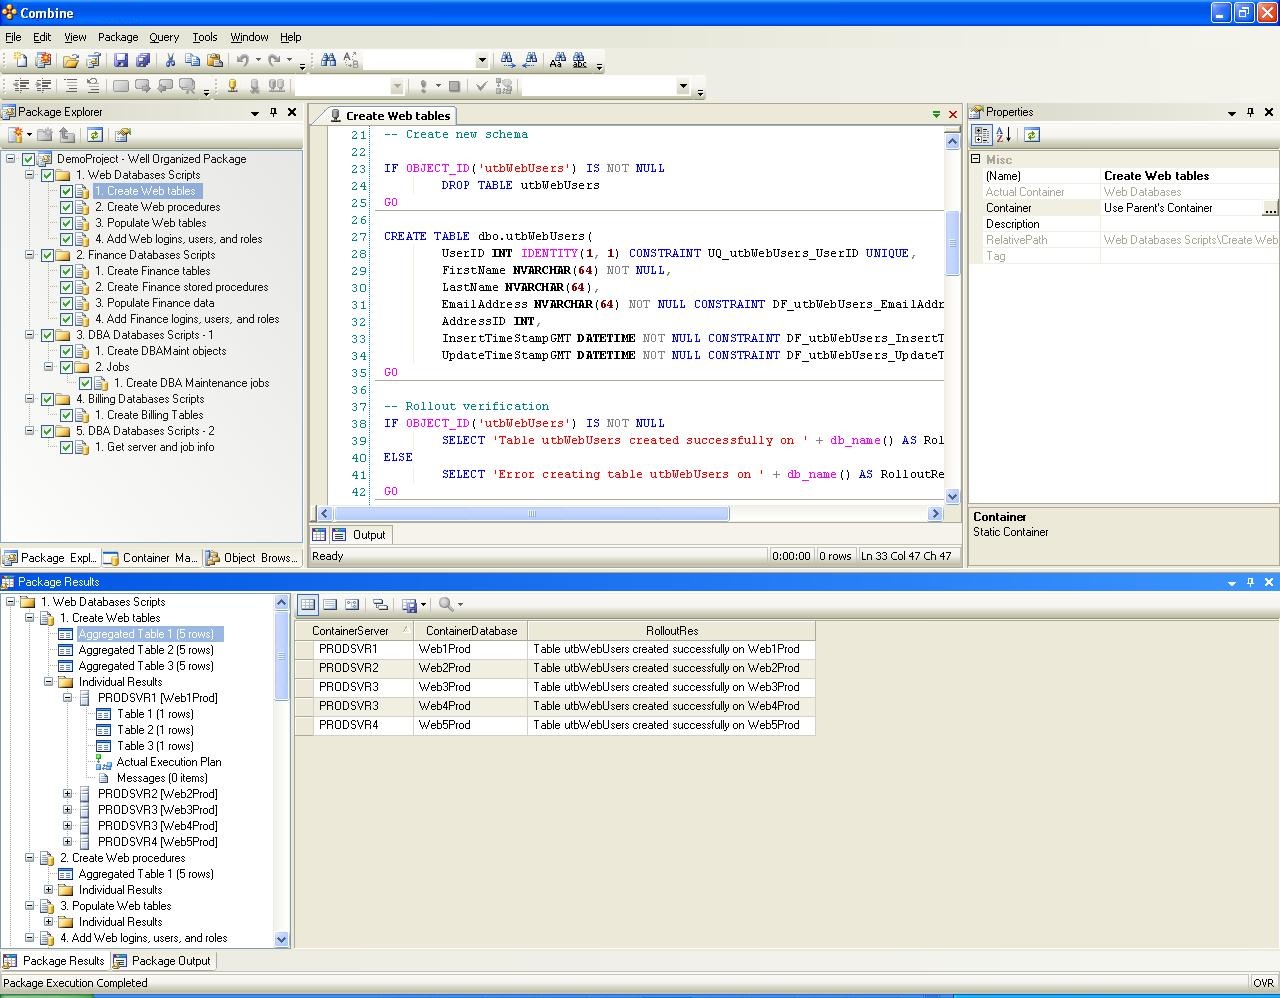
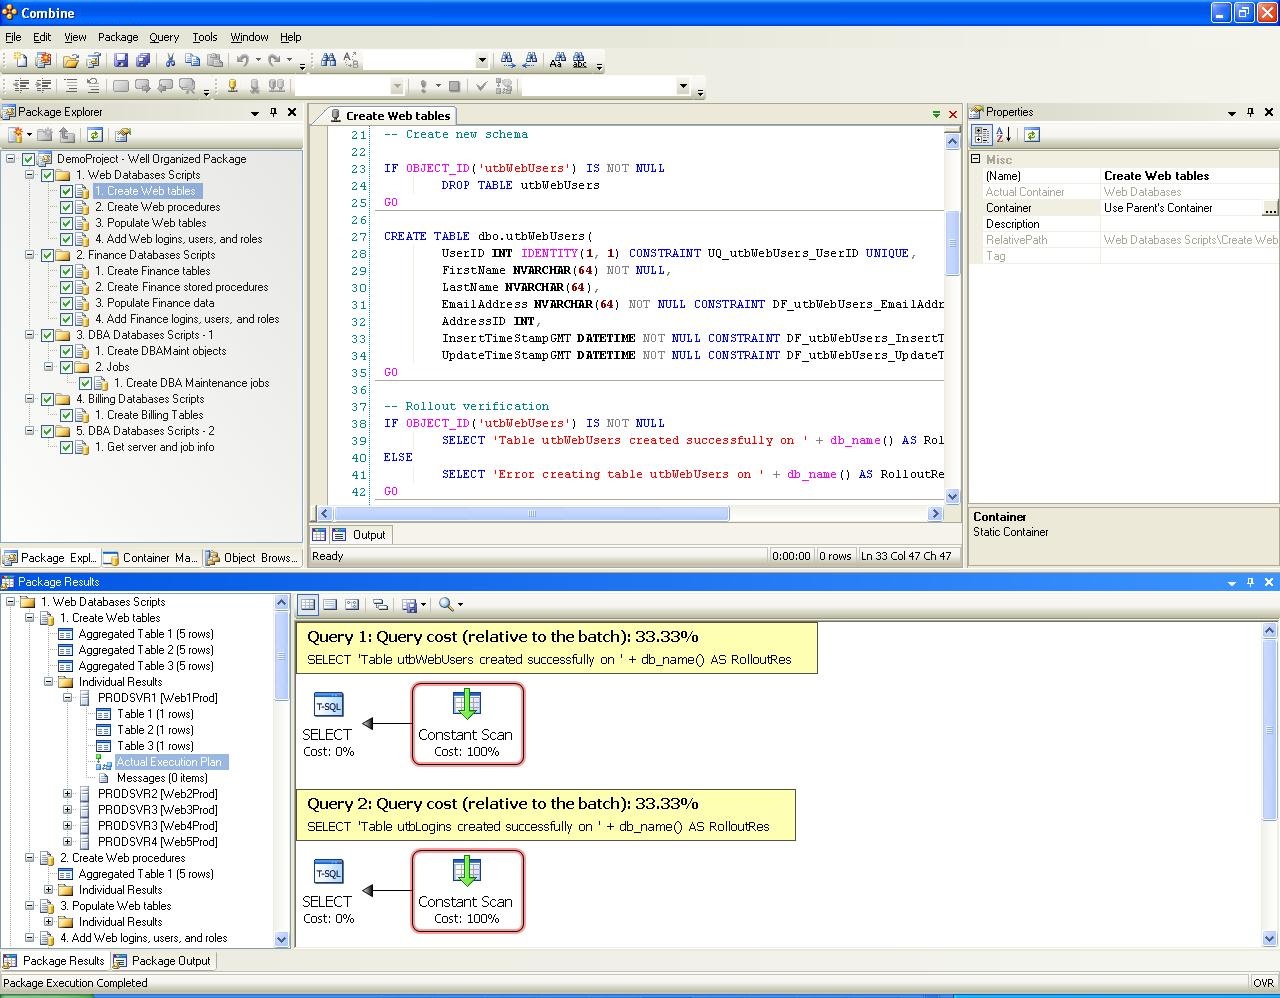
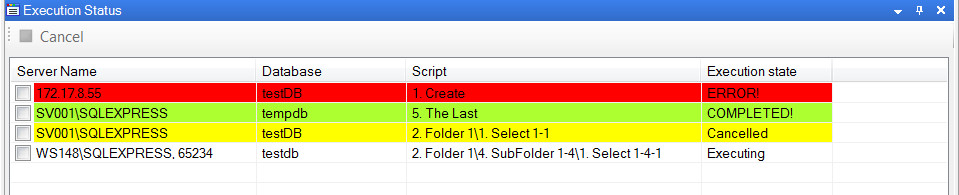
Deploy code on all selected databases and return execution plans and results. At this point, Combine will deploy all scripts against all target databases that were not unchecked in the last dialog. Result sets with matching schema returned from the target databases will be aggregated and displayed in the Package Results window, where results for each individual database are available as well. If you also requested to return the actual execution plans then the execution plans will be available for each individual target database. If any execution errors occur due to incorrect SQL code then package execution will pause and ask you whether you wish to continue, and you can view all steps that were taken by Combine in the Package Output window. Furthermore, error details and messages (such as row counts) returned from all servers can be found in both the aggregated messages window and the messages window for each database. The Package Output window can also be viewed during code execution to monitor the execution status. Below is an example of the aggregated results and individual results for each database when Combine was instructed to return the actual execution plans.
Execution Modes
Combine 6.0 introduces two package execution modes:
-
Traditional ‘Sync’ mode.
-
A new ‘Async’ mode.
‘Sync’ mode
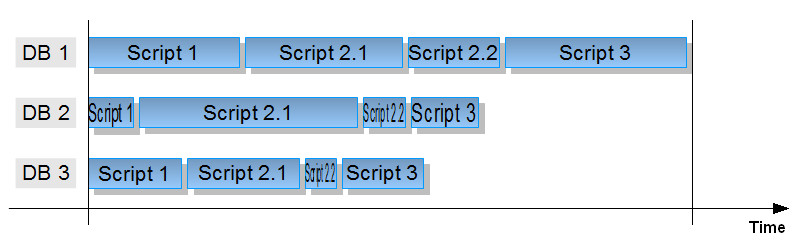
In this mode scripts are executed synchronously and simultaneously on all databases. I.e. each script execution is started on all databases at the same time, Combine waits until it is completed on all of them, and only then starts to execute the next script.
‘Async’ mode
In this mode scripts are executed on each database without waiting for other databases. Combine starts the next script execution on each database immediately after the previous script is completed. This mode allows Combine to minimize wait time for small databases in case when the corresponding container consists of several databases with significantly different sizes (and hence very different script execution times).
Set Execution Mode
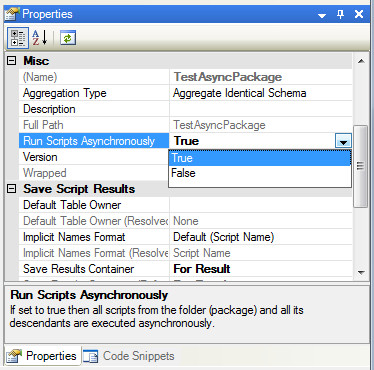
‘Sync’/’Async’ modes are set for a package or any folder inside package.
‘Mixed’ mode
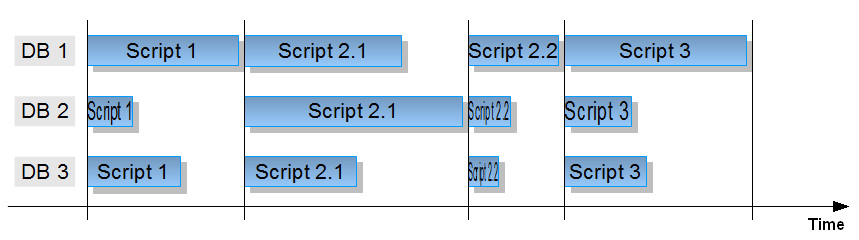
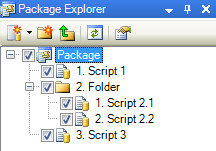
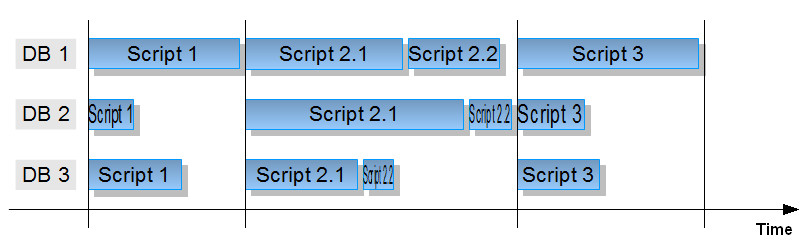
If ‘Async’ mode is set for some folder (or for the entire package) then all sub-folders despite of their settings are executed in ‘Async’ mode too. So it is possible to create a series of synchronization points during package execution. To do so user should create a corresponding number of folders and set their modes to ‘Async’ (the entire package should be in ‘Sync’ mode). In that case Combine will execute scripts inside each folder asynchronously, but when all scripts inside the folder are completed for one database — Combine will wait for the other databases before switching to the next folder execution. For example, package has the next structure:
Package has ‘Sync’ mode set, while the folder — ‘Async’. In that case execution diagram will be the next:
Deployment Errors
In some cases, for example, when scripts contain incorrect SQL syntax or code, deployment errors can occur. When this happens, Combine will complete the execution to the nearest synchronization point (please see ‘Mixed mode’ in Execution Modes for details about sync points), and then will behave according to “Promt On Error” option.
If it is set to ‘False’ then Combine will use “Cancel Execution” option to handle the occurred errors.
If it is set to ‘True’ then Combine will pause. In other words, Combine will not continue to deploy additional scripts until you instruct it to continue. The dialog below will appear when Combine has reached the next synchronization point.
This dialog contains a list of failed database on the left pane with a corresponding script and error details on the right pane. When you select a database on the left hand side of the dialog the corresponding script name and error messages are showed on the right pane.
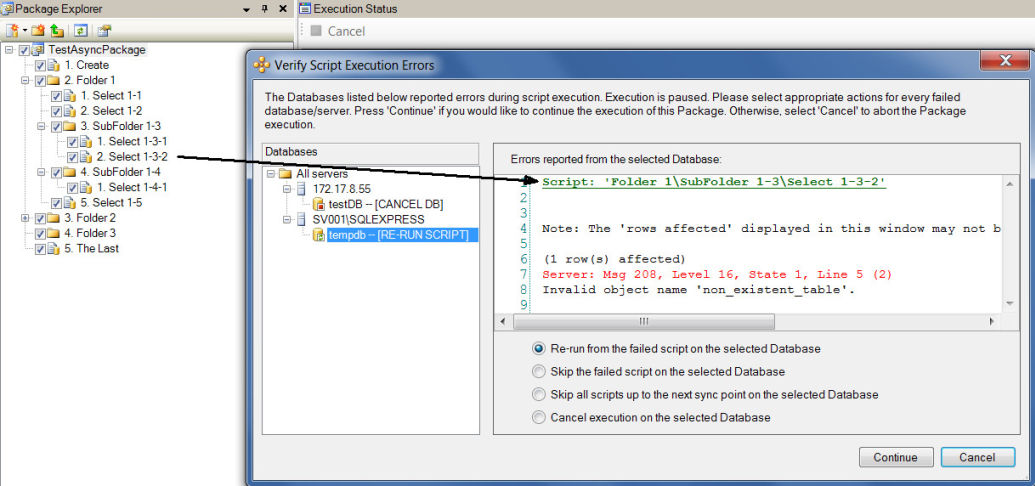
Also this dialog allows you to select appropriate action to handle an error for every database. Actions can be selected either by a context menu for selected database or by chosing radio button state on the right pane (radio button state is set according to the selected database). Desired action may be set as for a single database as for all databases on a particular server and even more — for all failed databases on all servers.
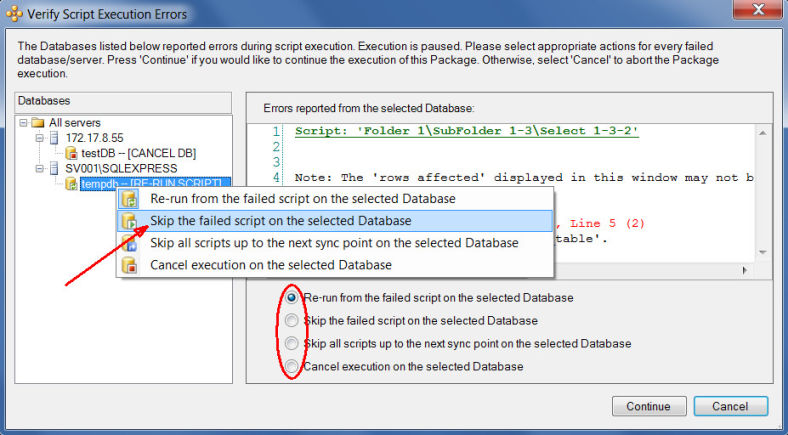
Possible actions are:
1. Re-run execution starting on the failed script.
The failed script will be re-executed and then package execution will be continued as usual. This feature may be used in case of recoverable database errors, for example — no database connection, no access rights, non-existent database object, etc.
2. Skip the failed script.
The failed script will be ignored and then package execution will be continued as usual from the next script. Usually this option is used if user performs manual operations to correct any issues, manually recovers database to a correct state which should be at the end of the failed script execution and then proceeds to deploy the rest of the scripts in the package.
3. Skip all scripts up to the next sync point.
The failed script and all subsequent scripts up to the next sync point will be ignored. And package execution will be continued as usual starting at the first script after the synchronization point.
4. Cancel execution on the selected database.
Combine will just cancel execution on the selected database. No more scripts will be executed against that database.
IMPORTANT: Combine DOES NOT REVERT any changes which may have been done to a database before script failure. If you decide to enable deadlock retrying — you do so at your own risk. It is advisable to start a transaction at the beginning of your script if you plan to use this feature.
The dialog has two buttons — ‘Continue’ and ‘Cancel’.
If you press the ‘Continue’ button Combine will resume package execution and will start to do selected actions for failed scripts (i.e. will re-run/skip scripts or cancel particular databases).
If you press the ‘Cancel’ button, Combine will stop the package deployment at all and will not deploy any more package scripts on any databases.
Deadlock Errors
In some cases deadlock errors may occur. This type of errors may be automatically handled by Combine. This automatic handling is controlled by two configuration options.

Deadlock Retry Count
This option sets the number of automatic tries to restart a script if deadlock error #1205 occurs during the script execution. By default it is set to 0 and Combine does not try to retry the script. If the value is greater than zero then Combine automatically re-executed the script the same way as if end user selects “Re-run execution starting on the failed script.” option (for more details please see The deployment error dialog actions section. Please note that Combine does not wait for the nearest synchronization point and restarts the script immediately after detecting the error. You may configure a delay before the script restart with the “Deadlock Retry Delay” option below.
IMPORTANT: Combine DOES NOT REVERT any changes which may have been done to a database before script failure. If you decide to enable deadlock retrying — you do so at your own risk. It is advisable to start a transaction at the beginning of your script if you plan to use this feature.
Deadlock Retry Delay
This option set a delay in milliseconds between retries of automatic script restart in case of a deadlock.
Package Execution Status
There are two ways to review package execution status:
- Execution Log
- Execution Status Window
Execution Log
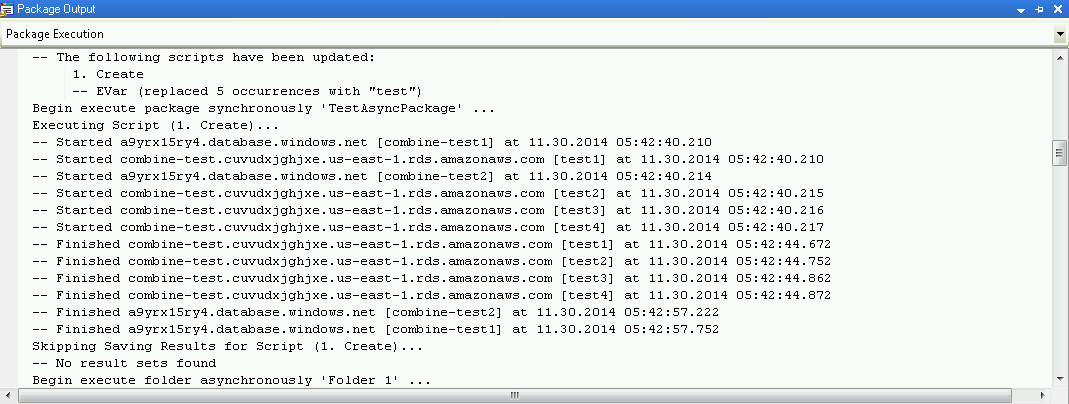
The Package Output window contains the Execution Log: a list of all events that occurred during package execution.
Execution Status Window
To open this window, choose the corresponding main menu item: View > Execution Status.
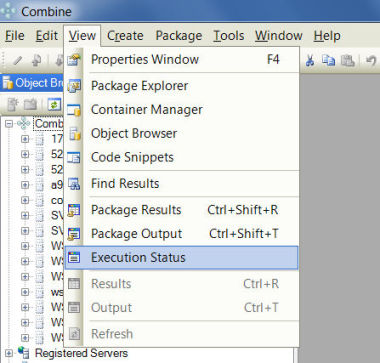
The Execution Status window contains a list of all databases and information about currently executing scripts. Such information includes script name (with a path inside the package) and current execution status. Some execution states are colored to simplify oversight.
Execution states
Possible execution states are:
- Waiting
- Executing
- ERROR!
- Cancelled
- Finished
- COMPLETED!
Waiting
The script is waiting in a queue before the execution (for example, if the server connection limit has been reached).
Executing
The script is currently executing.
ERROR!
There was an error during the corresponding script execution. Detailed error information can be found in the Execution Log or in ‘Messages’ items in the ‘Package Result’ window. Lines with ‘ERROR!’ state are marked red.
Cancelled
The script execution was cancelled by the user. Lines with this state are marked yellow.
Finished
The current script execution has been finished. Such state means that corresponding database waits for the next script to be executed (due to ‘Sync’ mode or server connection limits).
COMPLETED!
All scripts have been successfully executed on the corresponding database, no more scripts to execute left. Lines with this state are marked green.
Script cancellation
The upper left corner of state window column contains a Cancel button. The user can cancel package execution on any particular database by selecting check-boxes on appropriate rows and pressing the ‘Cancel’ button. In that case currently executing scripts on the selected databases are aborted, and all subsequent scripts on these databases are suspended too.
IMPORTANT: This operation cannot be undone!

Showing or Suppressing Package Output During Execution
When code packages are executed then by default Combine will prompt the Package Output results in runtime. However, you can suppress the Package Output and hide it during execution. In order to configure Combine to suppress or show the Package Output, go to Tools > Options > Execution Engine > Output and set the value of the property Show Output During Execution (Package). Similarly, you can configure Combine to show or suppress the script output window during the execution of scripts in the editor by setting the property Show Output During Execution (Script).
Saving Package Deployment Results
After running a script, a query, or a code package, against either a single database or multiple databases, all results returned from the target databases and servers can be saved into a single proprietary file with the extension .cre (Combine results). This includes all messages, warnings, errors, result sets and grids, as well as execution plans.
To save the deployment results, simply click the Save icon illustrated in the image below, to save all returned results in the .cre file. Later, you can double-click the .cre file, or go to File > Open > Open File in order to view the content of the saved results in Combine.
In addition to saving deployment results to a cre file, JNetDirect Combine can be configured to save package deployment results to the Change History Repository database. Additional information can be found in the Change History Overview section.
Executing Code Packages from the Command Line
See Cpaexec.
Find in Package – Search Text in Package Scripts
Using the Find in Package feature users can search for text in all package scripts. This feature is useful when looking for object code in a package, or when performing code reviews on projects and packages.
Find in Package can be invoked by pressing CTRL+SHIFT+F or through the main menu option Edit > Find and Replace > Find in Package. Using the tool, you can enter regex (regular expressions) or use wildcards to find strings and patterns in package scripts. All search results are displayed in the Find Results window.
The Find Results window allows you to double-click on each found entry to bring it up in the editor. Press F8 to go to the next result, or SHIFT+F8 to move to the previous result.
Source Code Control in Code Packages
Developers can use a wide range of source code control systems with Combine to version their code and collaborate while developing database releases. With unwrapped packages, each SQL script in the package can be checked in and out independently of the root node, so that developers could work on different scripts at the same time. However, since the root node of the unwrapped package (that reflects the .cpa package file) contains the mappings (names, paths) of all folders and scripts in the package, the user that checks out the root node is the only person that can add, remove, rename, or change the properties of items in the code package. On the other hand, since wrapped packages consist of a single file, only one user can work on a wrapped package at a time.
In order to work with source code control in code packages, all you need to do is to make sure that your source control provider is set up:
Go to Tools > Options, and select your source code control plug-in under Plug-in Selection. Then, when working on a code package in the Package Explorer, you can right-click and select various source-control features and actions from the menu.
When working in source-controlled package, several things need to be considered:
1. File > Source Control > Change Source Control – this option prompts the source-control binding dialog that maps between a folder in your source-control server and the local file system.
2. Get Latest – will retrieve the latest version of all code package items that are available on the local file system. For example, if other users check out a package and add new scripts to it (without checking the root node back to source control), when working on unwrapped packages, you will not see the new package items until you check out the latest version of the package. However, you can still get the latest version of all files that are locally available on your file system. This is common practice in many editors and IDEs.
3. Combine source-control icons – when working in the editor, you can see the status of your script in the lower pane in the editor window. Available icons and statuses are:
 Item added to package and not yet available in source control
 Package item is checked out to me
 Package item is checked out to another user
 Package item is checked in
 Package item is missing from the source control server (after item is deleted from SCS)
The exclamation mark is added to any of the above icons when the package item is missing from the local file system, for example:
 Item added to package but then deleted from local file system
 Package item is checked in but is not found on my local file system
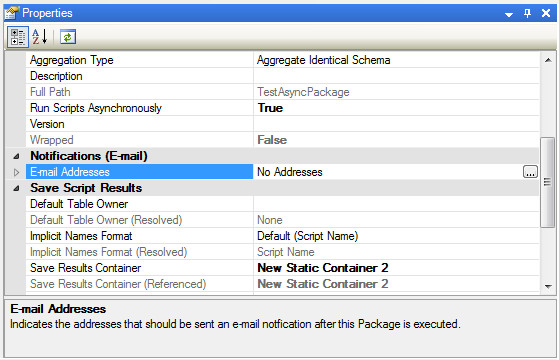
Email Notification for Package Execution
Combine™ allows you to configure an SMTP server and get notified whenever a package execution completes, either successfully or after package errors occur. Email recipients are divided into two groups: Users that always receive emails are configured in Tools > Options. Additional users can be notified for each package.
How to configure email notifications:
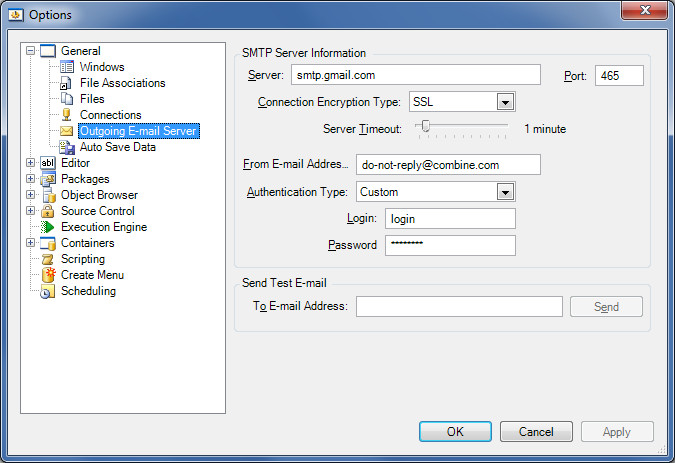
Step 1 – configure the SMTP server. Go to Tools > Options > General > Outgoing Email Server. In this dialog you should configure all the relevant email settings, including your SMTP server, authentication, and so on. In addition, you can test your email settings by sending emails using the Send Test Email feature.
Step 2 – set the conditions to send emails and configure users that will receive notifications in response to all package executions (under the specified conditions). Go to Tools > Options > Packages, and set the properties in the Notification (E-Mail) category.
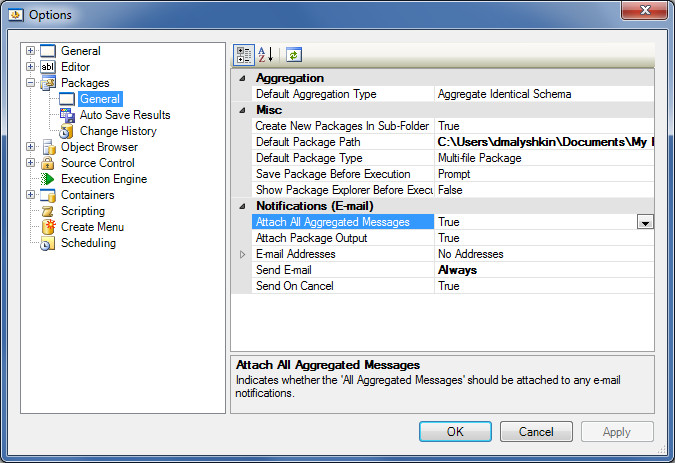
Attach All Aggregated Messages allows you to receive all aggregated messages (in a single file) as they appears in the Package Results window in the email. Similarly, Attach Package Output allows you to attach the output log to the email (the output log is not the cre file; it is the content of the Package Output window). Then, add the email addresses for all users that will receive notification in response to the execution of any package using this instance of Combine. Furthermore, the Send E-Mail option allows you to instruct Combine to send emails only upon package deployment errors or after every execution. Finally, the Send On Cancel lets you choose whether an email should be sent if the package execution was cancelled.
Step 3 – Package specific notifications. When you create a new package, click the package node in the Package Explorer and press F4 to bring up the Properties window. In the Notifications (E-Mail) category you can specify additional email addresses that will be notified when the package execution completes, subject to the notification conditions you specified in Step 2.